Best way to cut corian?

[member=5277]Alex[/member] [member=60461]Bob D.[/member]

Dupont do some excellent guides. I've attached a few that might be of use regarding the various questions posed in this thread.

 

Attachments

Solid Surface adhesive, no matter whether its Corian or another make, is very fluid and spreads very easily when 2 surfaces are clamped.

For example, in the picture posted previously by Bob D,.... 2 good beads along that edge are all that is needed and when the 2 sections are clamped together, the adhesive will spread out and ooze from the front and back. Once cured, the excess is machined off and sanded .......DO NOT ATTEMPT TO REMOVE ANY OF THE EXCESS ADHESIVE WHILST IT IS STILL WET......!

Excess clamping force is also to be avoided.....If you over clamp the joint, too much adhesive is expelled and it is known as "Starving the Seam".
Very accurate machining, preparation and cleaning(especially the light colours) is the key to achieving a "seamless" joint in the mating surfaces.

Little pin holes can be filled if necessary afterwards, but if you have applied the adhesive in the correct manner and to the correct quantity, this scenario will be avoided.
 
Gregor said:
kcufstoidi said:
Just a little OCD Bob, LOL
That would be spacing the ones with the barcode sticker evenly...

DeformedTree said:
How on earth do you have an orange clamp in there?  I would have to throw that away instantly, having one rouge clamp would drive me nuts.

Anyway,  Alex, nice work site, no different than what anyone working off the NJ turnpike would see every day of the week.  [big grin]

Bob D. said:
best-way-to-cut-corian


Proof that one can never have too many clamps. :-)

Sorry Alex, couldn't resist.

Now back to our regularly scheduled program.

Once the pieces are placed on the adhesive, the least of your concerns would be the bar codes. Limited time to get these on.

I'm already nuts, that clamp has no affect on me [big grin]

You're correct, one cannot have to many clamps, I have ~600 of these 2" clamps and run out at times. Color be damned..... [scared]

The reason for the tight clamp spacing, is to get a "seamless" seam you need some glue squeeze out. The clamps spaced this way prevents voids in the bead of squeeze out. This bead of squeeze out gets sanded off after the adhiesive cures, this process creates a "seamless" looking joint.

For top surface joints I have vacuum clamps that draw the joint together, done properly is is very difficult to find the seam/joint.

Tom

 
Alex said:
Just one more question, if you glue the seams, do have to make absolutely sure it is filled in one go? Or is it possible to apply a bit more glue later if you find any dimples?

A proper bead and clamping solves the void issue. This is one of the most important processes in solid surface work.

I've had it go both ways, sometimes I can add some adhesive, other times I've had to insert a Dutchman.

Tom
 
tjbnwi said:
The reason for the tight clamp spacing, is to get a "seamless" seam you need some glue squeeze out. The clamps spaced this way prevents voids in the bead of squeeze out. This bead of squeeze out gets sanded off after the adhiesive cures, this process creates a "seamless" looking joint.

Tom, I assume you start in the middle and then work to each end?
 
Cheese said:
tjbnwi said:
The reason for the tight clamp spacing, is to get a "seamless" seam you need some glue squeeze out. The clamps spaced this way prevents voids in the bead of squeeze out. This bead of squeeze out gets sanded off after the adhiesive cures, this process creates a "seamless" looking joint.

Tom, I assume you start in the middle and then work to each end?

I'm left handed, work right to left with the clamps. Never found a need to start in the middle, don't recall ever having a "trapped" piece of build up.

Tom
 
Thanks everyone, I understand enough to get myself in trouble now. :-)

JK, I think I've got the gist of it. Thank you all.

For clarification that was not my pic but one I re-posted from earlier in the thread.
 
Bob D. said:
Thanks everyone, I understand enough to get myself in trouble now. :-)

JK, I think I've got the gist of it. Thank you all.

For clarification that was not my pic but one I re-posted from earlier in the thread.

Ooopppsss! .......Sorry to Tom & Bob for the mistake...!
 
[member=11629]GarryMartin[/member] thanks for that, seems I got some reading to do.

Bert Vanderveen said:
[member=5277]Alex[/member]  Corian is not the only sherrif in town.

Well, it is for me now, hier in m'n hutje in de bergen. Stuff's already bought and paid for. When the designer first told me he  wanted to use corian he only asked me if I could cut it. Well, why not I thought, I have the special blade for my saw, and I have  a router. Just another composite material, no fuzz. I didn't know it is a kind of tricky material that needs its own special approach.

But I don't shy away from a challenge and am always eager to learn new things. When the designer heard my questions about the glue he just said, sod it, lets just tile it over like the rest of the bathroom. But then we'd have to trash the corian, and people say I'm a handy guy so I try to live up to that reputation. If I mess it up I can still revert back to tiles.
 
[member=5277]Alex[/member] sounds like a perfect situation for getting some experience with this stuff. An easy going client with a backup plan and material on hand.
 
tjbnwi said:
other times I've had to insert a Dutchman.

WHOA!  [scared] That seems somewhat abusive towards my people.

And I'm not sure how I'd manage that, I've only got one, and I'd like to make good use of him for the rest of my life.  [big grin]
 
Yes, good to try new things Alex and next time you'll know just what to do.  8)

I have not done a worktop in Corian or other engineered material yet but I expect to one day soon so glad this subject came up.

Wife has been hinting at me to build a countertop with some storage underneath in the laundry room next to the washer and dryer.

Thanks for posting the guides [member=11629]GarryMartin[/member]
 
Alex said:
Just one more question, if you glue the seams, do have to make absolutely sure it is filled in one go? Or is it possible to apply a bit more glue later if you find any dimples?

you will want 100% glue squeeze out. Also I havent seen anyone else mention it but when doing seams I always mirror cut the seam.  To mirror cut a seam you align the front edges straight and clamp them together with a space between the left and right hand panels slightly less than the router bit you are using.  So for a 1/2 bit space the panels 3/8 apart.  Set up a straight edge on one side so its taking off 1/16 from both panels (AT THE SAME TIME) this will give you the best invisible joint. Make sure when you glue everything up it is perfectly flat.
 
Thanks for the reply though it has been over half a year that I had to do this.

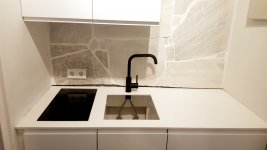
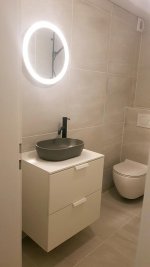
I installed a top for a kitchen and a bathroom sink, but in the end I didn't need to glue this together.

I did all the cutting with the router and sanded the edges with 180 & 320 grit and that worked fine. The surface was already polished by the supplier.

I installed everything on these pictures, tiles, kitchen, toilet, cabinets, paintwork & plastering.

[attachimg=1]

[attachimg=2]


Attachments

  • 20200422_211344.jpg
    20200422_211344.jpg
    35.7 KB · Views: 355
  • 20200426_210140.jpg
    20200426_210140.jpg
    282.6 KB · Views: 426
Real nice job Alex...did you use a removable panel on the toilet like Gregor suggested?
 
Cheese said:
Real nice job Alex...did you use a removable panel on the toilet like Gregor suggested?

Thanks Cheese, no I did not make the panel removeable. I don't think I have ever seen one that's not completely sealed.
 
Alex is that a Corian floating vanity? Did you make it? Looks nice!

We have two Gerberit Euro toilets in our home and I put them into the wall, so no bump out. Everything can be accessed through the flush buttons that needs to be. Great set up that has been flawless. If they ever require being accessed it will be one heck of a job ripping the tile off the Kerdi.
 
Back
Top