Superchunk
Member
- Joined
- Dec 8, 2017
- Messages
- 2
Remember the old saying "fast, strong, cheap.... pick two"? That doesn't apply here.
Hi, I'm Patrick from Toronto, Canada, and this is my first post. I'm not a carpenter or contractor, but I've got solid skills(when sober) and a broad technical/industrial background.
Material handling issues encouraged this project, as I'm using the Kapex for everything from big rough framing to face frame cabinets, and more. I always pack my saws on a shelf, so the Festool rolling stand was never really appealing, and the UG wings always seemed too slight for working big 3 1/4"X10"X10' LVL beams. Also, because the wings are connected to the floor directly, one misplaced foot or whatever, and they're out of alignment between cuts(this was my own experience on a friends rig; please note I have the motor skills of a toddler...).
I decided to go with the Dewalt #73 stand(The BOSCH 6800 is also very nice), and build my own wings. They had to be portable, strong, flat, cheap, and compatible. I set a budget of around $250 usd for the whole deal.
First option was 80/20, but I wanted some width, and an aluminum work surface. Some searching images of aluminum extrusions revealed stadium seating. "MarkStaar" is the brand, and they've got good stuff.
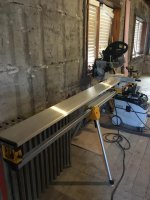
I ordered a few 6' lengths of extruded aluminum 1X8, anodized seating beams. They're lightweight, with clamping/joining/mounting brackets available in their accessories section. Fast shipping too.
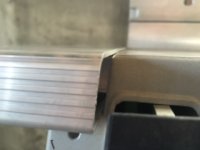
If you rest them on the edge of the Kapex's wing slot, they are about 1/16 too tall; a shallow cut on the back side with an aluminum blade and they line up PERFECTLY. It also holds them in alignment to the table. One little bevel cut on the ends, a quick file to deburr the edges, and everything fits like a charm.
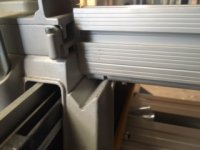
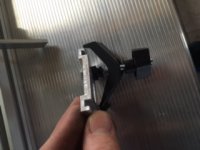
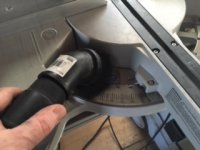
The other end mounts smartly to the Dewalt material support, and can be adjusted vertically and laterally to get everything in true. The saw side has a simple mounting bracket with an upside down Kreg track clamp which pops off in a heartbeat, but holds fast all the time. There are numerous ways to affix the beams, I'm sure others will come up with ingenious concepts.
I store the Stand, wings and hardware in ski bags( amazon), plenty of choices available. The three wings(6', 4', 2') are about 15 lbs total, making them very easy to transport and stow. I'll make up another pair of 6' wings with joiner brackets for doing decking & docks at the cottage.
I'll be adding some Veritas double track to the rear edge of each piece, for stops etc.
You don't need to add perpendicular slots for crown stop clamps; an MFT clamp holds a block perfectly in place for that application, resting on the I-beam style underside of the plank.
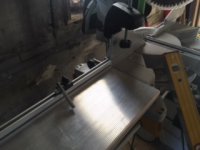
Unlike the other wings on the market, the extrusion is so stiff, these don't require intermediate support brackets. How stiff & strong? I can sit on the plank; try that with a UG wing, lol. Photo below has a 6' section, I can add 4' to that if cutting 2X6 or smaller, or use another 6' piece and stick a small work stand under the end.
I'm planning on getting another set of the saw mount brackets, and affixing some tool storage, lighting and accessory bits(coffee holder, iPad holder for viewing cut list, etc). These will stow in the transport bag and mount to either side of the saw, under the wings.
The CT48 fits nicely under the stand, with room for lots of other kit.
The Bosch 680 has the option for wheels and a scew base on each leg, and perhaps a slightly more uniform colour scheme, for those whose OCD prevents mixing yellow with green....
I expect to hear some ideas for other uses, I'm already building out feed wings for an MFT, and a quick release bracket for the Kapex.
https://www.markstaar.com Aluminum Planks
Hi, I'm Patrick from Toronto, Canada, and this is my first post. I'm not a carpenter or contractor, but I've got solid skills(when sober) and a broad technical/industrial background.
Material handling issues encouraged this project, as I'm using the Kapex for everything from big rough framing to face frame cabinets, and more. I always pack my saws on a shelf, so the Festool rolling stand was never really appealing, and the UG wings always seemed too slight for working big 3 1/4"X10"X10' LVL beams. Also, because the wings are connected to the floor directly, one misplaced foot or whatever, and they're out of alignment between cuts(this was my own experience on a friends rig; please note I have the motor skills of a toddler...).
I decided to go with the Dewalt #73 stand(The BOSCH 6800 is also very nice), and build my own wings. They had to be portable, strong, flat, cheap, and compatible. I set a budget of around $250 usd for the whole deal.
First option was 80/20, but I wanted some width, and an aluminum work surface. Some searching images of aluminum extrusions revealed stadium seating. "MarkStaar" is the brand, and they've got good stuff.
I ordered a few 6' lengths of extruded aluminum 1X8, anodized seating beams. They're lightweight, with clamping/joining/mounting brackets available in their accessories section. Fast shipping too.
If you rest them on the edge of the Kapex's wing slot, they are about 1/16 too tall; a shallow cut on the back side with an aluminum blade and they line up PERFECTLY. It also holds them in alignment to the table. One little bevel cut on the ends, a quick file to deburr the edges, and everything fits like a charm.
The other end mounts smartly to the Dewalt material support, and can be adjusted vertically and laterally to get everything in true. The saw side has a simple mounting bracket with an upside down Kreg track clamp which pops off in a heartbeat, but holds fast all the time. There are numerous ways to affix the beams, I'm sure others will come up with ingenious concepts.
I store the Stand, wings and hardware in ski bags( amazon), plenty of choices available. The three wings(6', 4', 2') are about 15 lbs total, making them very easy to transport and stow. I'll make up another pair of 6' wings with joiner brackets for doing decking & docks at the cottage.
I'll be adding some Veritas double track to the rear edge of each piece, for stops etc.
You don't need to add perpendicular slots for crown stop clamps; an MFT clamp holds a block perfectly in place for that application, resting on the I-beam style underside of the plank.
Unlike the other wings on the market, the extrusion is so stiff, these don't require intermediate support brackets. How stiff & strong? I can sit on the plank; try that with a UG wing, lol. Photo below has a 6' section, I can add 4' to that if cutting 2X6 or smaller, or use another 6' piece and stick a small work stand under the end.
I'm planning on getting another set of the saw mount brackets, and affixing some tool storage, lighting and accessory bits(coffee holder, iPad holder for viewing cut list, etc). These will stow in the transport bag and mount to either side of the saw, under the wings.
The CT48 fits nicely under the stand, with room for lots of other kit.
The Bosch 680 has the option for wheels and a scew base on each leg, and perhaps a slightly more uniform colour scheme, for those whose OCD prevents mixing yellow with green....
I expect to hear some ideas for other uses, I'm already building out feed wings for an MFT, and a quick release bracket for the Kapex.
https://www.markstaar.com Aluminum Planks