Blackwood Kitchenette Benchtop - Construction.

Stephen B

Member
Joined
May 6, 2013
Messages
2,749

[attachimg=1]​

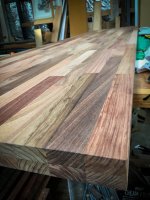
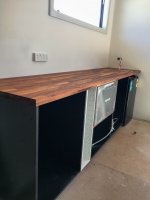
[size=18pt]Blackwood Kitchenette Benchtop.

[size=13pt]
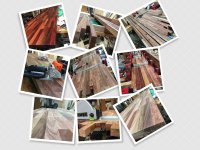
Around 6 years ago I obtained a collection of Otway Ranges Blackwood rough cut shorts. With plans to convert an upstairs home area to a kitchenette and bedroom with ensuite,  I saw an opportunity to make two Blackwood benchtops. One for the kitchenette, the other the ensuite.

Part 01. Machining and construction.

Processing.
In 2018 I commenced machining and then overlap laminating the shorts as 2 X 24mm over a  length of 3000mm.

Each short was jointed, thicknessed, rip cut to approx. 48mm width, 24mm thick and cross cut each end. Then one at a time 12/ 3000mm boards were individually glued up. This was an intermittent process during the past 8 months.

When completed the boards were rejointed on one face and one edge and then ripped to approx. a 45mm width. Then re thicknessed/planed and jointed to 42X42mm.

Blackwood is very susceptible to tear out. Many pieces had cross and indeed some fiddle back grain. Tear out was mitigated by using fresh sharp blades in the jointer and thicknesser/planner and restricting settings for each pass to under 1mm.

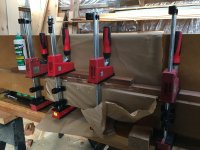
To create the benchtop itself each laminated board was then Domino jointed with 4 dominoes across the 3000mm. Six boards were glued up at a time and then each half glued together. The hardwood dominos were used not for strength, rather to assist overall flatness prior to sanding,

The bench was then trimmed each end to a length of 2700mm with a TS55 and 1400 Rail.

[attachimg=2]​

Materials:
Rough Cut Blackwood, , 5X30 Hardwood Dominos and TiteBond 111

Tools:
Festool - KS60, Domino 500, TS55 and 1400 Rail, CT22 and 24 Vacs.
Other - Carbatec - 8” Long Bed Jointer, 15inch Thicknesser/Planner and 10” Cabinet Saw.

[size=10pt][member=44099]Cheese[/member] [member=550]Tinker[/member]
 

Attachments

  • FOG 01.jpg
    FOG 01.jpg
    846.5 KB · Views: 1,334
  • Benchtop Construction.jpg
    Benchtop Construction.jpg
    229.3 KB · Views: 1,274
[attachimg=1]​
Still wet.

Blackwood Kitchenette Benchtop  - Finishing.

[size=12pt]Part 02. Sanding and Oiling.

Sanding:
ROTEX 150, Grits 80-120.
Makita ½ Sheet,  Grits 80-120
ETS 150 – Grits 120 – 180 Bottom Face and Top Face 120 – 150 - 240.
DTS400 [edges] Grits 80, 120,180 and 240.

After sanding the overall thickness was 39mm.

Finish:
Feast and Watson Kitchen Oil applied as per Festool Oil Instructions using non Festool sponge pad applicator and rubbing in with ETS150 using Green and White Vlies.

Sanding with 240 Grit using ETS between two coats on bench top face, ends and side. When doing this, the vacuum is not attached. In addition, I offset the disc holes to the pad holes so that the dust exhaust ducts within the sander are blocked to prevent residue damp oil entering the sander.

Note: the paler sapwood pieces will in the main be cut  out or remain under a sink tray when a sink is installed.

Materials:
Feast and Watson Kitchen Oil.
Festool sanding discs and sheets.
Festool Green and White Vlies.

Tools:
Rotex 150, DTS400 and ETS150.
Other - Makita ½ sheet Sander/ Sponge Applicator.

I have now started on the ensuite benchtop.

References:
[size=10pt]
http://www.feastwatson.com.au/consumer/products/interior/product-details/1527

Blackwood.
https://en.wikipedia.org/wiki/Acacia_melanoxylon
https://www.woodsolutions.com.au/wood-species/blackwood
http://www.woodreview.com.au/news/getting-the-best-from-blackwood

Otway Ranges
https://www.greatoceanwalk.com.au/stories/logging-the-otways/
http://agriculture.vic.gov.au/agric...tilisation-plans/otway-forest-management-area
 

Attachments

  • FOG 02.jpg
    FOG 02.jpg
    704.2 KB · Views: 1,310
Thanks for the explanation.
From the pics, it looks as if you had not much room to spare in your shop. I have done a dining table in a small space and I can understand you must have had quite a job of moving the, even half assemblies, around. What did the whole thing weigh when finally assembled in whole?
Tinker
 
Tinker said:
Thanks for the explanation.
From the pics, it looks as if you had not much room to spare in your shop. I have done a dining table in a small space and I can understand you must have had quite a job of moving the, even half assemblies, around. What did the whole thing weigh when finally assembled in whole?
Tinker

[smile] Have no idea, but it will take at least 2, hopefully 4 adults to get it into the house! [big grin]
 
That's nice... [big grin]...really nice [member=19746]Untidy Shop[/member]

Curious why you chose Feast & Watson over other products?

This so reminds me of a friend, now deceased, that went to the Anderson Window factory in Stillwater Minnesota and inquired if he could have some millwork scraps to make a roll-top desk. They rolled their eyes but they loaded up his truck with Douglas fir scraps and none of the pieces were longer than 6"-8".

It took him forever to laminate all of the scraps together and machine them into useable lumber. However, the finished desk was a thing of beauty. Made completely from scrap material, it also had the "checker board" look from the different grain patterns.  [smile]

 
Bravo -- looks spectacular with the finish with all that variation in the color.  This project reminds me of the Ipe desk and tabletops I made using over 1000 12"x2 1/2" Ipe offcuts I scrounged from a colleague who had just done a large outdoor furniture project -- the Ipe had a similar broad range of color variation.
 
[size=13pt]Thanks to all who have viewed and commented.

[member=44099]Cheese[/member] re Feast and Watson - I used to sell it in an Australian Big Box store and had a can in the Untidy Shop. In the past I have used OrganOil Hard Burnishing Oil and again using FESTOOL Oil application method, although OrganOil's instructions are not too dissimilar.

Thankyou too, for your comments.  [smile]
http://organoil.com.au/woodcraft/index.html
 
[size=13pt]Construction commences on bench number two for the en-suite. Note my MDF jig.

[attachimg=1]
 

Attachments

  • 12D8D8D8-81DB-4039-AC7B-D7E678509825.jpeg
    12D8D8D8-81DB-4039-AC7B-D7E678509825.jpeg
    2.2 MB · Views: 1,120
Bench top finally at rest.

[attachimg=1]
 

Attachments

  • Bench installed.jpg
    Bench installed.jpg
    629.5 KB · Views: 878
Untidy Shop said:
Bench top finally at rest.

Looks great!

How many coats of oil?  I did an African Mahogany bathroom counter top about 5-6 years ago with twenty or so coats of a custom mix oil/poly finish.  Neither the oil nor the poly was specifically designed for moisture resistance.  African Mahogany is fairly durable in moisture, but isn't naturally oily.  It has held up remarkably well to the granddaughters, but I noticed just a bit of raised grain in the last couple of months.

 
Ok I’m not the sharpest but I cant figure how you joined long ends together [end grain to end grain)
 
Back
Top