Blue Pine Garage Cabinets: Build

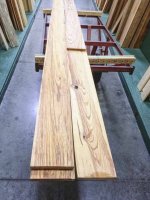
I resumed ripping the stock down to 210mm.  Now that I know I can use the DW735 I can take it that close.

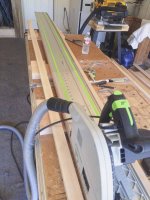
I have not been happy with the performance of my new TS75 and/or the universal blade.  I had thought the problem was too low a depth of cut because I had 3/4” sacrificial plywood underneath.

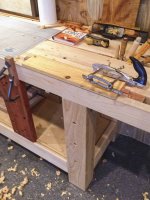
I thought about picking up some 2” foam insulation board but I don’t want to store it.  As such I took some 8/4 waste and cut some channels in them on a miter saw.  Because it didn’t cut as deep as necessary close to the fence I broke out my new Japanese hand saw.  (Sidebar)

I picked it up to cut the dovetails.  This one is expensive ($120) but I liked the specs.  After I purchased it I called the tech at Japan Woodworker to see if the one I ordered would be a good choice.  He thought I might want to return it for a saw that had a longer blade at half the price.

When the pricey one arrived I had to give it a try.  Wow!  It goes through the maple like butter leaving a tiny kerf.  I used some camellia oil on the blade.  I will practice cutting the tails with it.

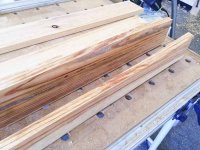
Back to the universal blade.  Setting the TS75 depth to the max and having the stock suspended helped some, but not as much as I had hoped.  I can't say it cuts like butter, however as you can see there are no burn marks.  I can’t imagine cutting oak or hard maple.  I’m going to put up with it for this project and buy a good crosscut blade. 

Jim:
Thanks for the link to WW video.  I had watched that several months back.  Thanks for reminding me of it’s existence.  I belong to the WW Guild.  I decided on purchasing Marc’s plans because the documentation and build videos are excellent.

Tim:
A very timely link. Thanks.

[attachimg=1]

[attachimg=2]

[attachimg=3]
 

Attachments

  • Maple_Rip-1.jpg
    Maple_Rip-1.jpg
    94.3 KB · Views: 1,609
  • Maple_Rip-2.jpg
    Maple_Rip-2.jpg
    110.8 KB · Views: 1,609
  • Maple_Rip-3.jpg
    Maple_Rip-3.jpg
    90.6 KB · Views: 1,652
Hey Luke...looking good mate!

On the 75 and blade.  You said that you were probably going to get a good crosscut blade?  Did you mean ripping blade?  You are going through a very long cut there, and the hook of the ripping blade would do you very good... at that length with the blade you have, I can totally see why you are not all that happy with the results. 

the cut marks you have are pretty apparent and with the Panther, you will have some but it will go much quicker through that lumber.

My .02

Cheers.  Bryan.
 
Happy Easter Everyone!
bkharman said:
Hey Luke...looking good mate!

On the 75 and blade.  You said that you were probably going to get a good crosscut blade?  Did you mean ripping blade?  You are going through a very long cut there, and the hook of the ripping blade would do you very good... at that length with the blade you have, I can totally see why you are not all that happy with the results. 

the cut marks you have are pretty apparent and with the Panther, you will have some but it will go much quicker through that lumber.
Cheers.  Bryan.
As usual, I didn't make myself very clear.  What I meant to say is I would like both a crosscut and ripping blade for the 75 but don't I have the budget for both.  Since I, most likely, won't be ripping much 8/4 stock after this project concludes I'll continue to use the universal blade for ripping thinner stock and get a nice crosscut/sheet blade down the road.  This is the majority of what I cut and IMO the universal blade is’t great at cross cutting.

Q: If I do get a panther blade, is it a big deal using a blade on the guide rail with a kerf narrower than the 2/6mm panther kerf?

Lastly,
This thread will go dormant while I post to a new Roubo Bench Thread.  When the Roubo is complete,  I’ll finish this thread by posting the build of the lowers and the floor installation.
 
iamnothim said:
I picked it up to cut the dovetails.  This one is expensive ($120) but I liked the specs.  After I purchased it I called the tech at Japan Woodworker to see if the one I ordered would be a good choice.  He thought I might want to return it for a saw that had a longer blade at half the price.

Nice saw Luke. the blade might be a bit short for your current purposes. You will have to learn how to sharpen it as the blade cannot be changed out like the Gyokucho.

 
Had to send my new TS75 in to Festool to have it looked over. [sad]

So I took some time to continue with organization.
Now you see it......Now you don't

[attachimg=1]

[attachimg=2]
 

Attachments

  • storage-2.jpg
    storage-2.jpg
    125.7 KB · Views: 1,435
  • storage-1.jpg
    storage-1.jpg
    109.6 KB · Views: 1,439
Time to crank up the Blue Pine Build Thread.  I've started to build the lower cabinets.
I have the boxes built and am ready to start making the drawer boxes.  The stuff below is from my asking for help on dovetail jigs.  Bottom line I will use [member=7816]Tim Raleigh[/member] suggestion and make the boxes with locking rabbet joints.

I have a really loony idea for the drawer fronts.  Not sure I'll go there.  It's one of those ideas that will either look amazing or like a 2nd grader did it.

Below is a pic I took with my Nikon rather than an iPhone.  It's for a friend that builds furniture and has a client interested in BP.

[attachimg=1]

[attachimg=2]
 

Attachments

  • G_Cabs-1.jpg
    G_Cabs-1.jpg
    417.2 KB · Views: 1,314
  • Photo Jul 21, 2 13 48 PM.jpg
    Photo Jul 21, 2 13 48 PM.jpg
    556.3 KB · Views: 1,328
Upon further review of The Joint Book, I'm going to attempt the "Housed Rabbet Miter" joint.
I think dowels look cool.  In this case they're more in keeping with the theme than fancy dovetails.
Edit:  Hopefully it won't turn into a hosed rabbet miter.
[attachimg=1]


Attachments

  • RabbetMiter-1.jpg
    RabbetMiter-1.jpg
    109.3 KB · Views: 1,313
Blum Drawer Slide Lock.  Pure madness.  I am going daffy.  This should not be hard.
Thankfully the plywood drawer box became a model.  A model of insanity.

First I mixed up the sides with the front and back when I built it.  So you can see the but joint.
I figured it out after I made my first set of notches.  Nice clean notches.
I have the Blum template for the tandem rails.  It's one of those no verbiage directions with pictures only.  I usually don't have a problem with these.  Not here.  Notice they have arrows to A,B and A,C.  There is nothing associated with these letters.

I used the template to cut the notches.  It's not the correct width, at least on one end.  That end is 35mm.
Yet, if you cut a 35mm notch out there isn't any wood to hold the screw they show.  There are holes on the bottom of the locking device that will work.  They don't show those at all.

The second and third cuts for the notches are not as clean as the first.  Ya'll know how it is in this situation.... you can hold back and you get all medieval on it. [attachthumb=1]

[attachimg=2]

[attachimg=3]

[attachimg=4]
 

Attachments

  • blumlock-1.jpg
    blumlock-1.jpg
    99.3 KB · Views: 1,245
  • blumlock-2.jpg
    blumlock-2.jpg
    95.3 KB · Views: 1,228
  • blumlock-3.jpg
    blumlock-3.jpg
    100.1 KB · Views: 1,235
  • medieval003.gif
    medieval003.gif
    796 bytes · Views: 1,336
Guess what?

You don't need notches in the front.

[attachimg=1]
 

Attachments

  • blumlock-4.jpg
    blumlock-4.jpg
    93 KB · Views: 1,206
correct  the notches go in the back to sit over the rail. I use the vecturo to make the bottom cut of the notch after making the vertical cuts with a handsaw
 
Need a breather cuz I'm using a hand plane and I'm a Fat B.

As you know, I'm making the drawer boxes from Caribbean Heart Pine.  First I was going to use Tim Raleigh's suggestion and go with the locking rabbet joints  (Routed housed rabbet).  Then I found the housed rabbet miter.  I looked cool but based upon the current level of my skills I shelved that idea.  What looks like the best of both worlds is the "stop routed housed rabbet".  What a name.  Just a joint just like Tim's suggestion except it hides the top rabbet joint.  Only question is....  can I build it.

I was pondering how I could make the dado for the bottom of the shelf and stop the groove before going through each end. 

The CMS is out because I need to plunge.  My MFS 400 is too short, and the router guide will be difficult to use on a narrow piece.  Maybe blocking it to secure it to the MFT/3.  I probably should YouTube this one.

I decided to try doing it by hand and use my 1970's Record 044C Plough Plane.  I got some tear-out on the test piece but I think I can pull it off.  I'm using the bench and holdfasts to secure a stop block.  I'll need to mortise out the beginning and end of each run.

Then there's the end grain dado.  Only one end needs to stop.  Perhaps the CMS.

Bummer du jour.  Watching a $20 bottle of camellia oil fall off the bench and have the top snap off.  [attachthumb=3]

[attachimg=2]

[attachimg=1]
 

Attachments

  • argh.png
    argh.png
    42 KB · Views: 243
  • argh.png
    argh.png
    42 KB · Views: 152
  • Thurs_23-4-2.jpg
    Thurs_23-4-2.jpg
    104.6 KB · Views: 1,097
  • Thurs_23-5.jpg
    Thurs_23-5.jpg
    111.7 KB · Views: 1,094
[member=28483]iamnothim[/member]

You really have a great ability to find very nice pine.  Your blue pine cabinets look great and that Caribbean pine looks cool. 

I have the joint book in my shopping cart, do you find it useful and worth buying?

Thanks
Bryan
 
Wooden Skye said:
[member=28483]iamnothim[/member]

You really have a great ability to find very nice pine.  Your blue pine cabinets look great and that Caribbean pine looks cool. 

I have the joint book in my shopping cart, do you find it useful and worth buying?

Thanks
Bryan
Hi Bryan,

This pine is very interesting.  I bought a 6' board a few months back thinking I'd find a use for it.  Since it resurfaced from the pile I had to get more, perhaps for more than the drawer boxes.  At the risk of making the project look like a hodge podge, blue pine, elm, maple/bubinga now Caribbean pine.  Why not.  If I can make the drawer cabinet it's own element (Furniture) it should work.  If it's just a different cabinet, not.  I am shooting for a Jory Brigham wavy front.  It'll with be fun or frustrating.  I might give it a whirl.

The joint book.  It's a nice reference book. Easy to follow, good instructions, index, and some tables.  The joints are categorized by type and all the pages look like the photo I posted.  If you want to go beyond cabinets, get it.  You now have choices!

[attachimg=1]


Attachments

  • a06c77874718d298080be2091c7538d5.jpg
    a06c77874718d298080be2091c7538d5.jpg
    65.3 KB · Views: 1,063
A demoralizing day with the plough plane.
Kept tearing the edges even after I eased them a bit.  Then there's my chisel handy work. [attachthumb=2]

I was able to make one (1) joint.  Totally unacceptable. Sloppy in every directions.  Blew out the end.  I'm cutting my losses, grabbing the domino, be done with the drawer boxes, and start something more fun.
I didn't show the really bad part.

[attachimg=1]
 

Attachments

  • Thurs_23Pl-4.jpg
    Thurs_23Pl-4.jpg
    102.3 KB · Views: 1,168
  • medieval003.gif
    medieval003.gif
    796 bytes · Views: 1,145
Now I know there are guys with a lot more experience than me that were sitting back thinking "wait until he starts working with that wood"  That would be "wood working"

I do not recommend this wood to anyone.  I don't know what it would be good for.  The stuff self-explodes.

Yesterday I decided to rip some long pieces on the band saw.  I get to the end and Bam, it splits.  I'm thinking that's strange, I must of pulled it off center.  Then weird splits start happening when I'm using the plough plane.  Like boom, the back blows out.  Naturally I'm thinking its me and the wood is difficult to work.

Just now I ripped some 6' pieces using the TS55 and a guide rail.  I get 18 inches from the end and BOOM the end splits, breaks and blows off the MFT/3.  The off cut piece was on the MFT/3, the entire piece was on the MFT/3, nothing hanging over.  After the explosion the off cut was on the floor.  Exploding wood.

When I'm picking it out yesterday I'm looking at this deep contrasting grain with a waxy feel.  (It's just like creosote).  I can cut an 24" piece off each end of an 10' board and one piece will weigh four times as much as the other.  These are the pieces that explode......  the purdy ones I picked special.

[attachimg=1]


Attachments

  • C-Pine-4.jpg
    C-Pine-4.jpg
    126.2 KB · Views: 1,033
Now I'm checking the 4" wide x 6" long sections I ripped.... Ripped with a clamped guide rail.
None of them are straight.  By a bunch.

How Does That Happen????  Is this wood possessed?
 
iamnothim said:
Now I'm checking the 4" wide x 6" long sections I ripped.... Ripped with a clamped guide rail.
None of them are straight.  By a bunch.

How Does That Happen????  Is this wood possessed?

You released some tension in the board. You need to allow for (edge) jointing after ripping a board. Sometimes you can get away with not having to allow for some jointing by leaving it over night to acclimatize.
Tim
 
Back
Top