Blue Pine Garage Cabinets: Build

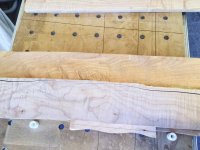
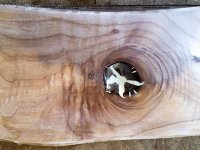
I asked my furniture making friend about the wood and here is his reply.....

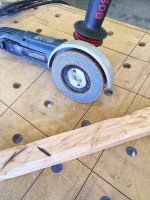
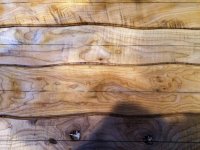
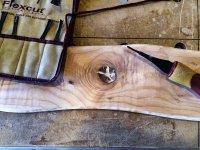
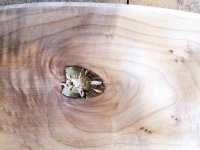
"Oh I have worked with a lot of heart pine,  it has to be “baked” , you need to get it to 160 degrees to set the resin, and it can be quite unstable unless that is done, but it has to be dried first , also when you have all that resin it is quite flammable .. go easy"

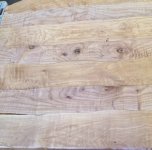
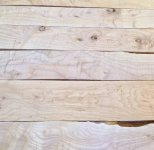
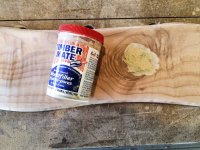
I went back to my hardwood dealer with a couple pieces and they said they will take it back.  They're a good outfit.
 
Luke,  I like the wood!  I would have just gone with a simple lock miter joint.  Easiest, fastest and best way to make a drawer, imho.  [member=28483]iamnothim[/member]

19811599820_fbf937eb2d_c.jpg
 
Where do you guys find this wood? I am in S CA and never see anything like that at local wood supply. I pass a beautiful blue pine sign everyday and just love the way it looks.

I think the lock miter is the nicest drawer joint there is. I know dovetails is the holy grail to a woodworker but nowadays even the cheapest offshore furniture has them. They have lost there craftsmanship look to me. The lock miter just provide a nice seamless look that is not easy to pull off.

I saw a local $50 dresser that almost fell apart when opened and they had a tape or edge veneer that had dovetails printed on it. from 3 feet I swear it looked real.

I also love that pinned dowel joint above
 
NEW2FES said:
Where do you guys find this wood? I am in S CA and never see anything like that at local wood supply. I pass a beautiful blue pine sign everyday and just love the way it looks.

I think the lock miter is the nicest drawer joint there is. I know dovetails is the holy grail to a woodworker but nowadays even the cheapest offshore furniture has them. They have lost there craftsmanship look to me. The lock miter just provide a nice seamless look that is not easy to pull off.

I saw a local $50 dresser that almost fell apart when opened and they had a tape or edge veneer that had dovetails printed on it. from 3 feet I swear it looked real.

I also love that pinned dowel joint above
[member=14303]NEW2FES[/member]
Your wife will never forgive me of giving you this information:

Austin Hardwoods
 
Jim Kirkpatrick said:
Luke,  I like the wood!  I would have just gone with a simple lock miter joint.  Easiest, fastest and best way to make a drawer, imho.  [member=28483]iamnothim[/member]

Jim,

You can't understand until you try to work with that wood.
After reading what Charles said, I think that particular batch of wood was not prepared properly.
 
I finally found a good use for my triangle set.

I need to redo the base and incorporate some fastener/knobs, but it works great.
I've had the set and almost never use them.

[attachimg=1]
 

Attachments

  • triangle-1.jpg
    triangle-1.jpg
    94.9 KB · Views: 814
Today I retuned the Caribbean pine and picked up some tiger maple that was on sale.  It'll look a whole lot better.
The planks are pretty rough but that doesn't matter for this application.

There will be two layers of 4/4 stock.  The backing layer and the show face with the undulations.  After choosing the pieces for the top I overlaid two edges, marked the cut area, and put a screw in each end to hold the two together.  I ran the assembly through the band saw and cut a wavy line staying within my marks.  Throw away the scrap and the pieces fit nicely.  The eye doesn't pick up wavy line as easily as a straight one, although with the contrasting colors it's obvious.  No matter.  I will probably mix up some gravy to fill the voids.

I will sandwich the two layers with some glue and put the stack in a veneer bag for pressing.

When dry I will use an angle grinder and a "King Arthur Tools" contoured "Holey Galahad" carbide disc to contour the face.  I did a quick trial on some scrap using a flap disc on the angle grinder.  It takes the material off in a hurry.  Will do more practicing and watch the Jory Brigham videos.  Lastly I'll use the same dye mixture I used on the tiger maple lamp top.

[attachimg=1]

[attachimg=2]

[attachimg=3]

[attachimg=4]

[attachimg=5]


Attachments

  • Drawer Face-1-2.jpg
    Drawer Face-1-2.jpg
    73.5 KB · Views: 766
  • Drawer Face-4.jpg
    Drawer Face-4.jpg
    122.7 KB · Views: 763
  • Drawer Face-3.jpg
    Drawer Face-3.jpg
    100.8 KB · Views: 769
  • Drawer Face-2.jpg
    Drawer Face-2.jpg
    91.8 KB · Views: 757
  • Drawer Face-1.jpg
    Drawer Face-1.jpg
    92 KB · Views: 765
I've been wanting to try this too. Any ideas on how to decide what is a high or low point?
 
blaszcsj said:
I've been wanting to try this too. Any ideas on how to decide what is a high or low point?

Good question....
I watched the organic bed video probably eight times in the past and just looked at it again.  The undulations are not as deep as his console doors.  Notice how he put a chamfer on the joints of the planks to accentuate them rather than hide them.  When he uses the angle grinder he pretty much stays within a given plank and lets it flow laterally.  I don't think he goes too deep.  I'm guessing 1/2" max.  The undulations are wide and "vague".  There are no flat areas. The only defined cuts are the chamfers.  I'm glad I watched again as I forgot about the chamfers.  This might not work for drawer faces because I'm going to have to cut them for the faces and they may not line up pleasingly.  Jory's stock looks a tad thicker than mine.  I may decide to keep it shallow and only have a single layer.  As I said after looking again he doesn't go too deep and a second layer might not be necessary.

With the tiger maple I will try to add a "face" to areas with medullary rays.  I'm hoping the dye and top coat will give a deep chatoyance in the dimensional areas.


I used the OF1400 with table widener, and an Amana 54304 ..... soft arc profile.
What a difference.  I am pleased.  It will go nicely with the grooves in the blue pine doors.

I checked the drawer spacing and I got lucky.  Each drawer face will have a groove-seam down the middle.  So it will be straight line wavy line.... straight line wavy line, and so on.

[attachimg=1]
 

Attachments

  • Drawer chamf-1.jpg
    Drawer chamf-1.jpg
    100 KB · Views: 818
Upon further review the undulations are rather deep and they have a consistent pattern.  I will be using two layers esp. since I want to have a self return that wraps around....
This screen capture will be very helpful when contouring.

[attachimg=1]
 

Attachments

  • Screen Shot 2015-07-27 at 5.24.26 PM.png
    Screen Shot 2015-07-27 at 5.24.26 PM.png
    1.3 MB · Views: 1,385
Trimming the drawers is tedious work for me.  I couldn't wait any longer, I had to dig into the fronts to see if they'd work.  At least all the material is cut.

[attachimg=1]
 

Attachments

  • DBox-1.jpg
    DBox-1.jpg
    121.6 KB · Views: 1,435
Awesome screenshot. You seriously have my undivided attention on this at this point. Looks like he is very consistent on the depth but just meanders a bit around to form the "grain". I think if I remember right, when he does the wrap, he just blends the edge because there will be some minor mismatch due to the loss of the blade width.

Keep up the cool work!
 
The Holey Galahad "fine" rounded disc arrived today.  It certainly take material off in a hurry.  Can't imagine the medium or coarse disc.  After practicing on some soft maple I decided to dig in to a tiger plank.

I worked for broad strokes trying not to call attention to any area in particular.  This project would have been significantly harder without a Festool RO90 in circular mode.  You can see the difference in the photo.  I used the RO90 to flatten any creases.  I'd work a section for 20 seconds with the grinder and 20 minutes with the RO90.

I had to throw my special dye mix on to see what I had....  I need to mix a larger batch, so I'll sand it back and apply the mixture when I have finished all the pieces.  A top coat should raise the beauty several notches.

[attachimg=1]

[attachimg=2]

[attachimg=3]
 

Attachments

  • D_Front-2.jpg
    D_Front-2.jpg
    51.2 KB · Views: 1,184
  • D_Front-3.jpg
    D_Front-3.jpg
    41.1 KB · Views: 1,201
  • D_Front-1.jpg
    D_Front-1.jpg
    87 KB · Views: 1,187
I sanded back the plank (middle) I dyed yesterday.  Then I completed plank number three.  I'm halfway there.  Oh how I hate sanding.  That said I cannot imagine this project without the RO90.  It's mandatory.  The Holey Galahad description says the fine disk only requires a light sand...  Or something to that effect....  Right.  There's plenty of hand sanding to be done too.  The only thing fun about sanding is you don't have to worry about keeping the RO90 moving all the time  [smile]  You can keep it in one place and dig into the deeper scratches.

One of the things I did was sand a slight round-over on the routed edges.  They don't look as severe and blend in.

I would have stained these three but I'm don't have enough of one color in the mix to make a large enough batch for everything.  I doctored the photo below to highlight the contours.  It's actually much more pale.

[attachimg=1]
 

Attachments

  • D_Front-1-2.jpg
    D_Front-1-2.jpg
    71.3 KB · Views: 1,222
Looks really good. Thank you for all the info and play by play. I am excited to try this.
 
Concerned about the linear seams between each drawer front and the accentuated wavy seams between the boards.  At least it's a first time piece, I'll learn something, and it's a Garage Cabinet.  Jory's Organic Bed which I've referenced is one giant slab with no straight lines, hence the accentuated wavy seams work.  In his console pieces with doors and drawer fronts he doesn't accentuate the seams......

I have a couple choices.
A) Do nothing.
B) Dig out the chamfers.  The wavy seams will still be visible because they aren't real tight.
C) Cut the wavy seams out straight, laminate the sandwich, and contour to disguise the seams.  This "should produce" a plank seam that is less visible.  However, the difference in the color of the planks and grain will still be there.  I need to buy more material and there will still be two lines per drawer front.  Stain will help.

"B" is out.  I think it does nothing.
"C" is a lot of work with no guarantees.
"A"  The more I stare at it the more I think it will be ok.  What the heck they are garage cabinets.

[attachimg=1]
 

Attachments

  • D_Front_V2-1.jpg
    D_Front_V2-1.jpg
    107.1 KB · Views: 1,107
I had some knots in plank 4 that I filled with Bondo.  I have the pink type because I can tell how much harder I've added.  But that doesn't take the dye as good as wood filler.

After contouring the knots I took my carving kit and removed a layer of the Bondo.  I applied TimberMate water based filler over the top of the Bondo.  The water based filler accepts the water based dye nicely.  I've given up on Fam-O-Wood.  Let's see how it looks after sanding and coloring.

I learned this trick on Charles Neil subscription finishing web site.  It's $10 a month and has great how to videos on every aspect of finishing wood.  I recommend trying a month before you finish an important project.  Plus, Charles has been very good at responding to my emails.

[attachimg=1]

[attachimg=2]

[attachimg=3]
 

Attachments

  • Knots-1.jpg
    Knots-1.jpg
    135.8 KB · Views: 1,087
  • Knots-2.jpg
    Knots-2.jpg
    97.8 KB · Views: 1,013
  • Knots-3.jpg
    Knots-3.jpg
    135.8 KB · Views: 1,031
Back
Top