You are using an out of date browser. It may not display this or other websites correctly.
You should upgrade or use an alternative browser.
You should upgrade or use an alternative browser.
Blue Pine Garage Cabinets: Build
- Thread starter iamnothim
- Start date
iamnothim
Member
- Joined
- Feb 5, 2014
- Messages
- 1,435
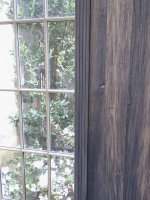
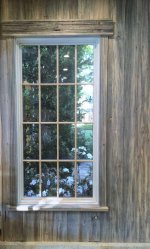
I decided to go mono-chromatic on the window case and trim. I didn't like the poplar fluted case I had so I decided to make my own. I made it of, what else, wormy blue pine. Didn't know how it would look.
I took the fluted poplar trim to set up the CMS and, low and behold, it was too wide to run. I had come across this before and never found a solution. Until today.
I'm sure this has been done before and there's a thread, nonetheless I found it myself because invention is the necessity of motherhood. I also got to use the protractor for once which is cool.
After posting this I'll head down and work on the stool and header.
PS. The trim is not as dark as it appears in the photo. iPhone glitch.
[attachimg=1]
[attachimg=2]
Attachments
bkharman
Member
- Joined
- Jul 1, 2013
- Messages
- 2,019
iamnothim said:I decided to go mono-chromatic on the window case and trim. I didn't like the poplar fluted case I had so I decided to make my own. I made it of, what else, wormy blue pine. Didn't know how it would look.
I took the fluted poplar trim to set up the CMS and, low and behold, it was too wide to run. I had come across this before and never found a solution. Until today.
I'm sure this has been done before and there's a thread, nonetheless I found it myself because invention is the necessity of motherhood. I also got to use the protractor for once which is cool.
Luke... read the thread Luke...
I just wanted to throw in a Star Wars reference... [smile]
I am not sure you want to head down the path I did in that link, but I am extremely happy with it and use it almost every time. With my setup, I of course can route up to 25" away...
That being said... very good use of your noggin for getting that pine fluted! my protractors and extra fences seem to collect dust...
Shop is looking sharp man.
Cheers. Bryan.
iamnothim
Member
- Joined
- Feb 5, 2014
- Messages
- 1,435
bkharman said:Luke... read the thread Luke...
I just wanted to throw in a Star Wars reference... [smile]
I am not sure you want to head down the path I did in that link, but I am extremely happy with it and use it almost every time. With my setup, I of course can route up to 25" away...
That being said... very good use of your noggin for getting that pine fluted! my protractors and extra fences seem to collect dust...
Shop is looking sharp man.
Cheers. Bryan.
Oh I saw that...... That is a significant amount of Spinach that has already been spent on the Benchcrafted Crisscross Retro M-Package. And then theres the Powermatic PM2800 that is on a truck somewhere that will be a total surprise for my sweetheart when it arrives. [eek] [scared]
Carl Prentiss
Member
- Joined
- Jan 3, 2013
- Messages
- 364
Lookin good Luke. I was on the fence between the PM2800B and the Kapex.... Kapex won. Looking forward to hearing your thoughts on the PM.
-Charlie
-Charlie
iamnothim
Member
- Joined
- Feb 5, 2014
- Messages
- 1,435
Charlie Mac said:Lookin good Luke. I was on the fence between the PM2800B and the Kapex.... Kapex won. Looking forward to hearing your thoughts on the PM.
-Charlie
Charlie
If you didn't tell me about the sale, I wouldn't have ordered one. Thanks.... I think. [smile]
Just finished with today's sawdust.
I made the jamb extensions, fluted case, and stool with self return.
For days I have been thinking about how/what to build for the header. Staining poplar moldings doesn't cut it. Any other species stands out like a sore thumb. Stained or otherwise. The elm burl kinda backsplash just makes it because it's so powerful, but I can't say it's real harmonious.
I'm very happy with the wormy case and stool. I think the "like on like" looks killer. Again what to do with the header. I don't have a shaper and putting together a hodgepodge of ogee and round-overs won't cut it. Then I noticed something and thought this might be powerful. It's totally different. (There's a 411)
It'll probably take most of the day but I'm going to enjoy the detour.
Pass or fail I will have pics tomorrow. Keep your fingers crossed.
iamnothim
Member
- Joined
- Feb 5, 2014
- Messages
- 1,435
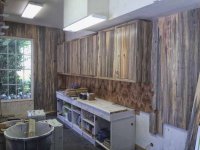
A lot has happened in the past couple days.
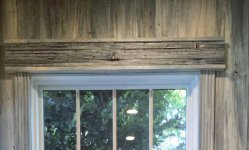
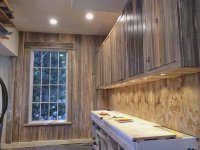
First. I finished making the header and casing the window.
Second. My electrician took down all the florescent fixtures and put in 6" can lights. He put in 9 but I'm having him come back tomorrow and put 3 more in near the bench. It looks significantly better.
Third. I took the TS 75 and trued up all the soft maple for the top. So I'm ready to start building the Split Top Roubo bench top.
The 36 tooth "Universal Blade" just barely handled the rips. The edge was smooth and it didn't burn, but a Panther would definitely be a better choice for ripping the 8/4 maple. Just as a 52 tooth will be better for crosscuts. Since the majority of what I do is crosscut and sheet goods I'm going to consider getting either the Forrest 70 tooth blade or the Festool 495381 52 tooth blade.
On to the Roubo phase !!!!
[attachimg=1]
[attachimg=2]
Attachments
iamnothim
Member
- Joined
- Feb 5, 2014
- Messages
- 1,435
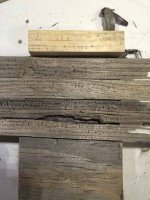
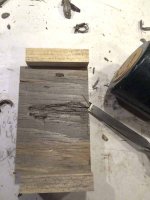
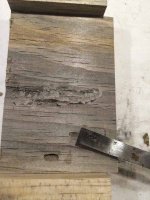
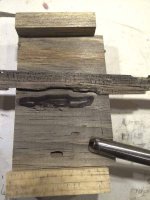
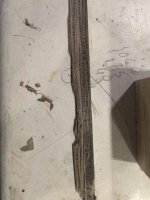
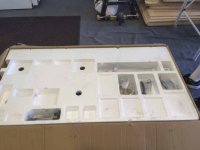
Here's a quick mock-up made from scraps to illustrate how I made the header.
To get the slivers I would split and pry strips off the edge of the board with a chisel and cut the strips off using the guide rail. The illusion off additional dimension was created by gouging out a void from the backer board then creating fibers in the void by prying with a chisel.
[attachimg=1]
[attachimg=2]
[attachimg=3]
[attachimg=4]
[attachimg=5]
[attachimg=6]
Attachments
iamnothim
Member
- Joined
- Feb 5, 2014
- Messages
- 1,435
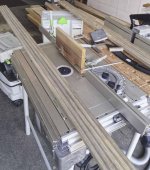
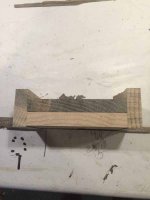
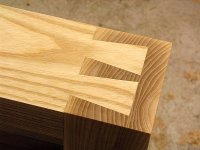
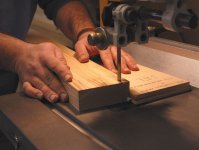
Cutting the Condor Tails.
Thank to Jim Kirkpatrick for his fine Roubo build thread in TalkFestool Jim also gave me a link to how to make Condor Tails in Popular Woodworking.
The article shows using a bandsaw to make the peripheral cuts. I do not own a bandsaw.
Would a Japanese Pull Saw do the trick? If so can yawl suggest a brand?
Thanks
Luke
[attachimg=1]
[attachimg=2]
Attachments
iamnothim
Member
- Joined
- Feb 5, 2014
- Messages
- 1,435
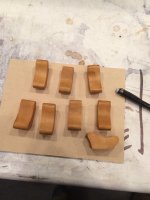
It doesn't look like much has been done, but I've been at it every day.
I made the door pulls for the uppers. 2 days. It took 12 to get 7 good ones. I routed them so the face grain is not end grain.
I had an electrician friend take down all the florescent lights and put in a dozen 6" can lights. (Costco LED bulbs)
It made a big difference. Aesthetically and luminescent.
While reviewing the Roubo build videos I noticed they differ from the plans. all the top members are on edge 4" deep. I thought they should be that way... rather than flat. So I recalculated all the other components (Legs, Chop, Cross members) I needed and went to the store to get a substantial amount additional soft maple. I also needed more blue pine to finish paneling the areas I want.
After returning home I boxed a small post and called it a day.
[attachimg=1]
[attachimg=2]
Attachments
tiralie
Member
- Joined
- Jan 26, 2010
- Messages
- 3,614
iamnothim said:Would a Japanese Pull Saw do the trick? If so can yawl suggest a brand?
I would use a large tenon saw or a frame/bow saw with a rip blade.
Tim
iamnothim
Member
- Joined
- Feb 5, 2014
- Messages
- 1,435
I've been considering that drill press for a while now, I will probably buy one the next time they go on sale. Hopefully you will give us your thoughts on its performance once you have played with it for awhile. Is it pre-wired for 230v or 115v?
tiralie
Member
- Joined
- Jan 26, 2010
- Messages
- 3,614
iamnothim said:It arrived....
What a beast.
Nice, that's the one I would buy too.
What are you making with it?
Tim
iamnothim
Member
- Joined
- Feb 5, 2014
- Messages
- 1,435
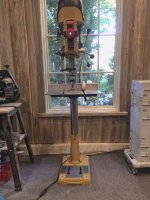
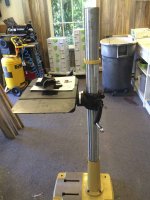
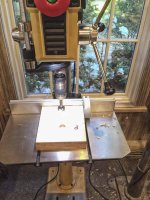
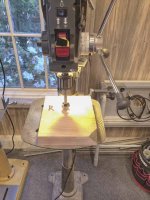
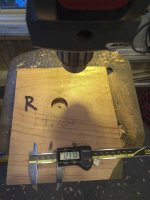
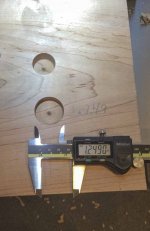
Powermatic PM2800B.
In no particular order...
I purchased it because I have a hole gaggle of wholes I need to drill for the Roubo bench top.
I ordered it because my 10 year old Rigid was out of alignment and I was smitten by the 2800B bells & whistles.
Note: I would buy a Soviet Lada if they put a laser on it.
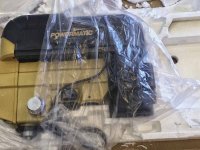
The LED lights are so bright the laser crosshairs didn't show up in the photo below. I need to align them....and other things.
It runs incredibly smooth and setting the quill starting point and bore depth limits are amazing. It takes seconds and eliminates 90% of table cranking on my Rigid.
The previous model, PM2800, came with table extension wings. I'd like to see if I can get a set.
I read several negative reviews about belts noise and such. One reviewer a year ago had his replaced but was very happy in the end.
I will see. As I said... If they put a laser on a Lada I would buy one.
Test was with a brand new, never used, 1/ 1/4" Porter Cable Forstner bit The Rigid bore was 1.237". The PM2800B was 1.249"
I was going to make a video to demonstrate the sound difference but I am too lazy. I also did not match the speeds of the two presses.
[attachimg=1]
[attachimg=2]
[attachimg=3]
[attachimg=4]
[attachimg=5]
In no particular order...
I purchased it because I have a hole gaggle of wholes I need to drill for the Roubo bench top.
I ordered it because my 10 year old Rigid was out of alignment and I was smitten by the 2800B bells & whistles.
Note: I would buy a Soviet Lada if they put a laser on it.
The LED lights are so bright the laser crosshairs didn't show up in the photo below. I need to align them....and other things.
It runs incredibly smooth and setting the quill starting point and bore depth limits are amazing. It takes seconds and eliminates 90% of table cranking on my Rigid.
The previous model, PM2800, came with table extension wings. I'd like to see if I can get a set.
I read several negative reviews about belts noise and such. One reviewer a year ago had his replaced but was very happy in the end.
I will see. As I said... If they put a laser on a Lada I would buy one.
Test was with a brand new, never used, 1/ 1/4" Porter Cable Forstner bit The Rigid bore was 1.237". The PM2800B was 1.249"
I was going to make a video to demonstrate the sound difference but I am too lazy. I also did not match the speeds of the two presses.
[attachimg=1]
[attachimg=2]
[attachimg=3]
[attachimg=4]
[attachimg=5]
Attachments
Similar threads
- Replies
- 25
- Views
- 4K
- Replies
- 5
- Views
- 2K