SMJoinery
Member
- Joined
- Nov 17, 2013
- Messages
- 522
Hi All
I read a lot of threads here are from guys sharing info on best technique etc and so I thought I'd share some experience on the above topic as it comes up fairly regularly.
BACKGROUND.
I run a small joinery / carpentry business and so do this for a living. My tools earn money but it's more than that for me and I'm striving for excellence.
My old ways would be to balance a sheet on my table saw with out feed table and get as good a cut as I could and then finish the cut with hand plane and sander in order to remove chips and blade marks etc.
I purchased the TS55 and two 1400 guide rails about a year ago and saw instant improvement but could see flaws with supporting sheets and joining rails etc.
MY BEST EXPERIENCE.
Cutting sheets by yourself and getting accurate and ready to finish cuts is simple.
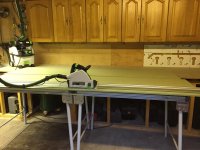
Take the sheet and lay it on a good sturdy bench capable of supporting your sheet, the edge being cut and the off cut. (I use 2 MFT3's with a back bench at same height). This way I can work round my MFT's or push them up to back bench for support when needed.
Get the 3000 guide rail and using the FS pistol grip clamp set up your cut so as the pencil marks line up on the splinter strip (previously trimmed as per instruction) and ensure that the guide rail is laid on top of the piece you want. (Otherwise you will be 2-3mm short!).
I don't place anything on top of the bench before I cut. I'm happy to replace bench tops if they get that bad.
Make sure the depth of cut is set to materials plus 1-2mm on the guide rail scale on the saw. Connect to extraction (I use a midi with cord suspended on bungee above the bench) and plunge smoothly but confidently and steadily guide saw on the rail.
The cut achieved is ready for paint or edging.
I always use the green splinter insert on the saw regardless if I need the off cut or not. Just simply sit saw on the rail at your first cut and adjust the insert to sit on work piece and tighten.
FINALLY
Some other tips..
If your cabinets are 600mm finished size, set your first cut into the sheet as 610mm up the middle and then using this cut as a datum cut the sheets machine edges off and now you have two great edges.
I use 12mm backs for my cabinets and use the OF1010 with 12mm cutter. I rebate the backs into the sides by 5mm each side using the edge guide set on the router. I route all my sides, tops and bottoms the same way at the same time to ensure consistency.
Cut your tall cabinets to height first remembering to deduct your legs (plinth) height as I find the off cut can be used for a bottom or top.
If your cabinets are being painted don't sand mdf edges before painting. Paint first then sand and repeat.
Use moisture resistant mdf where possible. It is easier to work with, has a better paint finish, copes better with humidity and is only about £2 a sheet more expensive.
You can achieve a good finish by hand painting. Ideally prime and undercoat the boards after machining but before assembly and then finish in place. If you don't have the space then assemble the cabinets and paint in place using a good quality brush for edges and corners and small foam roller for remainder. Sand lightly between coats and fill holes after primer coat and again at undercoat but not before.
The above is my method, it's not the only method but it does work well, is accurate and gives a consistent quality.
Please add your own experiences and tips so we can all continue to strive for excellence.
Thanks for reading and sharing.
Scott
I read a lot of threads here are from guys sharing info on best technique etc and so I thought I'd share some experience on the above topic as it comes up fairly regularly.
BACKGROUND.
I run a small joinery / carpentry business and so do this for a living. My tools earn money but it's more than that for me and I'm striving for excellence.
My old ways would be to balance a sheet on my table saw with out feed table and get as good a cut as I could and then finish the cut with hand plane and sander in order to remove chips and blade marks etc.
I purchased the TS55 and two 1400 guide rails about a year ago and saw instant improvement but could see flaws with supporting sheets and joining rails etc.
MY BEST EXPERIENCE.
Cutting sheets by yourself and getting accurate and ready to finish cuts is simple.
Take the sheet and lay it on a good sturdy bench capable of supporting your sheet, the edge being cut and the off cut. (I use 2 MFT3's with a back bench at same height). This way I can work round my MFT's or push them up to back bench for support when needed.
Get the 3000 guide rail and using the FS pistol grip clamp set up your cut so as the pencil marks line up on the splinter strip (previously trimmed as per instruction) and ensure that the guide rail is laid on top of the piece you want. (Otherwise you will be 2-3mm short!).
I don't place anything on top of the bench before I cut. I'm happy to replace bench tops if they get that bad.
Make sure the depth of cut is set to materials plus 1-2mm on the guide rail scale on the saw. Connect to extraction (I use a midi with cord suspended on bungee above the bench) and plunge smoothly but confidently and steadily guide saw on the rail.
The cut achieved is ready for paint or edging.
I always use the green splinter insert on the saw regardless if I need the off cut or not. Just simply sit saw on the rail at your first cut and adjust the insert to sit on work piece and tighten.
FINALLY
Some other tips..
If your cabinets are 600mm finished size, set your first cut into the sheet as 610mm up the middle and then using this cut as a datum cut the sheets machine edges off and now you have two great edges.
I use 12mm backs for my cabinets and use the OF1010 with 12mm cutter. I rebate the backs into the sides by 5mm each side using the edge guide set on the router. I route all my sides, tops and bottoms the same way at the same time to ensure consistency.
Cut your tall cabinets to height first remembering to deduct your legs (plinth) height as I find the off cut can be used for a bottom or top.
If your cabinets are being painted don't sand mdf edges before painting. Paint first then sand and repeat.
Use moisture resistant mdf where possible. It is easier to work with, has a better paint finish, copes better with humidity and is only about £2 a sheet more expensive.
You can achieve a good finish by hand painting. Ideally prime and undercoat the boards after machining but before assembly and then finish in place. If you don't have the space then assemble the cabinets and paint in place using a good quality brush for edges and corners and small foam roller for remainder. Sand lightly between coats and fill holes after primer coat and again at undercoat but not before.
The above is my method, it's not the only method but it does work well, is accurate and gives a consistent quality.
Please add your own experiences and tips so we can all continue to strive for excellence.
Thanks for reading and sharing.
Scott