I have an MFT, but sometimes it is just not large enough so I am going to build a custom MDF top that is larger. Any recommendations on drilling the top. I am thinking I can use an MFT top as a template. Precision of the the holes does not matter since it will only be used for clamping and assembly. I have another workbench and tablesaw for other cutting.
You are using an out of date browser. It may not display this or other websites correctly.
You should upgrade or use an alternative browser.
You should upgrade or use an alternative browser.
Building Custom MFT top
- Thread starter jeh
- Start date
Couple things I'd do differently-
1. Finish before you drill- no drips in the holes to clean out.
2. Maybe don't drill all the holes. It's nice to have part of the bench where junk can't fall thru. And most of the holes go un-used.
3. I've found a few situations where a piece of T-track in the bench helps a ton.
I splurged on the Parf kit. Love it. If you're not worried about hole placement, you should at least worry about hole quality- find a way to guide a forstner bit, so your dogs will fit nice and not be crooked.
Cheese
Member
tsmi243 said:Couple things I'd do differently-
1. Finish before you drill- no drips in the holes to clean out.
2. Maybe don't drill all the holes. It's nice to have part of the bench where junk can't fall thru. And most of the holes go un-used.
3. I've found a few situations where a piece of T-track in the bench helps a ton.
4. I splurged on the Parf kit. Love it. If you're not worried about hole placement, you should at least worry about hole quality- find a way to guide a forstner bit, so your dogs will fit nice and not be crooked.
1. YES
2. YES...I drilled the hole pattern with a 6 mm drill and then used a 20 mm Zobo bit with a 6 mm pilot to open just the holes I needed. 5-6 years later, there is an entire corner area of the bench that still only contains 6 mm holes, that's worked out well.
3. YES...I've also added T-track and secured it with #8 screws.
4. On another top I made, I used the 1400 router and the Festool 20 mm bit to maintain hole perpendicularity and diameter concentricity. The Fetool bit, 491072 was a charm...no hole burning what-so-ever despite the 10,000 RPM minimal router speed.
I find using existing top as a template the easiest. First, I clamped two together and drilled 1/2" holes freehand roughly in the middle of the template holes. Then, flipped the hole thing (template down) and followed with a pattern bit (bearing on the end of the bit). This way there is almost no risk of gouging the template.
[member=51752]tsmi243[/member] and [member=44099]Cheese[/member] great tips, thank you!
A few questions:
This is a great advice. However, my table top is 1.5" thick. Guide rail clamps won't go through a 20 mm hole as it's too deep. I'd need to drill out a larger (30 mm?) diameter holes from the bottom side of the table top. A similar process should work, right? Start with a 6 mm bit, then drill half way through from the top using a 20 mm bit; finish it by drilling the rest of the way from the bottom using a 30 mm bit.
What's the best approach here?
I don't get this one. When a track would be more beneficial vs just using the 20 mm holes for clamping?
That's what I'm planning as well. 1400 + 20 mm router bit + LR32.
But since the top is so thick, I will probably start with a 6 mm bit, then move on to 20 mm bit and go half way through.
A few questions:
Cheese said:2. YES...I drilled the hole pattern with a 6 mm drill and then used a 20 mm Zobo bit with a 6 mm pilot to open just the holes I needed. 5-6 years later, there is an entire corner area of the bench that still only contains 6 mm holes, that's worked out well.
This is a great advice. However, my table top is 1.5" thick. Guide rail clamps won't go through a 20 mm hole as it's too deep. I'd need to drill out a larger (30 mm?) diameter holes from the bottom side of the table top. A similar process should work, right? Start with a 6 mm bit, then drill half way through from the top using a 20 mm bit; finish it by drilling the rest of the way from the bottom using a 30 mm bit.
What's the best approach here?
3. YES...I've also added T-track and secured it with #8 screws.
I don't get this one. When a track would be more beneficial vs just using the 20 mm holes for clamping?
4. On another top I made, I used the 1400 router and the Festool 20 mm bit to maintain hole perpendicularity and diameter concentricity. The Fetool bit, 491072 was a charm...no hole burning what-so-ever despite the 10,000 RPM minimal router speed.
That's what I'm planning as well. 1400 + 20 mm router bit + LR32.
But since the top is so thick, I will probably start with a 6 mm bit, then move on to 20 mm bit and go half way through.
If you're not using dogs, then the quality of the hole really doesn't matter. Just use what ya got, and start drilling.
For the T-track, a pic is worth a thousand words. I'll try to get some pics of what I've jigged up in the past. But essentially, anything where you have a clamp or jig that needs to be less than 96mm away from the edge of your workpiece. The first available dog hole may be too close, and the 2nd dog hole is be too far. If you cut a T-track into the deck, you can infinitely locate things that need to be infinitely located.
For the T-track, a pic is worth a thousand words. I'll try to get some pics of what I've jigged up in the past. But essentially, anything where you have a clamp or jig that needs to be less than 96mm away from the edge of your workpiece. The first available dog hole may be too close, and the 2nd dog hole is be too far. If you cut a T-track into the deck, you can infinitely locate things that need to be infinitely located.
Most likely I won't be using dogs. But I want to keep that option, so hole quality matters to me.tsmi243 said:If you're not using dogs, then the quality of the hole really doesn't matter. Just use what ya got, and start drilling.
But essentially, anything where you have a clamp or jig that needs to be less than 96mm away from the edge of your workpiece. The first available dog hole may be too close, and the 2nd dog hole is be too far.
That makes perfect sense, thank you! But I totally agree, a picture would be awesome.
Cheese
Member
serge0n said:[member=51752]tsmi243[/member] and [member=44099]Cheese[/member] great tips, thank you!
A few questions:
Cheese said:2. YES...I drilled the hole pattern with a 6 mm drill and then used a 20 mm Zobo bit with a 6 mm pilot to open just the holes I needed. 5-6 years later, there is an entire corner area of the bench that still only contains 6 mm holes, that's worked out well.
This is a great advice. However, my table top is 1.5" thick. Guide rail clamps won't go through a 20 mm hole as it's too deep. I'd need to drill out a larger (30 mm?) diameter holes from the bottom side of the table top. A similar process should work, right? Start with a 6 mm bit, then drill half way through from the top using a 20 mm bit; finish it by drilling the rest of the way from the bottom using a 30 mm bit.
What's the best approach here?
3. YES...I've also added T-track and secured it with #8 screws.
I don't get this one. When a track would be more beneficial vs just using the 20 mm holes for clamping?
4. On another top I made, I used the 1400 router and the Festool 20 mm bit to maintain hole perpendicularity and diameter concentricity. The Fetool bit, 491072 was a charm...no hole burning what-so-ever despite the 10,000 RPM minimal router speed.
That's what I'm planning as well. 1400 + 20 mm router bit + LR32.
But since the top is so thick, I will probably start with a 6 mm bit, then move on to 20 mm bit and go half way through.
The top thickness of the first work bench table I modified was 1-7/8" thick maple. Drill straight thru from the top side. Trying to do this half & half thing will just guarantee your drill centers will be misaligned. That's a dead end. [smile]
For accurate registration purposes, use something that will guarantee drill bit perpendicularity, it can be as simple as a Big Gator guide, a Woodpeckers Autoline drill guide or a full sized drill press. They all work it's just a matter of time & patience.
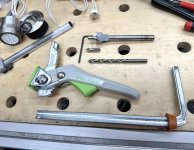
Here's what I used...no rocket science involved...just careful planning & accurate, careful measuring.
This shows the 6 mm drill bit, the 20 mm Zobo bit with the 6 mm pilot and a Festool clamp that's been modified to easily poke through very thick surfaces.
[attachimg=1]
[attachimg=2]
Attachments
Richard/RMW
Member
- Joined
- Jul 11, 2010
- Messages
- 2,947
[member=44099]Cheese[/member] inquiring minds want to know....
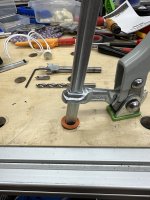
[attachimg=1]
I kinda recognize the washer but can't place it, plumbing fitting?
RMW
[EDIT] probably answered my own question...
[attachimg=2]
Can you confirm the 1/2" dimension?
Thanks,
RMW
[attachimg=1]
I kinda recognize the washer but can't place it, plumbing fitting?
RMW
[EDIT] probably answered my own question...
[attachimg=2]
Can you confirm the 1/2" dimension?
Thanks,
RMW
Attachments

Cheese
Member
Richard/RMW said:[member=44099]Cheese[/member] inquiring minds want to know....
I kinda recognize the washer but can't place it, plumbing fitting?
RMW
[EDIT] probably answered my own question...
Can you confirm the 1/2" dimension?
Thanks,
RMW
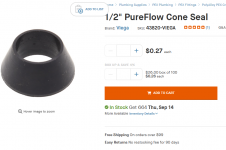
You got it [member=8712]Richard/RMW[/member] ...the plumbing section, I've known them as cone washers. Just measured mine and it's 1/2" ID while the largest OD is 7/8", it sits in the 20 mm hole nicely.
Richard/RMW
Member
- Joined
- Jul 11, 2010
- Messages
- 2,947
Cheese said:Richard/RMW said:[member=44099]Cheese[/member] inquiring minds want to know....
I kinda recognize the washer but can't place it, plumbing fitting?
RMW
[EDIT] probably answered my own question...
Can you confirm the 1/2" dimension?
Thanks,
RMW
You got it [member=8712]Richard/RMW[/member] ...the plumbing section, I've known them as cone washers. Just measured mine and it's 1/2" ID while the largest OD is 7/8", it sits in the 20 mm hole nicely.
Thanks, I'll grab some. The 3D printed ones slips at times, this looks like a good alternative.
RMW
Cheese said:The top thickness of the first work bench table I modified was 1-7/8" thick maple. Drill straight thru from the top side. Trying to do this half & half thing will just guarantee your drill centers will be misaligned. That's a dead end. [smile]
For accurate registration purposes, use something that will guarantee drill bit perpendicularity, it can be as simple as a Big Gator guide, a Woodpeckers Autoline drill guide or a full sized drill press. They all work it's just a matter of time & patience.
Here's what I used...no rocket science involved...just careful planning & accurate, careful measuring.
This shows the 6 mm drill bit, the 20 mm Zobo bit with the 6 mm pilot and a Festool clamp that's been modified to easily poke through very thick surfaces.
The cone washer + modified clamp is a smart idea, thank you! But it also means inserting the clamp rod from the bottom every time you need to use a new hole. Doesn't that get frustrating?
Yeah, the half & half approach is probably asking for trouble... Maybe I should drill it straight through from the top side, then use a 20 mm dowel cut off to plug the hole from the bottom side and drill out the bottom to 30 mm wide at least partially. The 30 mm hole doesn't have to align perfectly, it would be there to allow the clamp to go through from the top.
Or use a giant countersink/chamfer bit. Those can get really expensive though.
squall_line
Member
serge0n said:Cheese said:The top thickness of the first work bench table I modified was 1-7/8" thick maple. Drill straight thru from the top side. Trying to do this half & half thing will just guarantee your drill centers will be misaligned. That's a dead end. [smile]
For accurate registration purposes, use something that will guarantee drill bit perpendicularity, it can be as simple as a Big Gator guide, a Woodpeckers Autoline drill guide or a full sized drill press. They all work it's just a matter of time & patience.
Here's what I used...no rocket science involved...just careful planning & accurate, careful measuring.
This shows the 6 mm drill bit, the 20 mm Zobo bit with the 6 mm pilot and a Festool clamp that's been modified to easily poke through very thick surfaces.
The cone washer + modified clamp is a smart idea, thank you! But it also means inserting the clamp rod from the bottom every time you need to use a new hole. Doesn't that get frustrating?
With a top nearly 2 inches thick, that's pretty much the only way to use the clamps. With a standard thickness table top, it should work just the same as a normal clamp. Many thick tops usually use hold-downs instead of clamps, of course, and Festool sells their own version of those now, too.
NiteWalkerGR
Member
- Joined
- May 7, 2014
- Messages
- 190
Good to know about the 3d printed ones. I grabbed a hand full of the cone seals.Richard/RMW said:Cheese said:You got it [member=8712]Richard/RMW[/member] ...the plumbing section, I've known them as cone washers. Just measured mine and it's 1/2" ID while the largest OD is 7/8", it sits in the 20 mm hole nicely.
Thanks, I'll grab some. The 3D printed ones slips at times, this looks like a good alternative.
RMW
- Joined
- Oct 16, 2015
- Messages
- 5,791
My first custom sized bench top was made from a 4' x 8' sheet of 1 1/8" MDF. I made it with a template that was cut on a CNC machine. It had 1" holes for a router bushing and I used a 20mm bit from Freud in a plunge router. I used that thicker material because it was easily available and assumed to be stiffer/less prone to sagging over time.
I was blissfully unaware at the time that the clamps would not fit through the holes though. I solved this problem with a large chamfer bit on the bottom of the table. I cut to a depth to leave 3/4" of straight bore at the top. It worked beautifully.
My second top was done with the Parf system on 3/4 MDF. I use the holes for squaring/assembly as much or more than for clamping, so the accuracy is important. It was done that way because of the lack of CNC access at that time. The nice thing about the Parf system is that it can be adapted to virtually any size and re-used indefinitely. It's a bit of an investment, money and time, but it's a one-time thing....the money part anyway.
If you really don't care so much about the accuracy of the holes though, you could lay out the grid with a straight-edge, yardstick, or even a level. Punch the locations with an awl and go for it with a Forstner bit. One of those vertical drilling fixtures might be helpful too. I would also make the effort to support the sheet from underneath to mitigate the potential of tear-out.
That's exactly what I plan to do. Can you share which chamfer bit did you use? I'm thinking of buying a chinesium piece which is pretty cheap, but I'm worried about it dulling completely on the 10th hole...Crazyraceguy said:I was blissfully unaware at the time that the clamps would not fit through the holes though. I solved this problem with a large chamfer bit on the bottom of the table. I cut to a depth to leave 3/4" of straight bore at the top. It worked beautifully.
I do care about accuracy somewhat. I plan to use LR32 + OF1400 + 20 mm Festool router bit. Should work pretty well.If you really don't care so much about the accuracy of the holes though, you could lay out the grid with a straight-edge, yardstick, or even a level. Punch the locations with an awl and go for it with a Forstner bit. One of those vertical drilling fixtures might be helpful too. I would also make the effort to support the sheet from underneath to mitigate the potential of tear-out.
Good tip on supporting the top from underneath, thank you.
Duh! That's true, Festool has a version! Thank yousquall_line said:Many thick tops usually use hold-downs instead of clamps, of course, and Festool sells their own version of those now, too.
- Joined
- Oct 16, 2015
- Messages
- 5,791
Sure [member=50918]serge0n[/member] I'll share, no problem. The chamfer bit I use is Whiteside 2306. That's a 1/2" shank, 1" cut length. It's a big bit, but they cut really well. I think they are around $45-$50?
Yeah, you will get some tear-out if you don't back it up, but that shouldn't be a big deal on a thick top, where you have to chamfer the back side anyway. That tip is more for someone who is cutting a standard thickness top, but it certainly can't hurt.
Festool does indeed sell the hold-down style clamps...."but" they are a very close fit. They don't just drop in and cock over to the side to bind in the holes. They are intended for MFTs, which are nowhere near that thick. If you put one of them down a dog hole that was drilled with a Forstner bit (or a router bit) on a top that was over an inch thick, you'll play hell getting it back out.
I keep a 20mm hand reamer in my toolbox, just to clean up the holes, when they get glue or something dried inside them. The thru-clamps don't care about that, but dogs and hold-downs definitely do.
The LR-32 system should do a fine job of that. The hole spacing is automatic along the rail, it's just the perpendicular spacing and squareness that you would have to be careful to maintain.
Similar threads
- Replies
- 10
- Views
- 572
- Replies
- 14
- Views
- 2K
- Replies
- 30
- Views
- 2K