Cabinet middle divider out of square

AndrewG

Member
Joined
Nov 1, 2012
Messages
160
Hi all,

I just glued up a cabinet with a middle divider. I’ll eventually have 4 drawers on each side.

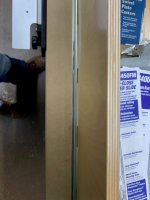
I noticed after the glue up that the middle divider is a little over 1mm out of square. I believe this is due to a loose fitting domino.

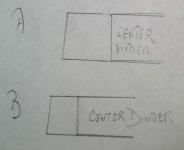
My concern is when I start installing the drawers it’ll start binding at the rear (left side) and the other way around for the other side.

My solution is to simply shim the drawer slides by 1mm in the offending area which in my own mind will bring it back to square. Will this work or has anyone else got any solutions? I know drawer slides have a bit of play but don’t want to take the risk.

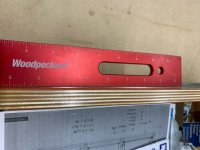
Below is a pic of the right side which shows it out of square towards the rear.

Many thanks in advance.
48d39fe1e24900f68216a71e6a591cee.jpg


Andy
0b9b37b542c27d9bbf9750c64fa8e0b5.jpg
 
Install the drawer, see how it functions. There is a little leeway in slides. Shim as needed if there is a bind.

Tom
 
I have 3 shop cabinets I built with a divider, side mount slow close slides, and some close nicely while others require the last bit pushed in by hand. I suspect it’s user error with the DF500 and if so I’m considering to use dados in the future to avoid the issue or under mounts which can be adjusted and compensate.

I like your shim idea, I might have to check if shims would do any good for me or if the drawer is just too wide. I hope you get better with the Domino … it’s a nice tool if you can figure out how to get it consistently and precisely lined up.
 
1mm is irrelevant in the overall scheme of things, so it’s 99% certain that it won’t make any difference. All of the commercial drawer systems I’ve ever used for kitchens (Blum, Grass Dynapro, Klug, Hettich etc.) have at least 2-3mm of sideways play in them. I think you’ll be good.
 
This topic has come at just the right time for me!
I'm building a draw unit for my son, it's the first draw unit I've ever built.
I'm using screwfix own brand full extension draw runners (the store is just round the corner).
The gap for the runner should be 12.7mm either side but I've left 14mm.  The runners don't run smoothly and don't fully close. :(
I can't make the drawers bigger, so I'm going try packing and then making the cabinet 2mm narrower (1mm either side).
regards
Bob
 
I built a dresser for some young friends. It had 6 drawers each 30" wide, 9" across, and 28" deep. As super careful as I was in the construction, I still had to shim the drawer slides. They were self closing slides so even a small amount of interference inhibited movement.

Boeing used a lot of shims in their planes when I was in the business, so I don't feel to bad in using them in a wood structure.
 
Hi [member=16995]AndrewG[/member]

Luckily the open end where the drawer will fit is wider than the inside width.

The drawer front need to fit perfectly but the slight narrowing towards the back of the drawer can be compensated for....

If you are are making a drawer that has no runners then just make the shape of the drawer match the shape of the space into which it fits.

If you are using ball bearing runners then 1 mm should be within the tolerance of the runners. If not then make the drawer body to the shape of the space but, only fix the screw holding the runner to the drawer body tightly at the draw front. The remaining 2 or 3 screws that hold the runner to the drawer as it goes towards the back of the drawer should be progressively looser allowing 1 mm of movement at the drawer back.

I hope that this explanation is easy to follow. Good luck.

Peter
 
I had a similar problem and it was easily solved.  Either the box or the drawer was out of square (I don’t recall which, but the remedy is the same either way).

I was using side mount, full extension slides.  I shimmed the slide on the drawer by inserting a steel washer between the drawer box and the slide, bringing the slides into square even if the box was not.

This is very easy on side mount slides.  I’m not sure how it would work with undermount slides.  You can add the washers to the drawer (which is marginally visible) or the the cabinet (which would be entirely hidden).  I added to the drawer.

If you have a table saw, you can remove material from the drawer side (just high enough to clear the side mount slides).  I have done that when my drawer was slightly too wide for the cabinet. But the taper would make that more complex.  Not more difficult but requiring more thinking. (And I hate to think while doing wood work.)

Note:  I am not opposed to thinking.  But I like to get it done in the planning stage, not during the actual fabrication.

There are some excellent full extension soft closed side mount slides.  The only drawback is that they are visible when the drawer is open.  Typically, they will carry greater loads than undermount slides.
 
It looks like my DF500 skills aren't the problem as my center divider is fine. 

I noticed the "sticky" drawers have the sides bowed inwards to some degree.  Perhaps I'll start using a temporary spacer block in the middle to avoid this in the future as using only the tips of the parallel guide clamps still caused them to bow under pressure.  That said, I've been able to fix the first drawer I checked by adding 3 post-it notes folded in half twice and wedging them behind the drawer slide to straighten it.

Good luck with your cabinets and hope you have a better drawer box glue-up process than me! :)
 

Attachments

  • 1.jpg
    1.jpg
    481.1 KB · Views: 96
  • 2.jpg
    2.jpg
    524.7 KB · Views: 86
  • 3.jpg
    3.jpg
    452.9 KB · Views: 81
When I first started woodworking about 30 years ago, I bought a second hand book on woodworking lthat was printed (probably) in the 1950s (but perhaps the earlier editions were even older).

They mentioned an under brace for very wide or very deep drawers.  I did it once, just for the heck of it, and it is really simple to execute.

I started with a 1/2” thick x 1-1/2” wide stock the exact length of the outside width of the drawer. 

Per the instructions, I cut a single dovetail (with shoulders)  on both ends of the brace, and cut openings to fit in the middles of the drawer.  I then glued it in and held it in place with small brads. 

I am sure that the glue alone would have been sufficient and the dovetail was not needed, but it was easy to cut and looked cool (even if I was the only one to see it).  It was for wide (48”) and deep (36”).  The drawers were just a couple of inches deep and this was to hold art prints prior to framing.  All the cuts were done with a back saw.  I first cut the shouldered dovetail on the cross piece, and then traced it onto the drawer sides (at the bottom).  Those cuts were also easy.

In any event, the sides of the drawers were about 2” tall and made from 3/4” stock.  I have no doubt that the sides would have bowed out over time.  This was cheap insurance.

The directions called for very small through dowels to hold the cross braces in place.  But the glue and the brads did fine.

I think you could retrofit an underbrace to your drawers and achieve the same thing.  I think 1/4 diameter dowels are called for because your drawer sides are plywood and the glue area is equivalent to gluing up to half the thickness of the stock.  Not enough surface to suit me. 

Remember to clamp the sides to straighten them prior to fastening the underbrace.

Note:  This might interfere with undermount drawer slides.
 
I always find it better to use a thicker bottom on wider drawers. You can still use the typical 1/4 dado, just rabbet the edges to fit it in place. On exceptionally wide drawers a simple rib running front to back, under the bottom, can also help with sagging in the center. Worst case scenario, you can add a vertical divider from front to back and run some screws into it from underneath. That one kind of defeats the point of a wide drawer though? depending on what you need to store in it
 
Bugsysiegals said:
It looks like my DF500 skills aren't the problem as my center divider is fine. 

Snip.

The center divider (mid-panel) joinery can go out of square if the mating boards are not lined up flush with each other (A) or if the center piece itself is not square to start with (B). I always check (A) after the mating boards are clamped together. Sometimes, the top piece can move when it's clamped down.

[attachimg=1]
 

Attachments

  • df mid panel.JPG
    df mid panel.JPG
    19.1 KB · Views: 282
Thanks for all the replies. It sounds like it won’t be an issue, but if it is I’ll shim it slightly. 
 
Try metal flat washers under the glides.  I’ve done that before where I was a little too small on the drawer and it worked well.
 
Back
Top