Cabinet to Cover Pipe

SoonerFan

Member
Joined
Jan 27, 2014
Messages
756
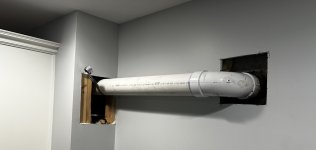
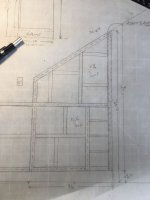
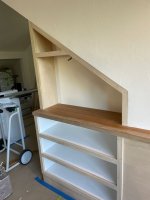
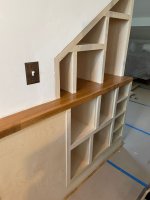
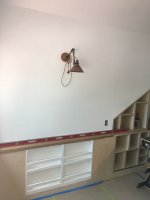
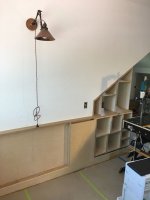
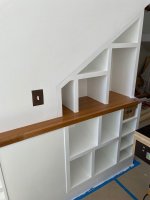
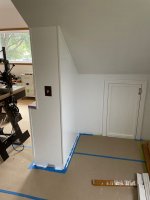
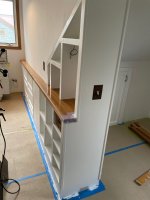
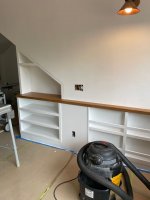
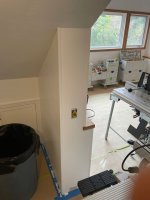
I have a friend who asked me to build a cabinet to cover a pipe that is now outside the wall given some plumbing issues that needed to  be corrected. Hoping for some suggestions on how you'd build a cabinet to cover this pipe. Rough measurements to cover the pipe, cover the holes in the drywall, and allow for crown moulding at the top to match the other cabinets are:

Depth: 8 inches / 205 mm
Height: 23 inches / 589 mm
Width: 46 inches / 1,178 mm

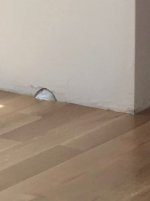
There is maybe a 1/2 / 13mm inch between the pipe and the back wall before the pipe turns.

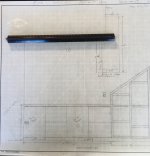
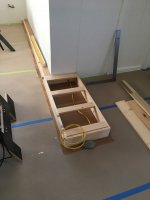
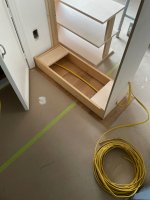
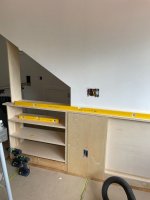
The cabinet will not be used for any storage. Rather, it is just needed to cover the pipe and provide access to the pipe if needed.  I am just starting to think about this, and two quick initial thoughts on options are:

1. Connecting stretchers above and below the pipe on the back and on the left side. Then build an "L" shaped "cabinet" front and right side. Connecting the L to the stretchers and using 1/4 inch plywood for top and bottom. Attach the crown to the front face frame. Could access the pipe through the doors. Could also connect the right side and front with Domino Connectors to provide even more access.

2. Using French Cleats on the back and left side. Hanging a cabinet off of these. Potentially add another French Cleat below the pipe to hold the weight since the back / right side won't provide much structure to support the weight of the front and bottom. Then just remove the entire cabinet if access is needed.

As I mentioned, I am just starting to think about this and would appreciate any suggestions before I really start to make plans. Any thoughts on how to build the cabinet, materials, etc. will be appreciated.
 

Attachments

  • IMG_7583.jpeg
    IMG_7583.jpeg
    965.6 KB · Views: 142
I need to see more images.

What is below the pipe (to the floor)?

What does the left side look like (floor to ceiling)?

I don’t think you have provided enough images.  What does the room look like?

Full wall photo for left side wall.

Full wall photo of the right side wall.
 
I'm just shaking my head here.
That's a DWV (Drain-Waste-Vent) pipe, and it's pretty big in diameter. What the heck is going on that he needed to patch something already in the house with this, and do it outside of the interior walls?
And then to support it with a galv pipe strap clumsily screwed to the studs where the drywall goes? And to leave the roll of strapping just coiled up there? Really bad.
I bet this isn't even to code.
There's no reason to ever need access to this - those glued joints should be fine to put behind drywall. But given this looks like a non-pro job, maybe those glue joints aren't as good as they need to be.

Assuming you don't want to hire a real plumber:
1) Fix that pipe strap to be attached to the stud's side, not the face.
2) Cut the extra strap off
3) Patch the drywall under the pipe and strap at the left there.

Then either just drywall up a box or build any sort of cabinet with fake doors. Put decorative stuff on top of the cabinet. Jeez.

 
Packard said:
I need to see more images.

What is below the pipe (to the floor)?

What does the left side look like (floor to ceiling)?

I don’t think you have provided enough images.  What does the room look like?

Full wall photo for left side wall.

Full wall photo of the right side wall.

Nothing below the pipe other than the floor.  Cabinet will sit about 5 feet off the floor and there will be about a foot above the cabinet.

On the left the wall sticks out about a foot and is floor to ceiling.

This is the only photo I have at this time.

I believe the room is square except the wall the juts out on the left side of the pipe.  There are cabinets on the wall that juts out.
 
smorgasbord said:
I'm just shaking my head here.
That's a DWV (Drain-Waste-Vent) pipe, and it's pretty big in diameter. What the heck is going on that he needed to patch something already in the house with this, and do it outside of the interior walls?
And then to support it with a galv pipe strap clumsily screwed to the studs where the drywall goes? And to leave the roll of strapping just coiled up there? Really bad.
I bet this isn't even to code.
There's no reason to ever need access to this - those glued joints should be fine to put behind drywall. But given this looks like a non-pro job, maybe those glue joints aren't as good as they need to be.

Assuming you don't want to hire a real plumber:
1) Fix that pipe strap to be attached to the stud's side, not the face.
2) Cut the extra strap off
3) Patch the drywall under the pipe and strap at the left there.

Then either just drywall up a box or build any sort of cabinet with fake doors. Put decorative stuff on top of the cabinet. Jeez.

I will ask a few more questions on the plumber that did the work. No idea what the issue was that required this fix.
 
smorgasbord said:
Then either just drywall up a box or build any sort of cabinet with fake doors. Put decorative stuff on top of the cabinet. Jeez.

Go with the Decorative look less the cabinet
Thats a funky spot to have some oddball contraption covering the pipe.
 
I would enclose the pipes as close as possible for depth and as wide as your heart’s desire with Sheetrock.

I would add LED grow lights aiming down from the bottom of your new enclosure.  Then I would build a wide cabinet with a lift up glass door to enclose the new cabinet.  And grow plants.

Blum makes soft close hinges for that application.  For a wide door, you probably need 3 or 4 hinges. I’ve never used them, but the install looks pretty straight forward.  I have the Blum catalog at home.  I can look it up if you need the part number.
 
It appears to be about an inch from the wall (parcial 2x4) and…if built of wood-for the structural part- it might only be 6-7” deep, maybe add the matching crown molding, a top and make it a high shelf……after drywall repair of course…just a thought
 
This installation only makes sense if you were the contractor that installed it and wanted the easiest way to get it done.

It would not surprise me if another contractor could figure a way to completely or mostly hide the pipe.  Maybe in between the floor joists above. 

I would check on that first.  An experienced cabinet maker would right away figure that the cabinet is hiding something.  And is that “something” that would have to be rectified if he wanted to sell the house 10 years down the road?

I would first exhaust all ways to eliminate the problem before I tried to hide the problem.
 
Packard said:
This installation only makes sense if you were the contractor that installed it and wanted the easiest way to get it done.

It would not surprise me if another contractor could figure a way to completely or mostly hide the pipe.  Maybe in between the floor joists above. 

I would check on that first.  An experienced cabinet maker would right away figure that the cabinet is hiding something.  And is that “something” that would have to be rectified if he wanted to sell the house 10 years down the road?

I would first exhaust all ways to eliminate the problem before I tried to hide the problem.

Hear, hear!!!  [smile]
 
Just a word of warning, with no judgement on the reason for the cover-up (sometimes they aren't avoidable) My advice is not only for this specific situation.
I would not put some kind of upper cabinet in that space, without putting something below it, to force people to stay away from it. That corner is a head banger, and even something as simple as a matching base cabinet below it, will work. It would also make the space look more intentional.
Alternatively, you could build something that reaches the floor. (A shallow display case of open shelves, with doors at the top, which would still hide the pipe, otherwise non-functional)
 
I'm with CRG on this...besides, who doesn't need more storage area?

A cabinet on the top to hide the DWV and a cabinet on the bottom for storage. The bottom cabinet could also have a countertop to hold or display items or photographs. Under cabinet LED lighting could be installed to highlight the displayed items.

By installing just an upper cabinet only, that aesthetic would create more questions than answers.  [smile]
 
Proceed with caution! I recently encountered a similar predicament. What started out as an hour long sloping box build, ended up transforming an entire master bedroom, all for the better.

This is the range vent intersecting the floor and wall from below.
 

Attachments

  • Range vent inersecting floor and wall.jpg
    Range vent inersecting floor and wall.jpg
    15.3 KB · Views: 31
  • Range vent 2.jpg
    Range vent 2.jpg
    55.5 KB · Views: 36
Old thread, but a fun exercise.

A two door, floor to ceiling cabinet.  Or stacked, floor to ceiling 2 door cabinets.  Add some shelves or pullouts.

This also addresses Crazy Race’s concerns about head bumping.
 
At one point in time, this home had a dutch dormer addition that bisected a conventional peaked roof. As a result, the original roof lines protruded into the room and made for some serious head banging opportunities. We incorporated shelves and drawers under said roof, making humans go around the lowest portion of the roof.
Of course, the same conditions existed on the opposite side of the room, so we mirrored the design.
 

Attachments

  • First concept.jpg
    First concept.jpg
    136.7 KB · Views: 21
  • Final concept.jpg
    Final concept.jpg
    99.3 KB · Views: 19
  • So begins the task.jpg
    So begins the task.jpg
    76.5 KB · Views: 27
  • Mirror 1.jpg
    Mirror 1.jpg
    148.1 KB · Views: 26
The concept grew on everyone as it progressed.
 

Attachments

  • Mirror 3.jpg
    Mirror 3.jpg
    96.1 KB · Views: 25
  • Hide the vent 3.jpg
    Hide the vent 3.jpg
    105.3 KB · Views: 19
  • It has to mirror on the opposite side.jpg
    It has to mirror on the opposite side.jpg
    94.8 KB · Views: 22
  • Hide the vent 2.jpg
    Hide the vent 2.jpg
    65.5 KB · Views: 19
  • Hide the vent 1.jpg
    Hide the vent 1.jpg
    76.2 KB · Views: 21
Sometimes you just have to let it roll.

E.
 

Attachments

  • Hide the vent final 3.jpg
    Hide the vent final 3.jpg
    81.6 KB · Views: 18
  • Hide the vent final 2.jpg
    Hide the vent final 2.jpg
    96.3 KB · Views: 18
  • Hide the vent final.jpg
    Hide the vent final.jpg
    107.2 KB · Views: 17
  • Mirror 6.jpg
    Mirror 6.jpg
    98 KB · Views: 16
  • Hide the vent 5.jpg
    Hide the vent 5.jpg
    93.6 KB · Views: 14
  • Hide the vent 4.5.jpg
    Hide the vent 4.5.jpg
    118.2 KB · Views: 16
  • Hide the vent 4.jpg
    Hide the vent 4.jpg
    80.2 KB · Views: 15
  • Mirror 7.jpg
    Mirror 7.jpg
    118.8 KB · Views: 29
Back
Top