Can you butt-join two boards using Domino Break-down Connectors?

CTWoodworking

Member
Joined
May 5, 2022
Messages
1
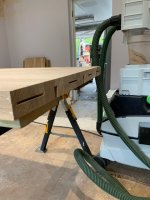
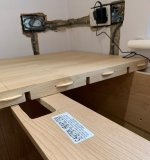
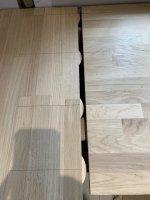
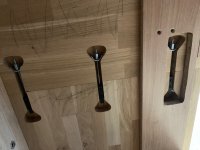
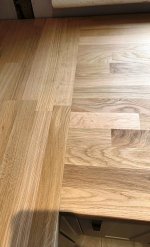
I've watched a good dozen videos on the Festool 500 break-down connectors, but I haven't seen anyone join, for example, two boards together end-to-end to make a longer board.  Specifically I have two bar-top pieces that I want to join together (the bar is supported, so it's not bearing weight), but also be able to take apart.  I'm hoping I could do four or five dominos across the surface and use break-down hardware to join them together in a reversible manner.  Has anyone seen this as an application and/or have harware recommendations?
 
I wanted to do something similar but there isn't a connector for the DF 500 that will accommodate is a workaround by using a corner connector to accomplish this.

2022_-_Festool_Catalog.pdf_2022-05-05_12-12-16.png


What I ended up doing was using Dominos for alignment and a few ZipBolts to hold the pieces together.

Woodcraft sells them. There's also a lower cost joint connector.
 
How thick is the material? What sort of size / weight ?

If you are careful you can use both the LR32 connector and the corner connector to butt joint a panel. Works ok in MR MDF, not tried in chipboard.

Regards

Dale
 
I joined all of the face frames together with the D8/50 KD connectors. Works well and everything is flush.

For your install you'll want the wood Dominos to support each section while the D8/50 connectors just pull it together. For a thick top I'd go to the DF 700 version.

[attachimg=1]


Attachments

  • 9321.JPG
    9321.JPG
    341.6 KB · Views: 999
I did it for a break down FRC lego table made out of a sheet of plywood.  I used some 8mm dominos for alignment and the connectors to D8 pull it together.  It seemed to work out fine, it's just like a butt joint.
 
4nthony said:
I wanted to do something similar but there isn't a connector for the DF 500 that will accommodate this.

2022_-_Festool_Catalog.pdf_2022-05-05_12-12-16.png


What I ended up doing was using Dominos for alignment and a few ZipBolts to hold the pieces together.

Woodcraft sells them. There's also a lower cost joint connector.

Am I missing something? There's no reason that you couldn't just use the "corner connector" placed flat as if you were doing a typical face frame or domino joined flat panel to panel connection like OP is looking for. The only oddity is that one side will get a 15 mm plunge, while the other side will get a 28 mm plunge with a hole drilled on the underside.
 
Another option would be to use regular dominos for alignment and a standard countertop connector bolt to tighten it up.

Just search the interwebs for "countertop connector" and you'll find lots of examples.

Ron
 
nvalinski said:
Snip.

There's no reason that you couldn't just use the "corner connector" placed flat as if you were doing a typical face frame or domino joined flat panel to panel connection like OP is looking for. Snip.
Agreed, given that "Specifically I have two bar-top pieces that I want to join together (the bar is supported, so it's not bearing weight."

A combination of the corner connectors and regular dominoes will do the job.
 
nvalinski said:
Am I missing something? There's no reason that you couldn't just use the "corner connector" placed flat as if you were doing a typical face frame or domino joined flat panel to panel connection like OP is looking for. The only oddity is that one side will get a 15 mm plunge, while the other side will get a 28 mm plunge with a hole drilled on the underside.

That's one way of thinking outside the box. Like the OP, I watched a bunch of videos to learn about the various connectors and never came across anyone doing this. Nor was I able to find any Festool literature showing your example. Maybe they should include this joint in their catalog.

In the end, I'm glad I found the ZipBolts I did, as it would've been a substantial investment, having to buy a set of connectors, a drilling jig, and cutter/bit for something I don't know how much use I'd get out of in future projects.

[cool]
 
There is another, far more expense, way to do this. That is the Lamello Zeta P2, along with a few Dominos. It is likely not as strong as the Domino style connectors, but it needs a much smaller hole for access to the fastener. 5mm
I use this quite often, but on something much thicker, like a countertop, I would use "Tite joint" bolts.
I cut the pockets for them with a simple template and a router.
 

Attachments

  • Dogbonetemp.jpg
    Dogbonetemp.jpg
    168.1 KB · Views: 183
Echo the Dominos plus pocket holes suggestion. Only glue one end of the tenon! The Dominos provide alignment and torque strength. The pocket hole screws draw the ends together.

Even with the Domino in place as you drive the pocket hole screws in, I’d clamp the joint. It’s very easy for the screws to pull the boards slightly out od alignment as you tighten them.
 
Birdhunter said:
Echo the Dominos plus pocket holes suggestion. Only glue one end of the tenon! The Dominos provide alignment and torque strength. The pocket hole screws draw the ends together.

Even with the Domino in place as you drive the pocket hole screws in, I’d clamp the joint. It’s very easy for the screws to pull the boards slightly out od alignment as you tighten them.

Yes, you would have to have either a lot more Dominos, closer together, or thicker materials that resist the flexing.
The other problem with the pocket screw method is that the original post was about being able to take it back apart. Sure, you can take the screws out, but how many times are those holes going to take that? The thing about the connectors is that they will come apart and go back together many many times, effectively indefinitely, because the parts are replaceable (at least with the Zeta) the Domino version might not be so easy? The metal wedge parts might be permanent, but then again, they are metal, so probably not needed.
The other advantage of the Zeta is that the parts are salvageable. If you take something apart to modify it in some way, you can roll the parts out of the slots and re-use them.
 
That’s a good point about how many times a pocket hole would hold up being disassembled.

If I were going to be assembling and disassembling often, I’d definitely use the Festool connectors. They are expensive however.

I’ve seen videos on the Zeta but never could justify the cost and I am really great on justifying tool purchases.
 
Birdhunter said:
That’s a good point about how many times a pocket hole would hold up being disassembled.

If I were going to be assembling and disassembling often, I’d definitely use the Festool connectors. They are expensive however.

I’ve seen videos on the Zeta but never could justify the cost and I am really great on justifying tool purchases.

I couldn't justify it as a hobbyist either. It even took me a while to buy the first one. We had a vendor come into the shop to demo it for us a few years ago. I really liked it, but didn't have an immediate "need" for it. Still nice to know the options of new things though. As it was, a perfect situation for it came up a few months later. The shop foreman and I talked the big boss into buying one. It worked out great and of course having it and having some experience with it open up the possibilities for other uses.
After the fire destroyed everything, I picked up another one in the first big lot of tools that I bought as replacements. It has done well for us, but that is in a big cabinet shop. It's too much of a one trick pony for a huge percentage of small shops. It's not like I didn't get by without one for many years, before they ever existed, just easier/faster now. That value is diminished if you aren't doing it for a living.
 
I use domino's and connectors for my extension table for the Hammer tablesaw. It doesn't. look or feel flimsy by any means. I can easily sit on it.
 

Attachments

  • Tablesaw_ext.png
    Tablesaw_ext.png
    1 MB · Views: 175
That's an interesting use of the connectors -- not for a furniture build, but for a detachable shop fixture.
 
You'll achieve a way, way stronger result using countertop butterfly bolts. You can still use either Dominos or biscuits to align the two halves of the joint, but these things will clamp up the joint really tight - much tighter than any knockdown connector. You can then separate the two halves in seconds with a ratcheting ring spanner. These pictures are of a 90-degree butt joint and show the whole process.


Attachments

  • IMG_0443.jpg
    IMG_0443.jpg
    507.5 KB · Views: 170
  • IMG_0452.jpg
    IMG_0452.jpg
    95.8 KB · Views: 163
  • IMG_0453.jpg
    IMG_0453.jpg
    69.3 KB · Views: 164
  • IMG_0454.jpg
    IMG_0454.jpg
    81 KB · Views: 149
  • IMG_0506.jpg
    IMG_0506.jpg
    719.9 KB · Views: 181
  • IMG_0518.jpg
    IMG_0518.jpg
    686.5 KB · Views: 154
Back
Top