Cedar Bee hives - TS55, MFT/3, Domino

dpetrzelka

Member
Joined
Mar 13, 2014
Messages
165
Just getting started on a new project - cedar bee hives. This is my first time using the MFT/3 and its working wonderfully.

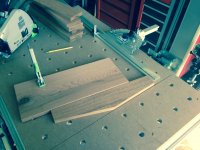
Everyone is aware of how easy crosscutting is on the MFT, but what I found even more valuable was the ability to very quickly/simply/safely set up a fixture for cutting the hive roof angles. Simple lined up the cut line on my first board with the splinter guard on the guide rail - set the fence as the forward stop, and clamped a board to the correct angle for repeat cuts.

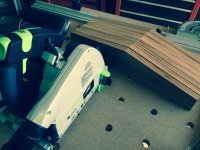
The rest where finished in a few minutes.

[attachimg=#]
[attachimg=#]
[attachimg=#]

More to come...
 

Attachments

  • photo 3.JPG
    photo 3.JPG
    497.8 KB · Views: 3,272
  • photo 4.JPG
    photo 4.JPG
    504.1 KB · Views: 3,185
  • photo 5.JPG
    photo 5.JPG
    464 KB · Views: 2,983
I decided to hand cut dovetails on the roof pieces, just for practice and a little show. (Good reason to use the dovetail I saw I made a few weeks back - Making a dovetail saw - FOG

I'll be doing all the hive bodies with dominos - rabbited, then dominoed as we've seen on domidrawers.

Photos coming soon.
 
Marking the boards in preparation for hand cutting dovetails - I'll use dominos on the hive bodies, just couldn't help but use my dovetail saw for these.

The_Hive_Project_makring_Gauge_Dovetail.jpg
 
I must be getting old, I'm coveting a hand saw  [embarassed]

Watching this thread as I need to make a hive in the next 6 months.
 
The MFT/3 and some 20mm dogs make dovetail marking quick and easy. When transferring tail angles to pin board it is critical to keep the pieces square and flush (or slightly proud as I do) - the dogs keep the tail board square to the front rail, and a quick clamp hold the pin board in place. Some clamping elements could be useful for holding the tail board in position.

The pencil is for lightly noting joining corners, I use a marking knife for transferring the dovetail angles.

I shot some stop motion video of the process that I will hopefully post soon.

The_Hive_Project_Cutting_Dovetails.jpg


In this shot I'm bringing the pin board up to touch the bottom of the tails - the tail board will be push back until it just barely proud. 

The_Hive_Project_Cutting_Dovetails_2.jpg
 
dpetrzelka said:
Marking the boards in preparation for hand cutting dovetails - I'll use dominos on the hive bodies, just couldn't help but use my dovetail saw for these.

Some lucky bees. Nice work!
Tim
 
Here are lid boxes with dovetail joints - soft cedar take some getting used to. I overshot on a few of my first cuts, but overall I'm satisfied with the fit.

The_Hive_Project_Dovetails_1.jpg


The_Hive_Project_Dovetails_2.jpg
 
I then routed 1/4" dados for the base of the lids. I had to do this in two steps as I needed to raise the 3/4 cedar up off the MFT/3 so my edge guide would have clearance. In doing that I ended up with clamps interfering with my router base.

It would be wonderful if that router had some green on it - this would be an ideal application for the MFK or 1010 - dust extraction with the cedar would have been a great advantage - a respirator was essential during this work. I went a little overboard with tools the past month - so this router will have to work - for now.

A stopped router table could have made quick work as well.

The_Hive_Project_Routing_Dado_Lid.jpg
 
I made a quick routing template for creating the handles int he sides of the hives. The template is very precise despite the image - I think we are seeing a little tear out on the back of the template plywood. The cutoffs from the lids were the perfect angle for the template - very little waste in this project.

I used homemade aluminum MFT dog as a left hand stop for the cedar board, and the stop flag on the fence for aligning the routing template - made for very quick and precise setup of the template for routing the total of 48 sides.

Makeshift dust extraction - essential with the cedar dust. I really need to think about a 1010 or 1400...

The_Hive_Project_Handle_Routing_Jig.jpg
 
MFT/3 with the clamping elements made setup for the domino quick and easy as well.
12 hive bodies, 16 dominos per body - 192 dominos. Since these will be in constant exposure to weather on our rooftop in Seattle, I decided to use Sipo Mahogany dominos for better rot resistance.

The_Hive_Project_handles.jpg


The_Hive_Project_Domino.jpg
 
I wanted to have these hives finished with oil, to show off the beautiful cedar, and the Surfix outdoor oil sounded like a good fit. I picked up the full kit - Thanks to Tom at Tool-home for the quick shipping.

I'll post some photos of of the ETS150/3, DTS400 and CT26 in action sanding these hives in prep for finish, but... I had to do a little test with the outdoor Surfix oil.

This domino had a little extra blowout around the mortise, as I cut the first few deeper than necessary. As I understand it, with the 5mm, when cutting deep mortises you can get a little flaring at the entry point. When this is inside the joint its hidden, and of no concern. With these exposed dominos, it works best, even though cutting through mortises, to set the bit depth to just slightly deeper than the thickness of the board. With the rabbit in the 3/4 cedar, I only needed 10mm, so the 12mm setting worked great on the rest of the dominos. I used the 20mm setting for the end grain of the long sides.

I'll put together a full post on the Surfix kit and oil application in the coming days - it really is quick and easy, and from my first test gives a beautiful finish.

A preview of what the fished hives will look like.

The_Hive_Project_Domino_Detail.jpg


The_Hive_Project_Surfix_Oil_Finish_1.jpg


Very nice, I love the router template.  I've been meaning to build some of my own, but too many other things have got in the way.  Good luck!
 
I brought them into the office in preparation for installing the hives this weekend - very happy with the results.

There may be other joinery methods that would have been quicker - but none combine the speed, beauty and strength of the Domino - and the great way you can set up contrasting woods, Sipo Mahogany and Cedar for example, just puts it over the top. Ultimately this project is about helping out the honey bees, and finding a way to engage our local community in discussion about how we can work together for a greater cause - but  the right tools make getting there so much more enjoyable.

10257283_634914969912346_7954287227153564220_o.jpg
 
For the finish I used Festool Surfix Outdoor oil.

Sanded with the ETS150/3, through grits 100, 120, 180. Then used the Surfix applicator to easily apply oil to all sides of the boxes. I used one small rag to get into the corners of the handles. After 15 minutes (about the time it took to put oil on all the boxes) I worked the oil in with a green vlies (fleece, correct? German V ≈ English F).
A quick wipe-down with a clean rag to remove excess oil and then let them sit about 6 hours. The final touch was to polish with the white vlies on the ETS150.
 
The DF500 Domino worked great for joining the peaked roof seam. Hopefully these photos demonstrate the process for those unfamiliar with the Domino.

The plan was to place 5mm Dominos down the center of the roof seam - as you can it was critical to keep them close to the inside edge to avoid blowout on the tops of the boards.

IMG_4546.jpg


I had a 20 degree angle to my roof, so set the Domino to 10 degrees to match each half (same angle the saw was set to for cutting the miter)
In most applications you use the good side of the board as reference for the Domino fence, but in cases of mitered joints like this you lay the board good side (outside) down and use the inside as your reference surface.

The first Domino is bored using the tightest setting, and the left hand paddle for alignment. The next two domino mortises are bored on the second width setting, and spaced 100mm from the inside edge of the preceding domino via the cross stops. The last two dominos are bored on the widest setting, also spaced 100mm from the inside edges of the preceding mortises. The other half of the roof is bored with the same size/spacing scheme, starting from the right hand side.

Be sure you have the DF500 turned on while changing the mortise width setting.

IMG_4550.jpg

IMG_4551.jpg


Here is what you end up with.
IMG_4552.jpg


The tight setting on the first domino assures perfect front alignment of the roof boards, while the extra width in the remaining domino mortises ensure a quick easy fit. All without taking any measurements.

The writeup makes it sound much more complicated than it is in practice - the whole procedure only takes minutes.
 
The bees are in and doing great.

[attachimg=#]
 

Attachments

  • 10173642_10204119186086846_7893400824220133631_n.jpg
    10173642_10204119186086846_7893400824220133631_n.jpg
    89.7 KB · Views: 1,716
Of course my TS-55 and CT26 came in handy for the rooftop deck build.

[attachimg=#]
 

Attachments

  • TheHiveProject_Blog-83.jpg
    TheHiveProject_Blog-83.jpg
    502.6 KB · Views: 1,494
Back
Top