Cherry cabinet

ear3

Member
Joined
Jul 24, 2014
Messages
4,341
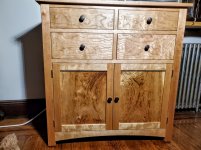
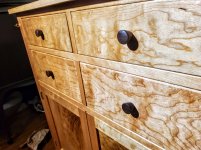
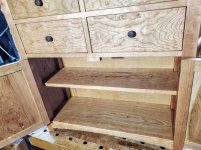
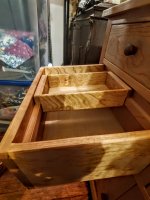
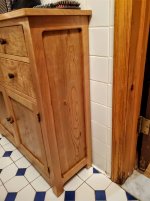
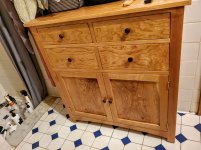
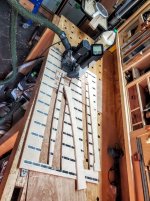
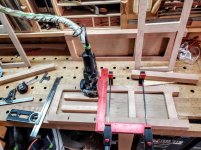
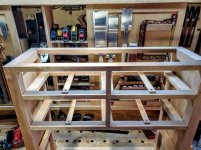
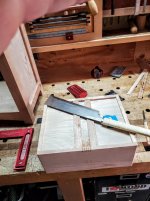
Recently finished a small cherry cabinet for storing toiletries and other stuff in my downstairs bathroom.  I'm not sure I quite achieved what I was trying to do with the grain -- I chose some of the more wild grain patterns from the boards I had on hand to do the doors and drawers.  But there's a marked contrast in effect between the upper and lower portions due to the different grain patterns, which is exacerbated by the fact that 1) I hand planed the drawers and therefore the grain pops considerably more than on the doors, whereas I only sanded the door panels; and 2) I bookmatched the door panels with a resawn board. 

Over time this contrast will lessen as the color of the cherry deepens -- in fact this has already begun as you can see in the pics of the cabinet in situ.  So I'm hoping after a year or so the color will meet somewhere in the middle.

[attachimg=1]

[attachimg=2]

[attachimg=3]

[attachimg=4]

[attachimg=5]

[attachimg=6]

[attachimg=7]


Attachments

  • 20211020_205702.jpg
    20211020_205702.jpg
    526.5 KB · Views: 656
  • 20211020_205720.jpg
    20211020_205720.jpg
    544 KB · Views: 657
  • 20211020_205759.jpg
    20211020_205759.jpg
    580 KB · Views: 641
  • 20211017_172222.jpg
    20211017_172222.jpg
    580.5 KB · Views: 647
  • 20211026_172034.jpg
    20211026_172034.jpg
    602.4 KB · Views: 643
  • 20211030_213057.jpg
    20211030_213057.jpg
    426.7 KB · Views: 648
  • 20211030_213103.jpg
    20211030_213103.jpg
    508.1 KB · Views: 649
Gorgeous Edward. That is stunning, as usual. That cherry will get even richer as it ages.

Ron
 
Personally, the choice of grain for the top vs the bottom reminds me of antique hand-built furniture or pieces with birds-eye maple that is used as an accent to an otherwise plain-grain piece.

I think it looks timeless and classic, and very nice.

Well done!
 
Looks great. Some nicely figured Cherry. I think you did very well in choosing and
laying out to make best use of the grain patterns. The door panels are awesome.
 
That is a good looking unit, the in-set drawers show some skill for sure. I especially like the sliding tray in the drawer. That is something that I have done in a couple of drawers in my shop storage drawers, except mine go front to back.
The only critique/question I have is about the construction of the sides. Why the rounded corners and off-set of the rail to style joint?
Not that there is anything wrong with it, they just don't seem to match the front?
 
Looks great. I think you chose the grain well. I’ve had similar questions with some of my cherry pieces at this stage but they aged well and, as you said, met somewhere in the middle. I love that about cherry.
 
Yeah, I hear you.  I built the sides before I had quite fully decided how I was going to do the front, and if I'm being honest, it was also a case of tools driving the design, as I wanted to incorporate a form done via the Origin, which provided the
template for the legs and the lower front stretcher.

[attachimg=1]

[attachimg=2]

[attachimg=3]

, as I
Crazyraceguy said:
That is a good looking unit, the in-set drawers show some skill for sure. I especially like the sliding tray in the drawer. That is something that I have done in a couple of drawers in my shop storage drawers, except mine go front to back.
The only critique/question I have is about the construction of the sides. Why the rounded corners and off-set of the rail to style joint?
Not that there is anything wrong with it, they just don't seem to match the front?
 

Attachments

  • Side panels.jpg
    Side panels.jpg
    404 KB · Views: 507
  • Template routing.jpg
    Template routing.jpg
    383.8 KB · Views: 513
  • Templates.jpg
    Templates.jpg
    398 KB · Views: 513
Origin project, well that makes sense. Did you use it for the joinery too? I have done some joinery work with mine, along with a few templates and some Soss hinges.
Honestly, I have just been to busy to mess with mine as much as I would like. I'm off of work between Christmas and New Year's, so I hope to get some time for it then.
 
[member=58857]Crazyraceguy[/member] Origin was just for the rail and leg templates.  Templates were the primary reason I got the Origin, and I haven't done a lot of direct cutting with it other than for pockets on slabs for butterfly inlays.
Otherwise the cabinet was put together with domino and dado.  Drawers are mounted with center guides on the underside screwed into the framing.

[attachimg=1]

[attachimg=2]

[attachimg=3]

Crazyraceguy said:
Origin project, well that makes sense. Did you use it for the joinery too? I have done some joinery work with mine, along with a few templates and some Soss hinges.
Honestly, I have just been to busy to mess with mine as much as I would like. I'm off of work between Christmas and New Year's, so I hope to get some time for it then.
 

Attachments

  • Domino side.jpg
    Domino side.jpg
    379.1 KB · Views: 451
  • Drawer guides.jpg
    Drawer guides.jpg
    373.1 KB · Views: 442
  • Drawer underside.jpg
    Drawer underside.jpg
    322 KB · Views: 447
That's a great combination of way "old school" with the center guides, yet modern construction method of Domino joinery. Realistically, since it's blind, without pictures "in progress", no one would even know that they were in there.

I see you're clamping a Woodpeckers square to align the Domino joiner. Have you considered doing that with the dog holes? I have used that technique to make it more repeatable for many parts, but it works well for just a few too.
 

Attachments

  • domino fixture.jpg
    domino fixture.jpg
    157.1 KB · Views: 308
Although my bench has MFT style top, the hole pattern is not CNC created, so would not support that level of precision.  I actually prefer this squaring method though, over doing it on my regular MFT.  It's not just the squaring, but also repeating the exact height on mating sides at multiple levels, which I do story-stick style via a combination square or ruler with rule stop.  This could be done via MFT hole pattern as well using a combination of dogs and spacer blocks to hit the needed offset, but in terms of how I work I have found that doing it with a ruler to set position of square directly is quicker, has less moving parts, and therefore least subject to error. 

Crazyraceguy said:
That's a great combination of way "old school" with the center guides, yet modern construction method of Domino joinery. Realistically, since it's blind, without pictures "in progress", no one would even know that they were in there.

I see you're clamping a Woodpeckers square to align the Domino joiner. Have you considered doing that with the dog holes? I have used that technique to make it more repeatable for many parts, but it works well for just a few too.
 
My dog hole table is a full 4' x 8' and very precise. I find it very easy and repeatable to do exactly as you said, dogs as a reference point and spacers to move the parts. This makes it so that the rail that the Domino references against never moves. This also gives you another place for pencil marks to add a center Domino.
I did a job several months ago that was a run of 8 separate shelving units that went from floor to ceiling  with fixed shelves. They were backless, viewable from both sides and the shelves alternated so that the ones next to each other were not at the same height. The spacers made it simple.
Sadly, no pics of that one.
 
Back
Top