CMS router table fence improvements ( micro adjust using crown stop) "updated"

Benjamin

Member
Joined
Oct 25, 2013
Messages
171
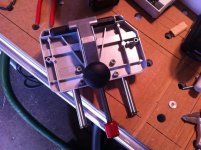
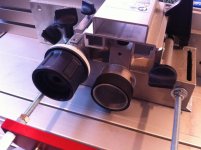
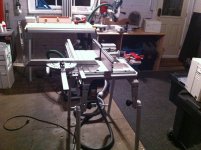
Just like JohnymanyB  me and a friend wanted to figure out how to improve on his cms fence and add a micro adjust to it,
so this is what we did.

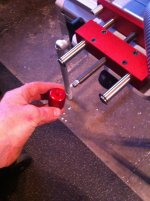
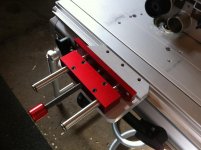
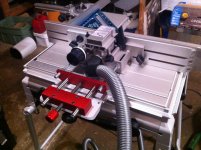
first we wanted to make it very light and simple so we to ordered the Wood pecker micro adjust as it is proportional to the rest of the cms table, rather then the larger possibilities . Next we wanted to be able to install it to the fence in a very short time period or I knew we wouldn't of used it or it would be to bulky to carry around, so we bolted the micro adjust to a festool crown stop . Next was to get around the hose connection at the back of the fence, but a couple weeks ago I figure out you could use a right angle attachment from the new tapered hose that comes with the Midi and attach it to the 36mm hose of the Y connection , and this now makes it possible to push the fence directly from the back of the table.

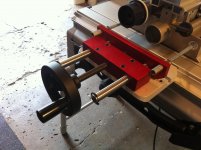
we next attached bolts to the fence that attached to the micro adjust with two nuts and there you go , a pretty simple micro adjust set up that only takes 10 seconds to attach.

and yes if you were wondering the fence is always perfectly square to the sliding table,  as the micro adjust is aligned so when you attach the fence to it it puts everything in sq. as the double nuts on each rod makes it possible to do fine adjustments.

( PS you need to flip the wood pecker micro adjust up side down as its not on a T track and this will make it sit flat)

"Update"

since this post we made a few changes that I thought some might find interesting.

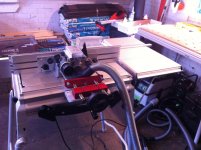
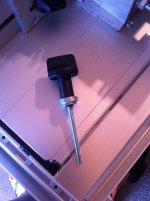
first I wanted to speed up the movement of the fence so I was able to take the knob off the wood pecker micro adjust and expose a 3/8th threading , so then I purchased a 4" hand wheel from Fastenal and attached it. It now moves very smoothly and much quicker back and forth , but also can be used for micro adjusting .

another thing we did ( which I'm guessing every one else has done by now ) is add a bunch more spacers to the festool knobs that holds the fence down, as I hated having to turn the thing 30 times before it was snug, so now with the added spacers it just turns 3 times and the fence is now snug done. (As I'm not promoting doing this for safety reasons )  but with the crown stop holding the fence in place you barley need to have any knobs at all as it almost doesn't move , but I place just one of them in for extra support.

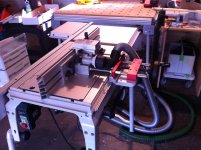
This comes down to the point of moving the fence really fast to switch out cutters and collets, with just 3 turns of one knob and 3 turns of the crown stop you can move the whole fence right out of the way and when your done place the fence back exactly where it was before, and as mentioned before completely square to the sliding miter gauge, so theres less tinkering with the set up every time you have to change something , which can drive you crazy.

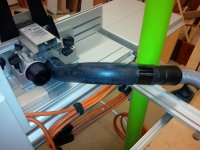
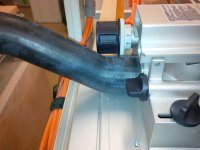
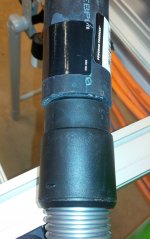
as for the right angle hose connection , the end is 50mm and the port on the fence is probably 45mm on the outside of the aluminum, so i placed a piece of the anti slip track strip around the opening and now the adapter fits nice and snug.

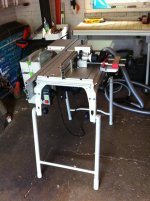
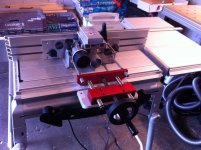
I hope this will be useful to those wanting to improve on there fence, as the table is a dream now that the fence is pleasant to work with.
 

Attachments

  • IMG_3823.JPG
    IMG_3823.JPG
    387.4 KB · Views: 4,293
  • IMG_3885.jpg
    IMG_3885.jpg
    351.3 KB · Views: 3,022
  • IMG_3883.JPG
    IMG_3883.JPG
    378.8 KB · Views: 3,684
  • IMG_3876.JPG
    IMG_3876.JPG
    362.1 KB · Views: 3,453
  • IMG_3874.JPG
    IMG_3874.JPG
    353.3 KB · Views: 2,438
  • IMG_3870.JPG
    IMG_3870.JPG
    374.9 KB · Views: 2,990
  • IMG_3872.jpg
    IMG_3872.jpg
    395.4 KB · Views: 2,199
  • IMG_3867.JPG
    IMG_3867.JPG
    349.6 KB · Views: 2,952
  • IMG_3837.jpg
    IMG_3837.jpg
    403.7 KB · Views: 2,843
  • IMG_3822.JPG
    IMG_3822.JPG
    261.6 KB · Views: 4,207
  • IMG_3825.jpg
    IMG_3825.jpg
    301.4 KB · Views: 3,674
  • IMG_3826.JPG
    IMG_3826.JPG
    411 KB · Views: 4,598
  • IMG_3827.JPG
    IMG_3827.JPG
    263.3 KB · Views: 3,514
  • IMG_3834.JPG
    IMG_3834.JPG
    392.7 KB · Views: 3,299
That's really a simple but effective approach.

Thanks for sharing the thinking and photos.

One question - effectively with this approach, you have to micro adjust ANY movement in the fence - there is no way as you have designed it to rapid adjust, or does the Woodpecker offer a fast advance option by chance?

neil
 
yes , interesting that you say that, what we ordered today was a crank handle ( similar to what you see on a table or band saw ) so when that comes in we want to attach it to the knob and were hoping this will speed the motion up hugely ,

as the crack is 4" wide so it will move 4X the rate , Cause remember most of a the motion is either moving the fence to switch a cutter or do some adjustment, so the fence really only has to move 3-4" one way or another to be effective .

I'll keep you posted on how it goes.

http://www.fastenal.com/web/products/details/3126310?searchMode=productSearch&zipcode=&filterByStore=&filterByVendingMachine=
 
I really love your design.  It's so much cleaner than mine.  FYI, I'm an anal bastard and drilling or doing any surgery to a $1,600 apparatus is just so emotionally hard, but your clean design makes it's really easy.  This is why I attached to the wing of the fence mechanism rather than the body.  The problem with this is that it adds so much more junk to the equation.  I have a degree in architecture and design-wise, you definitely did a better job.  I'm definitely gonna modify my design, adopting many of your ideas, but what I made works for now.

In terms of Neil C's question, I don't think that adding a table saw crank is what he's talking about.  Yes, this will make it physically easier to crank, but I think the rapid adjustment he's taking about is moving it, say, 2 inches without cranking.  What if you add a board with 2 perpendicular slots or 2 perpendicular t-tracks mounted onto the crown molding attachment.  Then mount the Woodpecker Micro Adjust onto the board/t-track with the knobs that came with it.  Now simply loosen the knobs to move it 1 or 2 inches, lock it in place, and then utilize the micro-adjust.

What do you think?

 
Jon - yes you read my question correctly, and I like your suggested approach as one way to enable a rapid adjust option.

neil
 
I am curious if there is a way to imitate this solution with a cms-vl... I know of the Incra LS solution, but I really like the simplicity of this one as well... Any thoughts?
 
jonmannyb said:
I really love your design.  It's so much cleaner than mine.  FYI, I'm an anal bastard and drilling or doing any surgery to a $1,600 apparatus is just so emotionally hard, but your clean design makes it's really easy.  This is why I attached to the wing of the fence mechanism rather than the body.  The problem with this is that it adds so much more junk to the equation.  I have a degree in architecture and design-wise, you definitely did a better job.  I'm definitely gonna modify my design, adopting many of your ideas, but what I made works for now.

In terms of Neil C's question, I don't think that adding a table saw crank is what he's talking about.  Yes, this will make it physically easier to crank, but I think the rapid adjustment he's taking about is moving it, say, 2 inches without cranking.  What if you add a board with 2 perpendicular slots or 2 perpendicular t-tracks mounted onto the crown molding attachment.  Then mount the Woodpecker Micro Adjust onto the board/t-track with the knobs that came with it.  Now simply loosen the knobs to move it 1 or 2 inches, lock it in place, and then utilize the micro-adjust.

What do you think?

Thx Jon,

I really like the idea but real soon me and a friend have a idea were going to impliment and if it works out the way we think it will I'll post the results
 
Sparktrician said:
I really like this version.  Where did you find the vacuum elbow?
[/quote

It's actually a 32mm end to the midi

I posted it done the page as ( 36mm right angle adapter )

Check it out
 
supimeister said:
I am curious if there is a way to imitate this solution with a cms-vl... I know of the Incra LS solution, but I really like the simplicity of this one as well... Any thoughts?

Yes the VL would probably be easier in the sense that you can use the dog holes of the mft to easily install and keep sq your micro adjust , I would just buy wood peckers micro adjust and try to install it to something like one of theses mounting plates that pop in the mft and then you could use your element clamps knobs to hold it down real fast and securely

http://www.leevalley.com/en/wood/page.aspx?p=70864&cat=1,43838,70865
 
Hi Jonathan

A very simple but clever idea - well done. I am sure that there will be many of these being made up very soon.

It appears from your photographs that you have done away with the screw knobs that Festool provide to hold their fence in place. Does your setup hold the fence firmly enough or do you have to use the Festool knobs once the fence is adjusted?

Peter
 
Benjamin said:
Sparktrician said:
I really like this version.  Where did you find the vacuum elbow?
[/quote

It's actually a 32mm end to the midi

I posted it done the page as ( 36mm right angle adapter )

Check it out

Excellent idea!  Thanks. 
 
Peter Parfitt said:
Hi Jonathan

A very simple but clever idea - well done. I am sure that there will be many of these being made up very soon.

It appears from your photographs that you have done away with the screw knobs that Festool provide to hold their fence in place. Does your setup hold the fence firmly enough or do you have to use the Festool knobs once the fence is adjusted?

Peter

Hi Peter,

Sorry I just didn't put them in before I took my photo graphs . yes I still use the one knob for extra security ,but you just unscrew it a turn and then you can micro adjust all you want.

Ben
 
If you want to use the Incra LS positioner instead, you could hang that on the Festool crown stop and connect it to the Festool fence just as you connect using the Woodpeckers micro-adjust...

RichK
 
Sparktrician said:
Benjamin said:
Sparktrician said:
I really like this version.  Where did you find the vacuum elbow?
[/quote

It's actually a 32mm end to the midi

I posted it done the page as ( 36mm right angle adapter )

Check it out

Excellent idea!  Thanks.

Just tried the 90° end from my Mini, but it does not make anywhere near a tight fit to the CMS' fence dust port.  Do you have the same issue?  I suspect that I could remedy this with a couple turns of electrical tape if needed. 
 
Sparktrician said:
Sparktrician said:
Benjamin said:
Sparktrician said:
I really like this version.  Where did you find the vacuum elbow?
[/quote

It's actually a 32mm end to the midi

I posted it done the page as ( 36mm right angle adapter )

Check it out

Excellent idea!  Thanks.

Just tried the 90° end from my Mini, but it does not make anywhere near a tight fit to the CMS' fence dust port.  Do you have the same issue?  I suspect that I could remedy this with a couple turns of electrical tape if needed.

yes same issue, as the opening is now 50mm I placed some gasket tape to make it more snug and air tight.

you could always just use the hose with out a end to it, that works as well, ( but not as  sophisticated )
 
richk said:
If you want to use the Incra LS positioner instead, you could hang that on the Festool crown stop and connect it to the Festool fence just as you connect using the Woodpeckers micro-adjust...

RichK

yes I think this could be a good possibility as well.  I just didn't want to have so much length hanging out the back of the table so I choose the wood pecker micro adjust instead for its petit size. Id like to see some one do it and get back to us on how it works.

I also didn't want to spend 4x the amount as the wood pecker
 
Benjamin said:
Sparktrician said:
Benjamin said:
Sparktrician said:
I really like this version.  Where did you find the vacuum elbow?
[/quote

It's actually a 32mm end to the midi

I posted it done the page as ( 36mm right angle adapter )

Check it out

Excellent idea!  Thanks.

Just tried the 90° end from my Mini, but it does not make anywhere near a tight fit to the CMS' fence dust port.  Do you have the same issue?  I suspect that I could remedy this with a couple turns of electrical tape if needed.

yes same issue, as the opening is now 50mm I placed some gasket tape to make it more snug and air tight.

you could always just use the hose with out a end to it, that works as well, ( but not as  sophisticated )

Well, I wasn't too happy with this situation, so I went to my friendly neighborhood auto parts place and had a good chat with my counterman.  He got into the Gates book and found what he thought would work.  Unfortunately, it didn't, so he ordered another.  It worked just about right.  One end fits snugly over the fitting on the CMS' fence and the 36mm hose end fits snugly into the far end.  No clamps are needed.  There is a 30° uptilt right off the fence's port, then a bend to the left which can be cut off if needed.  I may leave it on because it works well in my shop. 


Attachments

  • IMG_20140828_152546a.jpg
    IMG_20140828_152546a.jpg
    538.8 KB · Views: 1,512
  • IMG_20140828_152635a.jpg
    IMG_20140828_152635a.jpg
    638.9 KB · Views: 2,066
  • IMG_20140828_152649a.jpg
    IMG_20140828_152649a.jpg
    625.2 KB · Views: 1,726
  • IMG_20140828_152659a.jpg
    IMG_20140828_152659a.jpg
    553.7 KB · Views: 1,535
Sparktrician said:
Benjamin said:
Sparktrician said:
Benjamin said:
Sparktrician said:
I really like this version.  Where did you find the vacuum elbow?
[/quote

It's actually a 32mm end to the midi

I posted it done the page as ( 36mm right angle adapter )

Check it out

Excellent idea!  Thanks.

Just tried the 90° end from my Mini, but it does not make anywhere near a tight fit to the CMS' fence dust port.  Do you have the same issue?  I suspect that I could remedy this with a couple turns of electrical tape if needed.

yes same issue, as the opening is now 50mm I placed some gasket tape to make it more snug and air tight.

you could always just use the hose with out a end to it, that works as well, ( but not as  sophisticated )

Well, I wasn't too happy with this situation, so I went to my friendly neighborhood auto parts place and had a good chat with my counterman.  He got into the Gates book and found what he thought would work.  Unfortunately, it didn't, so he ordered another.  It worked just about right.  One end fits snugly over the fitting on the CMS' fence and the 36mm hose end fits snugly into the far end.  No clamps are needed.  There is a 30° uptilt right off the fence's port, then a bend to the left which can be cut off if needed.  I may leave it on because it works well in my shop.

pretty cool
 
Thanks for the Pics.  This is a really cool and efficient concept.  I'll definitely update my setup using a lot of your concepts.

Thanks again.
Jon
 
Back
Top