- Joined
- Oct 16, 2015
- Messages
- 5,834
This one is way out of the range of what I normally do, nice challenge anyway. It's kind of a design-build type thing. The office manager where I work asked me if I could build a box for his granddaughter, which also happens to be the receptionist's daughter. They gave me some general parameters and a knob for the drawer pull.
I had some Ash laying around that was left over from an old job. It started out as 1/2", but most of it was thinned considerably.
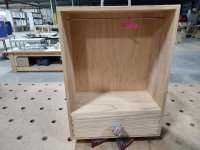
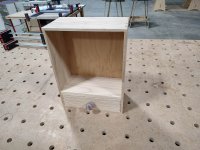
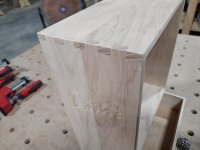
This "box" is really more of a miniature cabinet (Armoire without doors) for Barbie clothes and a lower drawer for loose accessories. It's essentially done except for drilling/installing the closet rod, final sand-finish, and coloring in the engraving.
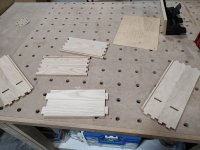
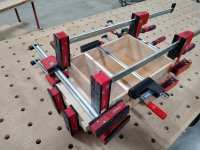
The main case is all 5/16" (8mm) except for the shelf above the drawer. I left it thicker to have more of a shoulder on the through-tenons, not sure it was necessary though? The drawer parts are slightly under 1/4" after fitting into the opening, with 6mm pre-finished Maple ply for the back and drawer bottom.
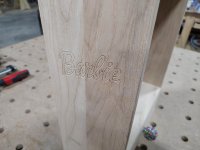
I got the Shaper Origin heavily involved on this one. The case and drawer have box joints, plus the engraving on the sides. I had the mom get me some copies of the logos that I could Trace and a sample of the child's own handwriting of her name.
I had some Ash laying around that was left over from an old job. It started out as 1/2", but most of it was thinned considerably.
This "box" is really more of a miniature cabinet (Armoire without doors) for Barbie clothes and a lower drawer for loose accessories. It's essentially done except for drilling/installing the closet rod, final sand-finish, and coloring in the engraving.
The main case is all 5/16" (8mm) except for the shelf above the drawer. I left it thicker to have more of a shoulder on the through-tenons, not sure it was necessary though? The drawer parts are slightly under 1/4" after fitting into the opening, with 6mm pre-finished Maple ply for the back and drawer bottom.
I got the Shaper Origin heavily involved on this one. The case and drawer have box joints, plus the engraving on the sides. I had the mom get me some copies of the logos that I could Trace and a sample of the child's own handwriting of her name.

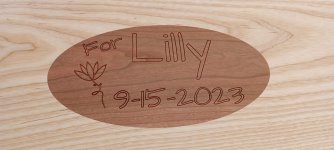
") . I "pre-treated" the area before inlay with shellac, but it wasn't enough to fill the deep open pores. If possible, mask the surrounding area as much as possible.
. I "pre-treated" the area before inlay with shellac, but it wasn't enough to fill the deep open pores. If possible, mask the surrounding area as much as possible.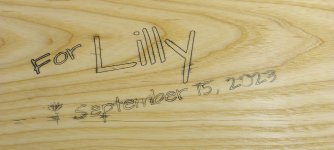
") )
)