Connecting two guide rails

Roman said:
Hi guys I know I am off topic but wondering if I connect 55" to 75" will be enough to cut 8 ft of ply , because there should be little overhang on both sides if I am not mistaken, thank you

I have 3 rails of different sizes. Getting the 75" rail if you have the 55" would give you flexibility and sometimes that means you don't have to connect rails with the 75". If you already have 2 55's though no sense buying another one unless you need it.
 
SteveD said:
I use a 6' length of 1/8" aluminium angle (that's aluminum to some) from the big box store for alignment.

[member=572]SteveD[/member], I think I understand what you're saying, but have you got a picture of aligning two rails the way you've described?
 
I initially hesitated on the Betterley StraightLine Connector because of the price but it is a precision piece of machined aluminum that would undoubtedly cost more from another domestic manufacturer (Beep! Beep!).

I love mine and find it well worth the price.  That being said, not all Festool tracks are extruded exactly the same so there can still be some unavoidable variation when connecting them.
 
You will know for sure your two tracks are not aligned if the saw does not move smoothly at the join. I use the Bettersley as well and leave it on when not using it during projects. I use the MFT rail for shorter cuts to avoid the hassle of disconnecting, reconnecting and aligning.
 
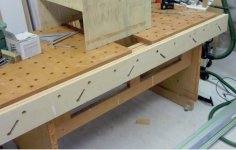
Ok pictures...

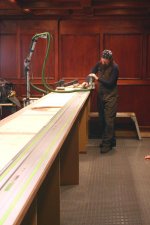
Rails1 - my workbench. MFT (sorta) style top, adjustable ends  for height and leveling feet. The slanted holes take the clamps in at 45 degrees and then they rotate 45 up to rest things on and clamp or 45 down to clamp vertical pieces. For solo working this is better as the clamps stay in place whilst moving things. The tops can be relocated closer or further apart.

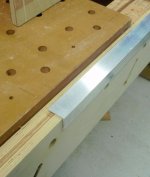
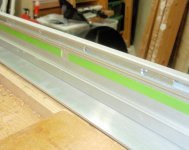
Rails2 - piece of aluminium angle on the edge.

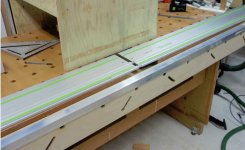
Rails 3 - lay the two rails together this way around.

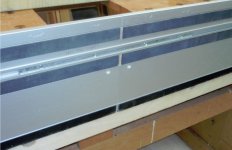
Rails4 - look! no hands! Rails are self leveling/aligning

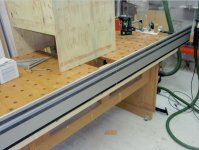
Rails5 - The sliding edge lines up - the connectors can be loose to get the least stress free fit and then tightened

Rails6 - you can easily get to both sides at the same time.

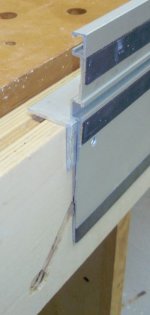
Rails7 - close up of the end showing how it fits/sits.

Gotchas ... When tightening the connector screws use your hips to stop the rails falling off onto your toes.

As noted with a long enough piece of aluminium you can align 3 shorter rails.
 

Attachments

  • Rails1.JPG
    Rails1.JPG
    92.7 KB · Views: 498
  • Rails2.JPG
    Rails2.JPG
    54.4 KB · Views: 454
  • Rails3.jpg
    Rails3.jpg
    113.2 KB · Views: 480
  • Rails4.jpg
    Rails4.jpg
    135.9 KB · Views: 481
  • Rails5.JPG
    Rails5.JPG
    93.3 KB · Views: 422
  • Rails6.JPG
    Rails6.JPG
    95.2 KB · Views: 450
  • Rails7.JPG
    Rails7.JPG
    28.4 KB · Views: 479
Sparktrician said:
As long as we're talking about the screws themselves, there is another option.  I find them far less likely to slip on the aluminum.  YMMV... 

These screws are definitely worth the money.  I've had a much easier time getting things tightened down and aligned without slippage since getting these.

I ended up buying extras just in case I lost some.
 
Sparktrician said:
As long as we're talking about the screws themselves, there is another option.  I find them far less likely to slip on the aluminum.  YMMV... 

[smile]

Not sure how I missed that thread until now, that looks like a good improvemrnt. Will give it a try, thanks much!!!!!
 
Paul G said:
Sparktrician said:
As long as we're talking about the screws themselves, there is another option.  I find them far less likely to slip on the aluminum.  YMMV... 

[smile]

Not sure how I missed that thread until now, that looks like a good improvemrnt. Will give it a try, thanks much!!!!!

I clicked on the link and got to the site. However, the part number in the original thread doesn't seem to exist anymore. At least I can't find it.
 
grbmds said:
Paul G said:
Sparktrician said:
As long as we're talking about the screws themselves, there is another option.  I find them far less likely to slip on the aluminum.  YMMV... 

[smile]

Not sure how I missed that thread until now, that looks like a good improvemrnt. Will give it a try, thanks much!!!!!

I clicked on the link and got to the site. However, the part number in the original thread doesn't seem to exist anymore. At least I can't find it.

It's there. Click on the soft tip conformable, it takes you to this page:

http://www.mcmaster.com/#set-screws/=w3fdan

Scroll down to metric nylon tip stainless...M6 x 1

EDIT: odd their URLs keep changing, posted the above via iphone and now doesn't go to the same via my laptop. Here's the direct product page based on the part # 93285A412 in that other thread. http://www.mcmaster.com/#93285a412
 
Hi Folks,

I don't know. Maybe because my rails are at least 12 years old, but I rarely if ever have a issue with connecting rails.
I also do it all the time. A lot. On a large job, 5 to 10 times a day. For me it's easier to transport the shorter rails then to risk damage to the 8 footers in the back of the pick up.
  I have also drilled and counter sunk holes in rails, screwed them vertically to a wall to correct a rather expensive error not of my creation. All i ever do is test run the saw or router to feel for a bump. I estimate 19 out of 20, I'm good. Then again I'm a carpenter not a machinist[attachimg=1]. It's wood Folks.
 

Attachments

  • guide rails.jpg
    guide rails.jpg
    55.5 KB · Views: 159
Back
Top