Connecting two rails in parallel for making dados

koze

Member
Joined
Jan 22, 2019
Messages
11
Hi,

New to FOG, and sorry if this has already been done but search gave me nothing.

I'm making cabinets with full width dados, and I find the process of aligning rails and measuring everything two extra times a bit tedious. Currently using the 1010 and the FS-OF 1000 but I constantly have to move it around for double width dados. I would love to put two FS rails in parallel and have some sort of adjustable spacer between the rails, and the just free hand in the space between. Is this doable, or should I just build a simple wooden jig for this?

Thanks
 
Renovatedspaces said:
How wide is the dado you are cutting?

It depends: 18 mm or 36 mm. And in terms of length, I'm routing 200-400 mm, and in some cases I'll just line up the sheets and do multiple dados in one cut.
 
I would go for a Festool MFS or similar. Also you could use a set of parallel guides to easily adjust for the wider cuts. And you could easily move the setup from piece to piece without having to remeasure.
 
Renovatedspaces said:
I would go for a Festool MFS or similar. Also you could use a set of parallel guides to easily adjust for the wider cuts. And you could easily move the setup from piece to piece without having to remeasure.

I'm sure the MFS is awesome, but I was hoping to achieve this with something simpler :)
The parallel guides look cool, but I'm not sure how to use them in this case. Could I use them with two rails to create a space in between?
 
Set the parallel guides to register the first pass with the router. Adjust to move rail by say 18mm
Over to widen the cut. You will need the rail guide for the router.
 
Renovatedspaces said:
Set the parallel guides to register the first pass with the router. Adjust to move rail by say 18mm
Over to widen the cut. You will need the rail guide for the router.

Comparing MFS and parallel guides on eBay, the price difference is not that huge. The guides are less and feels a bit more versatile since I can use them for TS cuts too (repeated cuts with TS is also pretty time consuming). As a first step I might just try to build a simple jig holding two rails in parallel and see how far it takes me. Thanks for the input!
 
So, these are the three options I have so far. One of them being an unknown jig/accessory to attach and align two rails and then free hand between them.


Attachments

  • dado jig.png
    dado jig.png
    20.9 KB · Views: 365
  • mfs.png
    mfs.png
    19.6 KB · Views: 307
  • parallel guides.png
    parallel guides.png
    20.6 KB · Views: 323
Michael Kellough said:
Do you really need to make two adjacent dados? Why not use the MFT?

The main problem for me is not making adjacent dados, it's making repeated dados and constantly readjust the rails and clamps and having to measure everything again. How could i use MFT for this? Or are you thinking of MFS? It's a bit expensive for my limited need, but I might consider it :)
 
Best way to layout/cut dados is by the center of the groove. Ideally you’ll have a bit that does the job in one pass.

You can move a guide rail and whatever other alignment hardware required across the work or you can move the work pieces under the guide rail on the MFT.

In either case you need to find the center of the groove the router will cut. Use the brad point 5mm dowel bit and plunge so the point makes a tiny dot on a scrap work piece. Adjust the router’s guide rail support rods so the offset from the aluminum rail is some easy number to work with like 20mm.

If the parts are small enough to place on the MFT add some kind of registration mark to the MFT that you can align the work piece to (align to center of groove). Drop the rail, add the router, adjust the depth (just for the first cut) and go. Remove router, lift rail, re-position work (or substitute next work piece), lower rail, add router, plow another groove.

If your work is nice and square and you need dodos on opposite ends and you set up the MFT then all you have to do is rotate the panel against a stop. In this case the outrigger foot will need to be set to ride on the MFT.
 
I recently had to make a box with a series of cubby holes in it and wanted to dado in the uprights, and came up with this easy, low tech way to get tight fitting dadoes on the undersize thickness plywood that I was using.

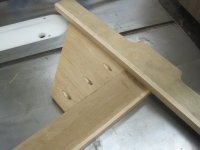
I made a T-Square with a leg long enough to span the material being dadoed.
[attachimg=1]

Showing the gusset added to strengthen the joint
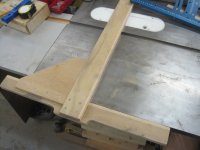
[attachimg=2]

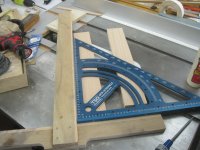
The finished assembly
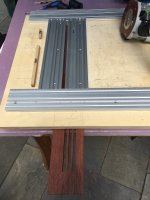
[attachimg=3]

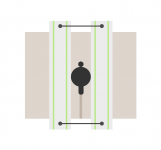
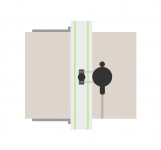
For some reason, I didn't take any photos past this point, but it's use is pretty easy to explain. Not shown in the part is the notch added to align the T-Square with the dado location - I use the Woodpeckers Story Stick to lay out the dadoes on each cabinet side for accuracy, and mark the TOP side of the dado. As I'm using a 1/2" router bit to cut the u/s 3/4" dado in two passes, the alignment notch was made with a strip of 1/2" thick MDF against the guide leg of the T-square, effectively moving the groove 1/2" over from the "normal" position where the edge of the router base runs against the guide. The first pass is then made with the T-square clamped to the part (the gusset makes a very handy clamping point) and the MDF strip against the long leg. After making the first pass, replace the MDF with a strip of plywood from the sheet that was used for the cabinet dividers and, moving in the other direction, make a second pass which opens the dado to an exact fit on the divider.

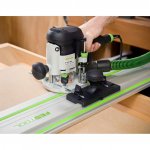
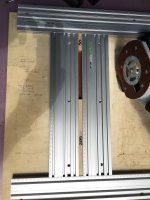
And, as the OP was asking how to do this using the Festool rail, I came up with this solution using the same basic method - you'l need a rail of the appropriate length, a GRS square with the angle accessory (short one should be OK) and a wood spacer. The base of the router would be guided by the rear (grooved) edge of the rail so that the Festool router adapter is not required. The angle would have to be modified by adding a couple of holes so that the wood can be attached to it. In use, the wood spacer would be attached to the angle and, still using a 1/2" spacer, the alignment notch cut in the wood spacer. At that point, the use is the same as my wooden version - line the notch on the wooden spacer with the layout line on the part, clamp both ends of the rail, put the 1/2" MDF spacer against the back of the rail and cut the 1/2" wide groove, remove the MDF and replace it with the plywood strip and cut the dado to the finished width. The big advantage of this method is that it can be used to cut dadoes of different widths as long as they're wider than 1/2", so that variation of thickness between different brands/batches of plywood doesn't affect it's use.

Actually cutting the dado takes less time than it took me to type out the instructions. I don't have a way to make a demo photo with the GRS square (still waiting for the drill jig to become available so that I can upgrade my early-model GRS) but I could maybe dig out the wooden square and try that. I replaced that method once I figured out how to adapt the EZ Bridge and SSRK to mount on the MFT, and use the stops on the SSRK to give me the end points for the dado - still using the 1/2" MDF and a piece of the plywood being used to set the stops on the SSRK.
 

Attachments

  • IMG_4955.JPG
    IMG_4955.JPG
    512.1 KB · Views: 861
  • IMG_4959.JPG
    IMG_4959.JPG
    447.9 KB · Views: 880
  • IMG_4960.JPG
    IMG_4960.JPG
    430.9 KB · Views: 850
Cheapest method:
If you want to space 2 FS rails, why not just cut 2 identical length stop blocks from wood, mark a center point on each of the blocks, align the blocks to your pencil mark for the center line of the dado, slide the rails up to the blocks and use the rail slots underneath the rails to clamp them to your work piece.
See photos below. In this case, I'm using the stop blocks to limit my router travel. However the concept is the same, 2 identical width/length blocks to maintain rail spacing.

More expensive method:
Purchase 4 Festool guide stops, 488752, and some 8mm (5/16") rod stock. Place a guide stop on each end of the FS rail and connect the guide stops with the 8mm rod. Once adjusted to the proper distance it's a simple matter of removing the guide stops, moving the rails, and then replacing the guide stops.

Most expensive method:
This also happens to be my preferred method.  [smile]
Purchase a MFS... [big grin]

[attachimg=1]

[attachimg=2]
 

Attachments

  • 4127_S.JPG
    4127_S.JPG
    686.3 KB · Views: 879
  • 4128_S.jpg
    4128_S.jpg
    593.4 KB · Views: 869
I just got a BCTW Kerfmaker in the mail yesterday to help with making dados. Check out

If the piece is long enough I envision keeping the router in the same position on the guide rail and using two stops on my MFT fence to move the work piece underneath the rail with the Kerfmaker. Or I have that little guide rod adjuster he uses in the video from my MFK fence. Either way works.

As mentioned above the easiest thing to do is use a bit the exact width of the material and find the centerline but I think in practice this doesn't work out unless you're doing cabinet back panels which can be a little loose.
 
Cheese said:
Cheapest method:
If you want to space 2 FS rails, why not just cut 2 identical length stop blocks from wood, mark a center point on each of the blocks, align the blocks to your pencil mark for the center line of the dado, slide the rails up to the blocks and use the rail slots underneath the rails to clamp them to your work piece.

More expensive method:
Purchase 4 Festool guide stops, 488752, and some 8mm (5/16") rod stock. Place a guide stop on each end of the FS rail and connect the guide stops with the 8mm rod. Once adjusted to the proper distance it's a simple matter of removing the guide stops, moving the rails, and then replacing the guide stops.

Most expensive method:
This also happens to be my preferred method.  [smile]
Purchase a MFS... [big grin]

or purchase one of these Mafell MF26cc which was my solution. Dado cutter width is adjustable from just over 1/2" to just over an 1". Cutter for 1/2" is being worked on by some other Mafell users. Many of us have asked Mafell to offer a smaller cutter, but it has been to no avail. There is no easier way to cut a dado.
 
Okay, Jim wins for most expensive solution.  Sorry Cheese!

I think Michael is on the right track (no pun intended).  You have two issues you are trying to solve for. 
1.  Setting up your panel and track for multiple dado's in the same location on multiple panels (don't measure and mark, they will all end up slightly off and the likelihood that you make a mistake goes up).
2.  Getting uniform width on dado's that require more than one pass.

For #1, assuming they are all sized similarly, set up a back fence at 90 degrees to your track.  Incra T track works nicely for this, just as long as it's shallower than the piece your are cutting.  Use the flips stops at the appropriate locations for your dado's.  When you finish a dado, flip up the stop and slide the panel down to the next flip stop.  Find a way to fix the track in a consistent 90 degree position in relation to the back fence and stops.  Some dogs and some 20mm holes in a worktop are fine.
https://www.woodpeck.com/drilling/drill-press-tables/woodpeckers-stainless-steel-arm-flip-stop.html

TTrack Plus
https://www.woodpeck.com/incra-tt-scale-track.html

For #2, use a pair of stop collars like the one's below.  Place one on the rod on either side of the router base and loosen the locking nuts on the router base and slide it along the rods to the other stop to make the second half of the cut.  Do some test cuts to get the width just right for your bit and desired dado width.
https://www.amazon.com/uxcell-Internal-Woodworking-Drill-Collar/dp/B00YCDSEVS

This doesn't involve too much of an investment and will give you accurate results.  And you'll always find uses for these parts. 
 
Wow guys, I did not anticipate this much effort in helping me with this. Much appreciated! I will try to experiment with the solutions you present in the thread. TBH I think one issue is my shitty work bench, I just moved in to a house and have not had time to build proper shop furniture yet. This makes it much harder to clamp down both rails and panels. I experimented last night with some simple spacers between two rails, but just aligning that setup with clamps, spacers between and under the rails etc took me much longer than just making one cut at a time with the router back up against the high groove side of the rail without any rail guide.

I actually decided to order a set of Festool parallel guides for evaluation, this will help me with repeated track saw cuts primarilly, but I think routing dados will be easier too since I can just slide the whole setup and make dados on multiple narrow panels in one cut. The MFS would have a more limited use case obviously.

Not a huge fan of the router rail guide (hard do get dado depth right, vertical play), but I think it might be my lack of experience that's the issue rather than the hardware :)
 
Back
Top