When dadoing with my router, I do not run the router on the rail. Granted this is awkward on narrow stock but this has not been an issue in my experience. The fact that the rail sits a few mm higher than the router base has also not been an issue for me. Sedge's tip on attaching the thin base to the 1400 to make up this difference is something I will use the next time.
You are using an out of date browser. It may not display this or other websites correctly.
You should upgrade or use an alternative browser.
You should upgrade or use an alternative browser.
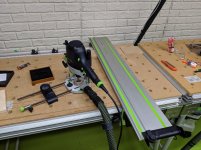
Connecting two rails in parallel for making dados
- Thread starter koze
- Start date
Cheese
Member
Here's another solution that will let you dial in distances on-the-fly.
While the MFS works well for widths that do not change, set & forget...if you have to continually make the width narrower, then wider, the MFS is rather clunky. The MFS can easily be set in .5 mm increments however it usually needs to be removed from the substrate you're working on for ease of adjustment. You then have to be able to accurately re-register the MFS on your previous dadoed groove.
The Micro Fence is really slick for both repetitive width dadoes and also for easily and accurately changing the width of repetitive dadoes. This way the rail is positioned and clamped down and all adjustments are made to the router carriage assembly. There is no re-registering of the rail.
For the imperial version, it can be adjusted in .001" increments and has a backlash of about .0015". There is also a metric version available that is adjusted in .5 mm increments. I chose the imperial version for it's better resolution. For actual .750" thick ply, if you need .754" you just dial it in and make a cut.
Because of the small amount of backlash, this is capable of extreme accuracy and very repetitive dimensions.
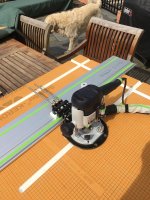
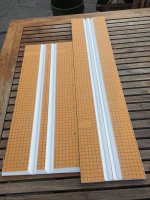
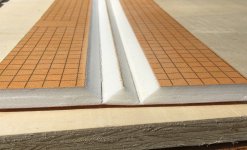
Here are a couple of photos of the Micro Fence in use on Kerdi board. In the 3rd photo check out how even and straight the peak of the 2 chamfers are on the RH piece of Kerdi.
https://microfence.com/product/interface-essentials-package-straight-line-only/
[attachimg=1]
[attachimg=2]
[attachimg=3]
[attachimg=4]
While the MFS works well for widths that do not change, set & forget...if you have to continually make the width narrower, then wider, the MFS is rather clunky. The MFS can easily be set in .5 mm increments however it usually needs to be removed from the substrate you're working on for ease of adjustment. You then have to be able to accurately re-register the MFS on your previous dadoed groove.
The Micro Fence is really slick for both repetitive width dadoes and also for easily and accurately changing the width of repetitive dadoes. This way the rail is positioned and clamped down and all adjustments are made to the router carriage assembly. There is no re-registering of the rail.
For the imperial version, it can be adjusted in .001" increments and has a backlash of about .0015". There is also a metric version available that is adjusted in .5 mm increments. I chose the imperial version for it's better resolution. For actual .750" thick ply, if you need .754" you just dial it in and make a cut.
Because of the small amount of backlash, this is capable of extreme accuracy and very repetitive dimensions.
Here are a couple of photos of the Micro Fence in use on Kerdi board. In the 3rd photo check out how even and straight the peak of the 2 chamfers are on the RH piece of Kerdi.
https://microfence.com/product/interface-essentials-package-straight-line-only/
[attachimg=1]
[attachimg=2]
[attachimg=3]
[attachimg=4]
Attachments

waho6o9
Member
Microfence rocks
I like to dado the full sheet and then rip to size when it's feasible.
I like to dado the full sheet and then rip to size when it's feasible.
Cheese said:Here's another solution that will let you dial in distances on-the-fly.
While the MFS works well for widths that do not change, set & forget...if you have to continually make the width narrower, then wider, the MFS is rather clunky. The MFS can easily be set in .5 mm increments however it usually needs to be removed from the substrate you're working on for ease of adjustment. You then have to be able to accurately re-register the MFS on your previous dadoed groove.
The Micro Fence is really slick for both repetitive width dadoes and also for easily and accurately changing the width of repetitive dadoes. This way the rail is positioned and clamped down and all adjustments are made to the router carriage assembly. There is no re-registering of the rail.
For the imperial version, it can be adjusted in .001" increments and has a backlash of about .0015". There is also a metric version available that is adjusted in .5 mm increments. I chose the imperial version for it's better resolution. For actual .750" thick ply, if you need .754" you just dial it in and make a cut.
Because of the small amount of backlash, this is capable of extreme accuracy and very repetitive dimensions.
Here are a couple of photos of the Micro Fence in use on Kerdi board. In the 3rd photo check out how even and straight the peak of the 2 chamfers are on the RH piece of Kerdi.
https://microfence.com/product/interface-essentials-package-straight-line-only/
[attachimg=1]
[attachimg=2]
[attachimg=3]
[attachimg=4]
That does look amazing, I will definitely check that out. Thanks!
Michael Kellough
Member
waho6o9 said:Microfence rocks
I like to dado the full sheet and then rip to size when it's feasible.
I’ve never done this but it seems like an excellent idea.
Ill put in a vote of confidence on micro fence too. Works so well I really don’t know what I’d do without it. Even use it to cut mortise and tenon joints. The owner/inventor/maker/showman Rich is a great to work with and makes really smart tools.
https://microfence.com/product/interface-essentials-package-straight-line-only/
Sean
https://microfence.com/product/interface-essentials-package-straight-line-only/
Sean
- Joined
- Feb 22, 2016
- Messages
- 2,858
koze said:Renovatedspaces said:Does this help?
This is how I make the cuts today, but constantly readjusting the rail is very time consuming.
Why move the rail? Once it's locked down leave it there and move the router on the rails of the router guide. There is enough adjustment to accommodate your desired dado width. Thinking about this if you had a couple stop collars that fit the FT router guide rails you could set one on each side of the router to set the dado width and slide the router back and forth (left to right) to make repeats cuts at your desired dado width.
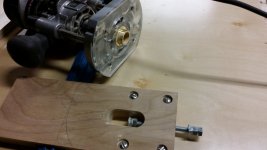
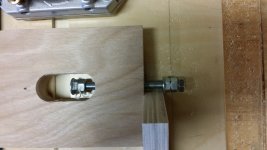
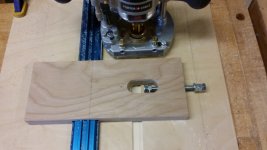
For making wide dados I made a jig for my compact router. It rides on a guide bar clamped to the work. I made it with a slot that the router rides in that fits a guide bushing on the router and my version let's me make dados up to just over 1" wide. It has foolproof adjustment using the workpiece to gauge the slot width that the router rides in. Once set its one pass up and another on the return stroke and I'm done, no moving the guide rail or adjustment required at all.
I have a couple photos somewhere (not accessible from this computer) I will dig up and add to this post. I made it in the spur of the moment with I had on hand when I was building some cabinets and needed to make a bunch of dados that would have been possible but difficult on the table saw. After a couple hours making the jig I sped through making all the dados easy peasy and every one was perfect.
Edit: turns out I can get to those photos from here.
")
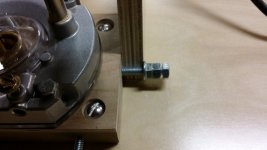
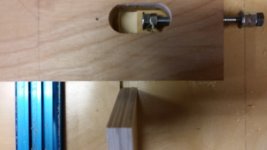
In the third photo is where you see how to set the dado width for the work. By adjusting the screw you can determine how snug of a fit you get. No measuring, just put your work in the gap and adjust the screw, then lock it in using the lock screw (out of view in this photo).
I leave a 1/2" bit in that router and that let's me make up to a 1 inch dado in two passes, but with a larger could go wider though I have yet to need that capacity.
It's worked so well I've never got around to making a more refined version. I took inspiration from a number of dado jigs I saw on the WWW. There are no plans. If you want one figure it out on your own as I did. There is more than enough information in these photos and on the web to put your own together in about an hour.
Attachments
Sean KS said:Ill put in a vote of confidence on micro fence too. Works so well I really don’t know what I’d do without it. Even use it to cut mortise and tenon joints. The owner/inventor/maker/showman Rich is a great to work with and makes really smart tools.
https://microfence.com/product/interface-essentials-package-straight-line-only/
Sean
What I don't get is how it's better than the less costly Festool FS-OF (apart from the fact that FS-OF seems incompatible with 1010)?
Bob D. said:koze said:Renovatedspaces said:Does this help?
This is how I make the cuts today, but constantly readjusting the rail is very time consuming.
Why move the rail? Once it's locked down leave it there and move the router on the rails of the router guide. There is enough adjustment to accommodate your desired dado width. Thinking about this if you had a couple stop collars that fit the FT router guide rails you could set one on each side of the router to set the dado width and slide the router back and forth (left to right) to make repeats cuts at your desired dado width.
For making wide dados I made a jig for my compact router. It rides on a guide bar clamped to the work. I made it with a slot that the router rides in that fits a guide bushing on the router and my version let's me make dados up to just over 1" wide. It has foolproof adjustment using the workpiece to gauge the slot width that the router rides in. Once set its one pass up and another on the return stroke and I'm done, no moving the guide rail or adjustment required at all.
I have a couple photos somewhere (not accessible from this computer) I will dig up and add to this post. I made it in the spur of the moment with I had on hand when I was building some cabinets and needed to make a bunch of dados that would have been possible but difficult on the table saw. After a couple hours making the jig I sped through making all the dados easy peasy and every one was perfect.
Edit: turns out I can get to those photos from here.
In the third photo is where you see how to set the dado width for the work. By adjusting the screw you can determine how snug of a fit you get. No measuring, just put your work in the gap and adjust the screw, then lock it in using the lock screw (out of view in this photo).
I leave a 1/2" bit in that router and that let's me make up to a 1 inch dado in two passes, but with a larger could go wider though I have yet to need that capacity.
It's worked so well I've never got around to making a more refined version. I took inspiration from a number of dado jigs I saw on the WWW. There are no plans. If you want one figure it out on your own as I did. There is more than enough information in these photos and on the web to put your own together in about an hour.
Very clever and pragmatic, I like it!
Michael Kellough
Member
koze said:Sean KS said:Ill put in a vote of confidence on micro fence too. Works so well I really don’t know what I’d do without it. Even use it to cut mortise and tenon joints. The owner/inventor/maker/showman Rich is a great to work with and makes really smart tools.
https://microfence.com/product/interface-essentials-package-straight-line-only/
Sean
The Micro-Fence is truly micro adjustable with zero lash. The Festool piece is pretty good but always has some +/- error.
What I don't get is how it's better than the less costly Festool FS-OF (apart from the fact that FS-OF seems incompatible with 1010)?
DynaGlide
Member
- Joined
- May 16, 2017
- Messages
- 1,588
[member=69732]koze[/member] I think you could skip the Micro fence altogether and use the Kerfmaker. In the attached picture I used a stop collar to set two distances for moving the router left/right to make a dado in two passes. The dado was so tight that the adjoined pieces had to be tapped apart. Alternatively I could've made the joint a little less tight by not pushing hard on the Kerfmaker when setting it up.
The nice thing with this setup is you could use the Kerfmaker between a stop on the fence and the material and not move the router at all. Set it up for the first pass, flip it over against the fence stop, move the board and run the second pass. I did this as well and it came out the same. At no point during this process did I have to take any measurements. The video on its uses was posted above in my previous post.
I bought mine from Canada to the US and it was around $60 shipped.
https://www.northwestpassagetools.com/collections/bridge-city-tool-works/products/km-1-kerfmaker
Attachments
Similar threads
- Replies
- 5
- Views
- 1K
- Replies
- 20
- Views
- 3K
- Replies
- 58
- Views
- 3K