per@landberger.com
Member
- Joined
- Jul 6, 2021
- Messages
- 11
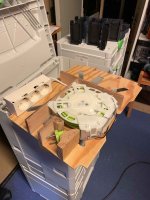
Since I wasn't really happy with the SYS3 M 187 ENG 18V I decided to build my own charging station. I want a charge station that is ready to go as soon as I open the lid. Festools box need to be unpacked and the chargers picket out and connected one by one to an outlet.
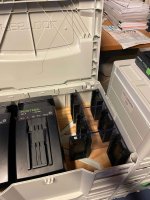
Since I wanted a as small as possible box every mm counts. The bottom is made of 4mm plywood. The walls are made of oak, just because that's what I had in small pieces. The power cord is a selfwinding roll from a vacuum cleaner, or rather for a vacuum cleaner; I ordered it as a spare part from Electrolux. I chose the color of the cord because it felt thematically correct for Festool.
[attachimg=1]
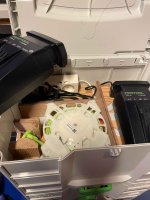
Everything is made to fit perfectly so there is no need to glue or screw everything together. They squeeze into the box and keep each other in place.
You can see I cut a hole in the box for the cord plug, and made room enough for the plug to go all the way into the box so that I can stack two boxes next to each other without risking to damage the cord. The cord winder fortunately had a very short release, you can see the metal wire part ontop to the right of the roll. It's so short between locked and winding that I din't have to make a button to press to wind the cord. I just placed it close to the wall of the box. It's enough to just press the side of the box to start winding.
[attachimg=2]
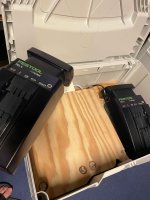
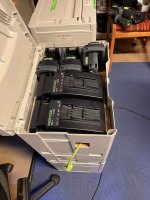
Here the bottom with cord winder inserted into the box and the chargers connected.
[attachimg=3]
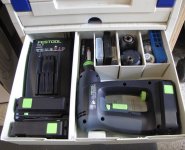
The lid that covers the cord is in place. Since the box is so small I had to cut out a few layers of the plywood for the feet of the chargers to make them fit under a closed lid of the box. This also keeps the chargers in place both when attaching or removing batteries, as well as when the box is closed.
[attachimg=4]
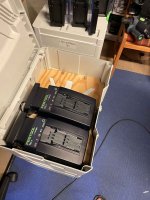
Chargers in place.
[attachimg=5]
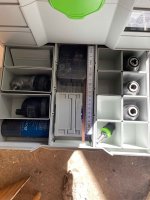
And then of course some holders for batteries. I made the walls from acylic plastic because I had a good glue that make very strong joints between acrylic, or between acrylic and ABS, from which the holders are 3D-printed. I might not have had to use holders since the compartments barely fits the 5.2Ah batteries, but now I can also securely put 3.1Ah batteries there. The two holders in the front of the box are specially for the 4.0Ah batteries since they are a little wider and higher than the 5.2AH or 3.1Ah. And again, it's a tight fit. The battery holder set angled to the others is to avoid the framework of the box's lid.
The holders are placed at the bottom of the box so I can't push the bateries all the way into the holders. This prevents the batteries barbs to hold the batteries stuck in the holders, since there is no room to put down your fingers to release the batteries.
[attachimg=6]
Finished box with some batteries and the cord sticking out!
Since I wanted a as small as possible box every mm counts. The bottom is made of 4mm plywood. The walls are made of oak, just because that's what I had in small pieces. The power cord is a selfwinding roll from a vacuum cleaner, or rather for a vacuum cleaner; I ordered it as a spare part from Electrolux. I chose the color of the cord because it felt thematically correct for Festool.
[attachimg=1]
Everything is made to fit perfectly so there is no need to glue or screw everything together. They squeeze into the box and keep each other in place.
You can see I cut a hole in the box for the cord plug, and made room enough for the plug to go all the way into the box so that I can stack two boxes next to each other without risking to damage the cord. The cord winder fortunately had a very short release, you can see the metal wire part ontop to the right of the roll. It's so short between locked and winding that I din't have to make a button to press to wind the cord. I just placed it close to the wall of the box. It's enough to just press the side of the box to start winding.
[attachimg=2]
Here the bottom with cord winder inserted into the box and the chargers connected.
[attachimg=3]
The lid that covers the cord is in place. Since the box is so small I had to cut out a few layers of the plywood for the feet of the chargers to make them fit under a closed lid of the box. This also keeps the chargers in place both when attaching or removing batteries, as well as when the box is closed.
[attachimg=4]
Chargers in place.
[attachimg=5]
And then of course some holders for batteries. I made the walls from acylic plastic because I had a good glue that make very strong joints between acrylic, or between acrylic and ABS, from which the holders are 3D-printed. I might not have had to use holders since the compartments barely fits the 5.2Ah batteries, but now I can also securely put 3.1Ah batteries there. The two holders in the front of the box are specially for the 4.0Ah batteries since they are a little wider and higher than the 5.2AH or 3.1Ah. And again, it's a tight fit. The battery holder set angled to the others is to avoid the framework of the box's lid.
The holders are placed at the bottom of the box so I can't push the bateries all the way into the holders. This prevents the batteries barbs to hold the batteries stuck in the holders, since there is no room to put down your fingers to release the batteries.
[attachimg=6]
Finished box with some batteries and the cord sticking out!