Custom router table

Joelm

Member
Joined
Feb 25, 2019
Messages
218
I started another thread about shop upgrades to help reclaim space in my workshop. One of the suggestions was to combine on of my tables with my router tablehttp://festoolownersgroup.com/festool-tools-accessories/shop-upgrade-help/

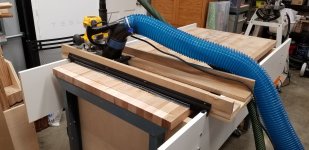
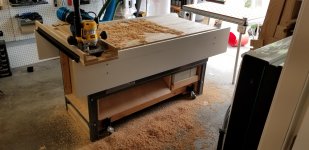
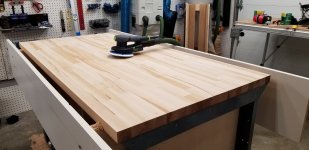
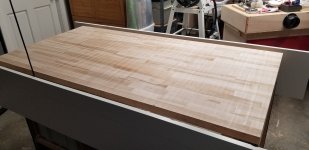
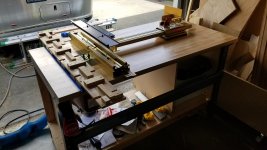
Here is what I've got so far.

I bought an Inca Mastr-Lift ll, cleansweep and LS positioned (still waiting on the last one). After I ordered everything I discovered my table top had warped over the years. I made a sled for my old router and flattened to top this morning.

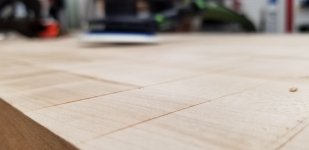
I have a question for those wo have done this before. My table is flat but I notice each pass looks stair stepped from each other. The height is very small, maybe 1/64th of an inch. Is this normal or did I not align something correctly with my rails?I'm thinking I can smooth it out with my ets 150.
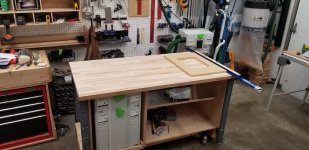
Anyway, pictures:
 

Attachments

  • 20190807_152902.jpg
    20190807_152902.jpg
    2.5 MB · Views: 655
  • 20190808_221616.jpg
    20190808_221616.jpg
    2.4 MB · Views: 548
  • 20190809_114443.jpg
    20190809_114443.jpg
    2.7 MB · Views: 544
  • 20190809_115243.jpg
    20190809_115243.jpg
    1.3 MB · Views: 547
  • 20190809_151239.jpg
    20190809_151239.jpg
    1.6 MB · Views: 503
[member=70049]Joelm[/member]  - have you checked the router spindle for square to the work piece?
if you are using a sled, that would be a good place to look. But the router spindle must also be dead square to the base of the router.
even a slight variance will result in the kind of steps you reported.

The larger the cutter diameter, the more critical this becomes.

share with the FOG how you solved the problem!
Hans
 
Could you try flipping the carriage around end to end for one pass so if there is an error you should be able to cancel it out (theoretically).

Also, if you are going to try to sand it out with your ETS you might want to invest in the Hard pad if you don’t already have it.
 
Is the step the same depth all the way across? If it is the problem is in the area Hans pointed to. If the steps are deeper in the middle then it’s flex in the MDF sled. Could also be a combination of the two.

It’s extremely difficult to get a step free surface with this method which is why dishing bits are often used rather than flat bottom bits.

I’d do what Alanback suggested before moving on to sanding.
 
Hey,  thanks everyone for the quick replies.

I checked the router bit and it was ever so slightly off. I've carefully reseated it in the plunge base and it is now perfect.

I also checked the sled with a straight edge and it is bowed slightly. I think I'll try to straighten it out and screw some strips of 3/4 plywood to the sides to keep it from bowing again.

I do have a hard pad and tried sanding it down for about 20 minutes. It started to smooth out  but the lowest grit I have is 80. I've ordered some 40 and 60 grit sandpaper from Amazon and it should arrive tomorrow.

I'll try and do another pass tonight after the kids go to bed. Thanks for the awesome advice.
 
Here is my latest update. I rechecked my router bit for alignment and found it out again. I left it as is and went ahead and bent my sled straight with 2 clamps on either side and a straight edge to tell me when I was straight. I then screwed 2 strips of 3/4 plywood top the outsides and did another 2 passes.

Going in one direction then flipping the sled 180 degrees and going over everything again. There were some seams and swirl patterns on the surface but it measured flat.

I then sanded with 40 grit paper for 6 passes to get rid of the swirls and then 2 passes of 60, 80, 120 and 220 grit paper. This is the first time using my ets 150 since getting it for father's day and I love it! I did go out and buy a boom arm for my CT today and enjoyed that too. I've always enjoyed sanding but this sander makes it that much more enjoyable.

I've layed out when I will rout the hole for the router plate and where I plan on placing the miter slot. The left side of my table houses some systainers on a drawer so I want to leave it there. The rest of the table used to house my 3d printer but I'll put my cleansweep there and hopefully have space for my wonderfence.

I'm thinking once I've routed the hole for the Mastr-Lift and miter slot I'll coat the top and bottom with wipe on polyurethane. I really don't want the top to warp again so I'm going to cover the underside and edges of the hole as well.

Any thoughts or comments are welcome.
Thanks
 

Attachments

  • 20190813_211245.jpg
    20190813_211245.jpg
    2.6 MB · Views: 407
  • 20190812_212047.jpg
    20190812_212047.jpg
    2.1 MB · Views: 402
  • 20190812_204558.jpg
    20190812_204558.jpg
    2.1 MB · Views: 359
  • 20190809_204218.jpg
    20190809_204218.jpg
    2.4 MB · Views: 412
Consider (and see if you can fit) some type of structural support under the table to help prevent sagging. A piece (or two) of thick laminated hard maple or a piece of angle iron might do the trick. Now you just have to figure out where it can go and not be in the way.
 
After a summer of visitors and travel I finally was able to finish up my router table. At some point I'll add drawers and close it up so it looks better but for now it is working out great. I've even managed to scratch my table top already.
 

Attachments

  • 20190912_125742.jpg
    20190912_125742.jpg
    1.4 MB · Views: 382
Back
Top