So it bends symmetrically. There are 3 sections to accommodate 360 motion. Gears prevent it from bending into Z-shape.casper said:A great build and good thinking but I am curious why the gears are used?
You are using an out of date browser. It may not display this or other websites correctly.
You should upgrade or use an alternative browser.
You should upgrade or use an alternative browser.
DIY Fully Articulating Boom Arm you can make to use with Festool products
- Thread starter martin felder
- Start date
- Status
- Not open for further replies.
I have nothing specific in mind. Just seemed like another alternative where you could use stuff lying around. As already mentioned drive belt could work well. Also, one strap could go on the lower hinge, the opposite on the upper hinge.martin felder said:Thanks Svar,
If you have a link to a particular product for straps you recommend as a nice durable option, I can try it.
Two observations, you can buy Unbrako bolts that are ground to size and fit with far less clearance in the bearings. Secondly, it occurs to me that if the gear was on top it would be under tension and not compression and this may result in less friction within the gear teeth and the tooth mesh could be adjustable if it was necessary. The mesh clearance could be done after the arm was fully assembled as well. I saw reference to another thread but can't seem to find it.
Cheese
Member
casper said:Two observations,
1. you can buy Unbrako bolts that are ground to size and fit with far less clearance in the bearings.
2. it occurs to me that if the gear was on top it would be under tension and not compression and this may result in less friction within the gear teeth and the tooth mesh could be adjustable if it was necessary. The mesh clearance could be done after the arm was fully assembled as well. I saw reference to another thread but can't seem to find it.
You're referring to shoulder bolts, that was also one of my previous thoughts for the retention of the bearings.
[attachimg=1]
I agree, any slight sagging of the arm will release pressure on the gears if they are mounted on the top of the arm. If mounted on the bottom, the gears could get jammed up.
Attachments

Michael Kellough
Member
I like the straps idea Svar illustrated. Almost anything should work from nylon to neoprene. I’d go with neoprene because if you assemble the joints so the strips are slightly compressed that will also take care of the need to dampen movement.
martin felder
Member
- Joined
- Dec 17, 2019
- Messages
- 121
For the shoulder bolts, not sure if that applies to this design (wood version) but I could be mistaken. On the bearings, I wanted them to be sandwiched between the top plate and the arms on top, and between the bottom plate and the arms on the bottom. I wanted wide diameter bearings. I found the 2 inch OD but the center bore was well over what would be used as a bolt. So, I figured with the Forstner bit, that would seat the bearings, and the hole in the middle would allow the bolt to go through. If it was not for the gear having a 10mm bore, I could have used 3/8 or 1/2 inch bolts. If a certain shoulder bolt is a good choice, I could try it out if given a link. I think what helps keep the gears from being compressed or separated is the fact that there is support on top and bottom with a good amount of distance in between. The bottom line is that what I have now is easy to make and is working perfectly and holding up so far. I do not know how well it will hold up in 2 years until 2 years from now no matter what I do, but I am trying to stress it, and it is passing.
On these straps, if someone give me a link to a specific product, I am happy to buy it and try it.
On these straps, if someone give me a link to a specific product, I am happy to buy it and try it.
Michael Kellough
Member
Changing my mind about using simple neoprene, reinforced flat belting would be better.
The McMaster page
Smaller width belts are the same cost. If you need two 3/8” belts you could buy one at 3/4” and rip it in two. You order by circumference so just get one belt a couple inches longer than the radius X2 for each side of the knuckle and then cut the belt in two equal parts. That’s two belts, or one that’s twice as long and cut it into four equal lengths.
Also, rather than reworking the spacing of the holes in the parts to try and compress the belting (to get some resistance to motion so the arm stays were you park it) and following Svar’s comments about any kind of (low friction) ball bearing being overkill, you could simplify drilling and reduce cost by using bronze bushings or steel sleeves. A little friction is good and the arm gives you plenty of leverage to easily overcome it.
McMaster page of 1/2” bore press fit drill bushings
I’d use ordinary nominal 1/2” bolts with these (usually a little smaller than the nominal size). Precision shoulder bolts will require precise drilling and pressing on bushings.
Another option is bronze bearings. Use ordinary bolts with these too.
McMaster page for DRY bronze bearings for 1/2” shaft
These won’t stain the wood. I’d use the largest od bearings so there is less wedge force on the wood. I’m a little nervous about the change to wood. If the wood holding a bearing splits the arm could fall? You could make it safe by running a bolt side to side through the wood.
The way I have the bearing on the boom arm I made, seems to work perfectly. I drilled and reamed out a hole to fit the 26mm bearing and pressed the bearing in..that bearing is NOT coming out at all unless driven out. With the boom arm that MartinFelder is making, the bearing is seated in the slot he drilled using the forestner bit. It's not moving either and it works very well for what he is doing. As for using straps instead of gears, what is to keep the strap from slipping off the rounded plate when rotated (since that plate is only 5/16" thick aluminum or..3/4" lumber if that's what is used) when slack on the strap is present? Perhaps some sort of "Lip" on the top and bottom plates? The gear really does work well in keeping the arms aligned and was not hard to secure onto the plates.
Michael Kellough
Member
Glad to hear it’s working well as is. What I posted might be better suited for another forum where the economy version is desired.
simo.ahtola@netikka.fi
Member
- Joined
- Jan 29, 2015
- Messages
- 16
Hei,
Very interesting development!
How about if you replace the gears with pieces of bicycle chain?
- fixed from both ends, and if falling down you could add nails or similar that gets on the slots in the chain.
BR. Simo
Very interesting development!
How about if you replace the gears with pieces of bicycle chain?
- fixed from both ends, and if falling down you could add nails or similar that gets on the slots in the chain.
BR. Simo
martin felder
Member
- Joined
- Dec 17, 2019
- Messages
- 121
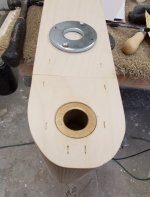
As an update, the first boom arm was mounted to the bracket with a 6 inch long 3/4 diameter hole drilled through wood. That worked out great. On the next boom arm, it was not plumb. The drill bit used was not long enough to go all the way through with 1 pass from 1 direction. I figured that could be a problem for others.
So, modification using flange bushings
[attachimg=1]
With this, you can use Forstner bits to drill accurately a short distance into the wood from both directions and have a larger hole in between so the rod is secured top and bottom.
Anyhow, getting close to final plans. The boom arm works, but wanting to get a few things dialed in for upgrades that will make construction easier.
Attachments
martin felder
Member
- Joined
- Dec 17, 2019
- Messages
- 121
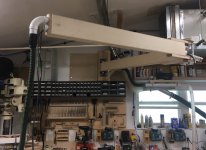
Picture of the current mounting bracket
[attachimg=1]
Picture of the boom arm mounted
[attachimg=2]
In the picture of the mounted boom arm, it was taken as I was passing the power cords (1 plug-it and 1 standard). It is fully functional with the wood version of the center pivot point. Some day I will swap it out for an aluminum version. It works and it is great having a working articulating boom arm in my shop.
My plan was to post a detailed guide at this point. However, a couple of things I want to first upgrade. On the mounting bracket, there is just a little bit of sag. That would be remedies by shimming out the bottom bolts, but still a bit of sag when to the side. That is not present on my friend Randy's boom arm and I am wanting something just right if I am going to suggest it to others.
Another imperfection is there is just a slight twist of the first section of the boom arm with the second arm off to the side, and I am thinking the first arm could be made a bit beefier, with care being taken not to add too much weight. Along with that, I could have the first arm be a bit taller at the area of the mounting bracket to have a longer rod as was mentioned.
I would be curious if someone has a link to what may be a better option for a mounting bracket.
Attachments

NuthinFancy
Member
- Joined
- Jan 19, 2020
- Messages
- 7
I just discovered this thread and am keenly interested as I intend to build something very much like your intriguing design.
It's clear you've put a great deal of thought and effort into this project - thank you for sharing the results of your work.
It's been a couple of months since your last post - I'm sure I'm not the only one who is interested to hear how it's been working.
My requirements are slightly less demanding: an arm to support only a vacuum hose and a power cord.
Got tired of dragging it around and getting hung-up on every doggone thing I try to cut, route, or sand.
My first model was two pieces of 3/4" BB plywood, each 60 inches long. I cut these lengthwise in a taper; 8" at the wide end (attaching to wall) to 4" at the boom arm end of the second piece. Perhaps too concerned about weight, I then cutout sections in both pieces, leaving a vertical 1-1/4" "post" every 5-1/2".
Attached the wide end of piece 1 to a 3/4" BB plywood plate, this was then screwed to a stud wall with large lag screws and washers. The first piece (60" long) was stable and quite solid. Adding the hinge and the second 60" arm served to educate me in the amount of torque the hinge mechanism and arms must deal with and helped me appreciate the triangular structure used on crane arms.
The second arm was fine - as long as it was perfectly inline with the first arm - effectively behaving as single piece would - but any deviation from that plane and the whole affair sagged and the outer arm flexed significantly. This with no load at all.
Back to the drawing board, more research, and now, your post.
- Joined
- Jan 22, 2007
- Messages
- 1,486
NuthinFancy said:It's clear you've put a great deal of thought and effort into this project.....
It's been a couple of months since your last post
I haven't commented on this thread, but I cannot sit back and see someone praise the guy for something he didn't do. No, he didn't put an ounce of thought into it. He literally stole everything from me after having one of my boom arms in his possession to take photographs of it. He was literally asking people what the purpose of some of the design components were...because the design wasn't his, and it was completely over his head. He was also posting this solely to harm my business...and that is why he let this thread die...literally on the same day that Paypal issued his refund.
Oh, and in case you think I'm making this up, he screwed over another contractor that many of the members here also know. My "Customer from Heck" also turned out to be "Finish Carpentry TV's" customer from heck. See his video here:
Banana
Member
- Joined
- Dec 21, 2019
- Messages
- 89
Rick Christopherson said:NuthinFancy said:It's clear you've put a great deal of thought and effort into this project.....
It's been a couple of months since your last post
I haven't commented on this thread, but I cannot sit back and see someone praise the guy for something he didn't do. No, he didn't put an ounce of thought into it. He literally stole everything from me after having one of my boom arms in his possession to take photographs of it. He was literally asking people what the purpose of some of the design components were...because the design wasn't his, and it was completely over his head. He was also posting this solely to harm my business...and that is why he let this thread die...literally on the same day that Paypal issued his refund.
Oh, and in case you think I'm making this up, he screwed over another contractor that many of the members here also know. My "Customer from Heck" also turned out to be "Finish Carpentry TV's" customer from heck. See his video here:
=71
Thanks for the link... it explains a lot.
I just thought this was a guy who prioritized the ‘process’ / journey of building something / over purchasing a tool to expedite efficiency in his shop. I.e. someone who geeks out on making his own, we’ve all been there in one way or another.
But the amount of time, effort, cost had me scratching my head.
I sincerely doubt anyone would copy his approach though when your boom arms are engineered, cheaper to buy & exponentially higher in quality than his 'version' is to make if you include the cost of labor coupled with zero guarantee of performance, longevity / durability, resale etc etc.
Sucks that he only purchased yours for a closer look and had no intention of keeping it. ("None stranger than folk").
But fwiw I didn’t even know about your product until I read this thread so if anything it has probably raised awareness and will most likely drive a few sales over time.
Banana said:Snip.
Sucks that he only purchased yours for a closer look and had no intention of keeping it. ("None stranger than folk").
Don't jump into any conclusion before you do a proper research. There's bad blood between them as shown in another thread, and there're often two sides to a story.
I don't know any of them, but the dispute isn't as simple as what you made it out to be.
- Joined
- Jan 22, 2007
- Messages
- 1,486
ChuckM said:Don't jump into any conclusion before you do a proper research. There's bad blood between them as shown in another thread, and there're often two sides to a story.
Absolutely there's bad blood, and if you watch Finish Carpentry's video I posted above, you'll see exactly why there's bad blood. Joel (aka Martin Felder) did the same thing to me that he had done to Finish Carpentry a few months earlier. I've since seen the photologs; he took dozens of pictures before hanging my boom arm on his wall, and even showed it fully functional before faking the damage he later claimed.
I didn't go looking for that video. Someone that knew the story sent it to me.
- Status
- Not open for further replies.
Similar threads
- Replies
- 25
- Views
- 1K
- Replies
- 16
- Views
- 827
- Replies
- 5
- Views
- 2K
- Replies
- 8
- Views
- 618
- Replies
- 0
- Views
- 426