Domino DF500 Alignment issues

MunsonT45

Member
Joined
Dec 12, 2017
Messages
6
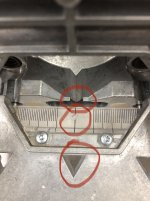
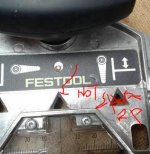
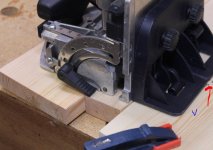
I will do my best to explain what is going on. There are 3 alignment points on top of the machine and one on the bottom. The 3 on the top are: 1. the point on the machine 2. the black line on the moveable clear plastic, 3. The triangle. On the bottom of the machine there is the engraved line.
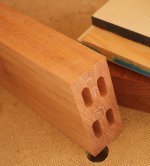
Over the last few months I noticed that the domino would not align. I would make the cuts, insert the domino and it would be mis aligned by a good 2mm. To overcome this I would just cut one of the slots on the lose setting so I could get it aligned. But with a tool this price, you shouldn't have to do this. I decided to send it into Festool for repair. This tool originally was purchased back in 06 when they first came available in the States. I get a call a few days later saying the bearings were worn and they needed to be replaced and they did some adjustments to the vertical fence. I call to try and talk to the technician to make sure they fully understood the problem and they assured me the problem was fixed.
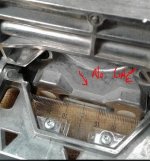
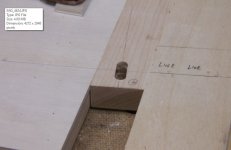
I get it back about a week later and immediately notice that the vertical portion of the fence was all jacked up and I hadn't even said anything about repairing that. I then make a couple lines to check and see if the horizontal alignment issue was resolved and it was not. I was able to get a good alignment using the triangle. But the black line on the plastic was off and the point on the machine were way off. I can adjust the plastic piece and get that aligned, but I cant adjust the point on the machine.
Since I was having problems with the vertical fence, I decided to get the Seneca domiplate. That uses the line on the bottom of the unit. But that was also off by about 2mm and is not adjustable.
My question is, is this fixable? I have already sent it to Festool to fix the problem and it came back the same. Is there something I can do?  I hope that I explained this well enough. If you need more information, please let me know.
 

Attachments

  • 40DEC07C-9B9E-45A3-B343-5069861393D3_1_201_a.jpeg
    40DEC07C-9B9E-45A3-B343-5069861393D3_1_201_a.jpeg
    737.2 KB · Views: 411
I centred the plastic plate with the black line using feeler gauges and ignored the matching line when I did it. I haven't personally used it since but my son regularly uses it without comment on any accuracy problems.
 
Personally my advice would be to contact Festool via phone and ask to speak to the Service Manager.  Explain what is going on and that the recent repair did not correct the original issues which basically as I understand that all of the counter centerline indicators on the machine are not matching up, and two of those are not user adjustable.

Handling this politely and explaining simply will probably get you the help you need.

Festool USA does have a specialized jig / tool for making adjustments on the Domino.

Peter
 
Mini Me said:
I centered the plastic plate with the black line using feeler gauges and ignored the matching line when I did it.

That's also exactly what I did... [smile]...and the individual piece-part registration is great. I usually use tight mortises for all the boards being joined...that's how well the black plastic cursor registers on center lines.

It never really made sense to me to use non-machined/cast-in features for precise center line location. Just the amount of casting flash that was left in the triangular window precluded me from using that option.
 
Munson T45,

Yours is the old model with pins rather than paddles. I checked mine, and didn't see any engraved line on the machine as circled and shown in your photo (there're engraved lines on the bottom of the base). Perhaps, if Festool really couldn't fix the alignment issue for using that engraved line, ignore it, and use other lines (when fixed) or the pins for registration and alignment. I wish mine had the pins!

As Cheese says, the triangular windows are too crude for precision alignments; I use them only for quick, ballpark checking, like using the laser lines on my Kapex.


Attachments

  • DF500 lines.JPG
    DF500 lines.JPG
    34.6 KB · Views: 353
  • DF500 tri.JPG
    DF500 tri.JPG
    30.4 KB · Views: 348
Birdhunter said:
Why do you use all tight mortises?

Agreed -- all tight mortises are not necessary or even desirable.

I use the tight setting only for the first two mating mortises so the edges are joined flush, and the rest tight on one piece and wide on the mating piece.

The only exception is when I need full joint strength such as in an M&T joint, or when double and/or twin tenons are used. All mating mortises are cut in the tight setting in those cases -- and that's where a factory- or user-calibrated Domino Joiner with precision is critical.
 

Attachments

  • rail.jpg
    rail.jpg
    394.7 KB · Views: 259
I have bothDomino machines and use them a lot. But, for the extreme precision, I use a Mafell dowel machine.
 
I will contact Festool and return this to them. The Domino is a game changer. But a tool that costs this much, it should be cutting mating pieces that are closer than 2mm when fitted. I have no problem using the loser setting, but it should not have to be used out of necessity.
 
The introductory price of the DF500 when it came to the US in 2007 was $720 for the DF500 Set, with the trim and cross stop and the 5mm cutter.  Adjusted for inflation, that's $950 today.

That same tool set is priced at $1099 as of January 1, 2022 (some dealers have already applied the markup), or $1060 now.

Surely if the tool flat out died, was stolen, or was lost in a fire tomorrow you have appreciated it enough since you had it that you would want to replace it with another? 

That said, even a Mercedes needs a tune up now and again, and especially after 14 1/2 years.  It just sounds like you need to send it back to the "mechanic" to get it right.

I would send it back to Festool and get on the phone with them to help them understand exactly what the concerns are.

Pictures, either sent with the tool or e-mailed to whomever you're on the phone with, may also help explain your concerns about the quality of the repairs done (or not done) to this nearly 15 year old tool.
 
When  the  cutter  in  the  domino  oscillates  it  has  an  exact  center  point  relative  to  the  machine.
And  when  you  cut  a  mortise  from  two  opposing  sides  you  have  a  right  and  a  left  to  create  a mirror  image.
So  any  slight  deviation on  the  cursor  from  what  is  dead  center  will  multiply  by  two  when  the  two  sides  meet.

The  plastic  cursor  adjusts  by  about  2mm  when  you  loosen  the  torx  screws.
If  its  1mm  from  center  then  its a  2mm  deviation  when  the  sides  meet.
Halfinch  shy  gives a  good  tutorial  on  this.

I have  acquired    the  500  just  recently.
When  using  the cross  stops  and  the  side  wings  on  this  machine I  notice  that it achieves  total  accuracy  from  left  to  right  using  the  tight  mortise  setting.
And  that  for  me  is  the benchmark  for  the  accuracy  of  this  machine.

If  you  cut  two  mortises  on  opposing  sides  using  the  engraved  line  in  the aluminium  base as  a reference  point  and  that  gives  you  good  accuracy  then  transfer  that  line  to  the  plastic  cursor  and  adjust  accordingly.
My  domino  gives  total precision  in  that  regard  I'm  pleased  to say.

 
Also  just looking  at that  image  in  the  OP  the  cursor  line  looks  to be slightly  offset  from  the  machine  body  reference  point. (top  circle  in  the  image)
It looks  to be  slightly  to the left.
Perhaps  loosening  those  screws  and  shifting  it  slightly  to  the  right  will help.

My new  500  doesn't have  that  reference  point  incidentally.

Using  the  cursor  alone  on  tight  setting  is  not  going  to  give  you  accuracy  anyway  no  matter  how  accurate  its  set.
Because  its  open  to  user  error.
ie.  not  holding  the  cursor  on  the  exact  point  of  the  line.

Its  like  cutting  on  the  miter  saw. Having  stop  blocks  gives  you the  ultimate  accuracy.
 
Birdhunter said:
Why do you use all tight mortises?

Well it originally began as a simple challenge to myself and to help me improve my craft but after I became proficient I just kept up the process. It really isn't that hard and it doesn't take any appreciable longer length of time. All the tenons get glued in one of the boards and then the 2nd board is easy to mate up with. If I was doing all production work then the extra time/care needed may make a difference.

I think there have only been 2 or 3 occasions when I used the wider width setting and that was when I was using a 3 minute quick-set epoxy.
 
I too always use tight settings for similar reasons but I never glue the Domino when gluing boards or any long grain work. End grain is a different thing altogether of course and needs the reinforcement of the Domino in most cases. Actually using bent cauls where possible is as good as a Domino and faster as well.
 
MunsonT45,

I have the same model and I have the same issue. I've tried adjusting the clear plastic gauge, but I still have some misalignment. I never had the courage to ship it back to Festool because I was concerned about follow on issues like you experienced. I think the DF500 should have been designed to have a more robust method of calibrating the cut center position. I don't always try to cut all tight mortises, but I do need at least the 1st 2 to be aligned in many situations. I can't do this with things as they are. I always have to take into account some amount of misalignment and correct for it. Usually, making numerous test cuts to see where the final alignment will be.

I'm not familiar with the feeler gauge method of calibration posted by someone above. Is there a link?
 
I believe that Festool would say that the "robust method of " aligning the domino cuts is to use the reference pins and reference from the edge of the material. Even that has its caveats and adjustments to get the left and right side correct.

A pure sight method of alignment is never going to be as accurate as a hard stop, whether that's on a Domino, track saw, miter saw, or table saw.
 
squall_line said:
I believe that Festool would say that the "robust method of " aligning the domino cuts is to use the reference pins and reference from the edge of the material. Even that has its caveats and adjustments to get the left and right side correct.

A pure sight method of alignment is never going to be as accurate as a hard stop, whether that's on a Domino, track saw, miter saw, or table saw.

I agree with you on hard stops. But, that can't be used for some designs/situations. Also, the misalignment inherent in my DF500 was not a fraction of a mm. I can easily get within a fraction of a mm visually. A fraction of a mm is quite easy to plane or sand. 1-2mm is not, especially if you have a lot of joints.
 
squall_line said:
Snip.
A pure sight method of alignment is never going to be as accurate as a hard stop, whether that's on a Domino, track saw, miter saw, or table saw.

Once the DF500 is properly tuned or calibrated, the stop latches/paddles or pins on the cross stop do provide reliable and accurate registration. Anyone who leaves their paddles out of alignment is missing the precision feature of the machine. (Festool should by default set and verify each DF's accuracy before shipping them out. It's not a $100 machine; the numerous accounts of user frustrations with the machine's accuracy should not have happened. This accuracy concern seems to be happening to some Kapex owners, too.)

When using a hard stop is not feasible such as in milling mortises on narrow pieces, I extend the alignment/placement lines, and use both the engraved line on the base and the V notch on the support bracket (also called side stop) to position the machine at the desired spot.


Attachments

  • DF500 intersecting lines 2.JPG
    DF500 intersecting lines 2.JPG
    56.8 KB · Views: 276
  • DF500 intersecting lines.JPG
    DF500 intersecting lines.JPG
    43.9 KB · Views: 276
Feeler gauges are used by selecting a thickness of gauges that set the gap from the plastic plate to the frame on both sides to the same gap. It is certainly the most accurate method to set the calibration of the plate.
 
Back
Top