Domiplate on 1/2" plywood - Joining in center of board

grellpin

Member
Joined
Nov 28, 2022
Messages
7
Hello!

Just got a Domiplate and it is so far so good. Seems great for stuff like face frames. However, I am a little confused by how it would be used to create a butt joint in the middle of a board.

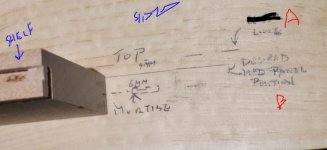
One method I have seen (not Domiplate specific) is to "open the joint like a book', so that the board being joined in the center (lets call it a Shelf) is laying flat on top of the other board, half its own thickness away from the centerline, and it then serves as a fence for the vertical cut. This works great. However, with the Domiplate out of play, the vertical cut may no longer be centered, correct? How does one calculate where to place the tool/clamp the shelf? Would it just be half of the material's thickness (aka 1/4") away from the center line?

I am probably overthinking this, but am relatively new to the Domino.

Thank you!
 
You wouldn't use the Domiplate for a center-panel plunge, you would use the factory fence at 90 degrees.

See also around 1:30 in this halfinchshy video:


Or in this Sedgetool video:

 
I understand that the plate wouldn't be used for the vertical plunge, but if it were used, already, for the other cut (because it does make it easier to center on 1/2" stock), how would you calculate the position for the next cut? Sorry if I am not explaining this well.

I was immediately a little surprise that even with the 4mm bit, the Domino seems to have issues with 1/2" material, and thought the Domiplate was a solution for this. It is, for something like a face frame (end to edge) or a butt joint on a corner, so I am trying to figure out how to use the plate for the end or edge mortise, but then correctly calculate placement for the face mortise.
 
For 1/2" material, I would use the DF 700 method shown in Paul's video (it works just as well with the DF 500), where you are lining things up with a centerline.
 
I call the center line method the intersecting center lines method because you need to align the machine with two center lines (one horizontal & one vertical) if the mortise is located away from the edge of the work.

However, there is a third way -- more a variety of the center line method -- to do mid-panel mortises, especially on narrow pieces where you simply can't use the top edge of the milled flats (DF500) or the center mark (DF700) as the machine is wider than the work underneath. In this case, instead of drawing a horizontal line to mark the center line, you mark a horizontal line that is 10mm (15mm if yours is a DF700) from where the desired center line should be. Now, to position the machine, align the bottom of the baseplate (not the milled flats or center marks) with the horizontal line.

Like the intersecting center lines method, this "10mm-from-the center-line" marking scheme works for stock of any thickness. And it particularly shines when used with the trim stop on narrow workpieces.

P.S. There're other ways to do mid-panel or mid-section mortises, but the above three don't require any shop-made jigs, just what come with the machine.

 
Thanks everyone- and especially the details there, ChuckS! Makes perfect sense now.

I'm still a little surprised there is not more out there specifically about 1/2" or 12mm panels and the Domino since it seems perfect for light drawers and organizational dividers.

 
grellpin,

I use 1/2" stock a lot, more than 3/4" when it comes to smaller builds. It's not difficult to mill mid-panel mortises on 12mm ply if you don't want to use the intersecting center lines approach. The trick is to know where to position the shelf piece on the side piece and do the plunging.

First, mortise the shelf piece (endgrain) in the center (6mm).

Second, position the shelf piece 4mm away from its desired final position (B), and mortise the side piece (face grain). A sketch would help here:
[attachimg=1]

A is the line where you'd fold down the mid panel for mortising the side; B is the line where the mid-panel would meet the side after assembly.

Can you mortise the shelf and side in one go like how you do it on 19mm (3/4") material? Yes, you can. Simply lay a 4mm thick sheet underneath the shelf piece and clamp the stack to the side piece before mortising the shelf and side. 


Attachments

  • df500 12mm mid panel1.JPG
    df500 12mm mid panel1.JPG
    40.9 KB · Views: 266
ChuckS said:
Can you mortise the shelf and side in one go like how you do it on 19mm (3/4") material? Yes, you can. Simply lay a 4mm thick sheet underneath the shelf piece and clamp the stack to the side piece before mortising the shelf and side.

This is where a slide-on shim piece similar to the one that comes with the Lamello Zeta P2 would come in really handy (although I believe those are only 1mm and 2mm shims; I'd have to look again...)
 
squall_line said:
ChuckS said:
Can you mortise the shelf and side in one go like how you do it on 19mm (3/4") material? Yes, you can. Simply lay a 4mm thick sheet underneath the shelf piece and clamp the stack to the side piece before mortising the shelf and side.

This is where a slide-on shim piece similar to the one that comes with the Lamello Zeta P2 would come in really handy (although I believe those are only 1mm and 2mm shims; I'd have to look again...)

Zeta spacers are 2mm and 4mm.
 
For 4mm or 0.157" thick sheets, Home Depot has fewer choices in size than Amazon, but, because of the bigger size sold, has much lower price per square ft for its sheets.
 
Back
Top