Dresser Box Joints

Mike Goetzke

Member
Joined
Jul 12, 2008
Messages
1,133
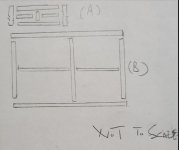
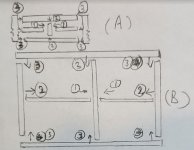
Building a dresser and making a plywood frame for it. I keep changing my mind where to have the domino joints. I think the easiest would be to have the three vertical members one piece and all the horizontal ones split in half. But, something keeps telling me it would be best to have at least the bottom one piece.

Any help appreciated.

[attachimg=1]
 

Attachments

  • Screenshot 2024-06-27 194343.jpg
    Screenshot 2024-06-27 194343.jpg
    108.3 KB · Views: 296
I've built a similar structure with dominoes for a credenza. I'd choose one of these two, depending on how you want to show (or hide) the endgrain:

[attachimg=1]

Of course, your design could have three one-piece horizontal members instead of three verticals
 

Attachments

  • DF500 joint designs.JPG
    DF500 joint designs.JPG
    20.5 KB · Views: 271
ChuckS said:
I've built a similar structure with dominoes for a credenza. I'd choose one of these two, depending on how you want to show (or hide) the endgrain:

[attachimg=1]

Of course, your design could have three one-piece horizontal members instead of three verticals

Thanks  A will work since I planning to use two 3” wide boards on the top- or should I go full depth?
 
I'm not a pro but I have built lots of drawers and usually use Baltic birch for the body. I use a combination of Dominos and pocket holes. I don't glue the Dominos and just rely on them for alignment. If something isn't right with the drawer, I can pull it apart and correct the error. Also, having the Dominos in place prevents the drawer sides from moving when I drive in the pocket hole screws. This technique gives me a lot of flexibility for internal dividers. I do edge band the exposed Plywood with solid edging.
 
Looking at Chuck’s sketches, A requires 4 precise sizes of parts while B only requires 3.
Assembly of B will also be significantly easier.
 
Michael Kellough said:
Looking at Chuck’s sketches, A requires 4 precise sizes of parts while B only requires 3.
Assembly of B will also be significantly easier.
Good point regarding the parts, but why is it harder to assemble the case under A? This is how I'd put everything together under the two scenarios:

[attachimg=1]


Attachments

  • DF500 assembly.JPG
    DF500 assembly.JPG
    33.5 KB · Views: 210
[member=57948]ChuckS[/member] at first glance B looked simpler to me but your analysis shows they’re about the same difficulty.

I  always try to have more parts that are nominally identical so I can choose the best looking parts to go where they are most visible. Just another reason to prefer design B.
 
The (A) method is more traditional. The "top" would only be narrow stretchers and then the actual top would be applied to that, overhanging the ends and front, flush to the back.
This way there is no end grain exposed to the top or sides of the case.
The shelves can be done several ways.
Permanently, with Dominos, dowels or biscuits.
Removable on pins, which can be located in grooves, therefore not visible or obvious that it is removable.
You could also do that with multiple holes, being adjustable too.
 
"Traditionally" wouldn't this be better off as a carcass frame?  Minimize the use of "nice wood" and maximize the use of Domino.  If each layer of the drawers were done in "edge grain" ply then you would have problems with "piston action" as opposed to nice, easy closing drawers.  I could be out to lunch here but the carcass style seems to make most of the build pretty simple and you could use the initial design with vertical stretchers in the middle of each frame for the drawers. 

Maybe Im overcomplicating it.  I tend to over-engineer everything I touch which is why my router table alternates for a tornado shelter... ROFL

Thanks Dan
 
Back
Top