Drywall corner floating advice

Kodi Crescent

Member
Joined
Aug 6, 2010
Messages
791
Hi,

I need some advice on taping a drywall corner I'm finishing.

I'm working on installing cabinets in what will be an office area.  The cabinets will occupy an entire back wall of this room, and the counters need to fit into corners.  I've taped the drywall and am in the process of finishing it.

In one of the corners the walls are out of square.  I've been floating the drywall in the offending corner with setting compound in an effort to build it up.  Unfortunately, the corner was about 1/2" out of square.  So my buildup layers are something to the effect of drywall, paper tape, drying-type compound (green lid stuff), several thicker coats of setting compound, and soon to be a few thin coats of drying compound to make it square.

Since I have a thick buildup area, should I re-tape it before my final few coats of drying compound?  I'm not sure what to expect in regards to cracking, and if a second coat of tape would prevent that.  Thanks for your advice!

On a similar note, is there a method for scribing a countertop into an out of square corner?
 
No way I would have done all that taping. Fit the top to the corner not the corner to the top.

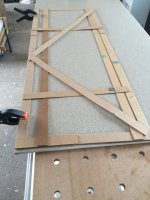
I use drywall shim and hot glue to make my counter top templates, you can see how far this one is out. If I recall correctly it was 3/4". The top fit perfectly when I set it in place.

Found the picture of the "scribe in a tube" used to fit the original top.

I also like the "Thingamejig" for scribing solid surface top to the walls.

Tom
 

Attachments

  • IMG_4050.JPG
    IMG_4050.JPG
    588.8 KB · Views: 715
  • IMG_4007.jpg
    IMG_4007.jpg
    756.2 KB · Views: 573
Look into using Fiba Fuse on 36" roll or Fiba Tape also 36" roll for floating a thick area.

Tom
 
tjbnwi said:
No way I would have done all that taping.
Agreed.

tjbnwi said:
Fit the top to the corner not the corner to the top.
Agreed.

tjbnwi said:
I use drywall shim and hot glue to make my counter top templates, you can see how far this one is out.
Or 1/4 mdf cut into strips etc. This really works well on fitting large counters. For smaller pieces you can use the ticking stick method if you can find a big enough piece of card.
Tim
 
Tim and Tom are surely better countertop fitters than me but I would have done the same thing you did and floated the corner. I would have taken 60 minute (20 minute if you've got experience) hot mud and filled in the majority of the issue and let that dry. It almost turns into concrete and you can put it on thick and it'll still firm up quickly because of the chemical reaction. Then I would take a laminate drywall tape like http://www.all-wall.com/Categories/NoCoat-Drywall-Corners/No-Coat-Ultraflex-325.html and taped the corner like usual.

If your corner still needs some build up grab yourself some laminate tape and hot mud and you'll never see and issue. I have fixed some very ugly drywall work that others have left me with those 2 things.
 
rizzoa13 said:
I would have taken 60 minute (20 minute if you've got experience) hot mud and filled in the majority of the issue and let that dry. It almost turns into concrete and you can put it on thick and it'll still firm up quickly because of the chemical reaction. Then I would take a laminate drywall tape like http://www.all-wall.com/Categories/NoCoat-Drywall-Corners/No-Coat-Ultraflex-325.html and taped the corner like usual.

Just so the OP understands what you're saying, you're talking about Durabond in 20 minute, 45 minute or 90 minute set times. It has high bond strength and low shrinkage so is perfect for heavy fill areas. High resistance to checking & cracking.

[member=4105]tjbnwi[/member]
The drywall shim you show looks like cardboard. Is there really such a thing?
 
Thanks for the advice.  I floated because my wall is a little bit wavy along the wall after the corner I floated (I learned my lesson on insetting nailing plates and using drywall shims before hanging), and I'll need to feather that wavy part out too.  I'd scribe the corner using the template method, but I'm not too confident on scribing in two directions.  One direction, great.  Two...I'm not sure how to do that.  Do you use the template method for this as well and scribe the template parts before gluing?

Would paper tape work for this?  I know that No Coat may be the ideal stuff, but if I remember correctly, it is kind of thick.  There is a 4 gang light switch about 6"-8" off the corner perpendicular to the floated area.  I don't know that I could tape and float No-Coat well in that tight of a space.

As an alternative, this is essentially an office area with lower cabinets 21" lower cabinets and 12" upper cabinets.  I could put backs and sides between the top and bottom cabinets (like desks with hutches), but that 4 gang light switch interrupts the vertical line of the side panel.  Any alternatives that you guys can advise on?
 
[member=4105]tjbnwi[/member]
The drywall shim you show looks like cardboard. Is there really such a thing?
[/quote]

I must look really dishonest. [eek]

These are the shims I use to make my templates;

http://www.amazon.com/Strait-Flex-DS-45-Drywall-Shim/dp/B00236E27Q

There is also drywall shim on a roll comes in 1/16th and 1/8th;

http://trim-texestore.com/index.php?l=product_detail&p=67

http://trim-texestore.com/index.php?l=product_detail&p=178

I make my own tops so they fit when I install them.

Best way to make the template is to set the shim edge to the back wall, a few dabs of glue will hold it to the cabinet, set a corner tip to tip, don't bend it, run the front with the over hang and the last corner. Glue in some bracing as shown in the previous post. Any curves and undulations can be patterned by cutting short pieces of shim, push the edge against the wall, hold it in place as the glue cools. Do this all the around the temple where needed. Write all the references and notes on the template.

If you did everything correctly you'll have a top that fits perfectly once it is matched to the template.
Odds are you won't be able to get the top in when doing an alcove install. To solve this problem, tape a piece of aluminum coil to one of the side walls, place the opposite edge of the top on the cabinet, the top should be high on the aluminum side, push the top in place, as it slides down, the aluminum protects the wall, kinda acts like a shoe horn. Pull the aluminum, you're done.

Again no way I'd do all that taping, I'm wayyyyyyyyyyyyyyyyyy to lazy.

Tom
 
"Again no way I'd do all that taping, I'm wayyyyyyyyyyyyyyyyyy to lazy."

You're way more skilled than I am, too, so you probably don't need to do it.
 
I've had to do this in the past, as my drywall skills were greater than my carpentry skills at one time. I never had an issue. If by some strange set of circumstances you do get checking, just fill it in with more mud and repaint. No biggie.
 
tjbnwi said:
These are the shims I use to make my templates;

http://www.amazon.com/Strait-Flex-DS-45-Drywall-Shim/dp/B00236E27Q

There is also drywall shim on a roll comes in 1/16th and 1/8th;

http://trim-texestore.com/index.php?l=product_detail&p=67

http://trim-texestore.com/index.php?l=product_detail&p=178

I make my own tops so they fit when I install them.

Best way to make the template is to set the shim edge to the back wall, a few dabs of glue will hold it to the cabinet, set a corner tip to tip, don't bend it, run the front with the over hang and the last corner. Glue in some bracing as shown in the previous post. Any curves and undulations can be patterned by cutting short pieces of shim, push the edge against the wall, hold it in place as the glue cools. Do this all the around the temple where needed. Write all the references and notes on the template.

If you did everything correctly you'll have a top that fits perfectly once it is matched to the template.
Odds are you won't be able to get the top in when doing an alcove install. To solve this problem, tape a piece of aluminum coil to one of the side walls, place the opposite edge of the top on the cabinet, the top should be high on the aluminum side, push the top in place, as it slides down, the aluminum protects the wall, kinda acts like a shoe horn. Pull the aluminum, you're done.

Again no way I'd do all that taping, I'm wayyyyyyyyyyyyyyyyyy to lazy.

Tom

[member=4105]tjbnwi[/member]
OK , I'm almost embarrased to reply to this post. I never knew that drywall shims existed. When I've encountered out of square walls, I've tried to measure the amount that they are out of square with a Starrett taper gauge and then went downstairs and tried to rip 2X  material to the appropriate thickness. Sometimes a hit and miss time consuming proposition. That Strait-Flex would have been a game changer.

Also, thanks for the discussion on making the template, a clever, straight forward method. I've used the aluminum sheet shoe-horn on a number of ocassions.
 
I used those Trim Tex shims for one project where I had to replace the drywall from floor to ceiling.  Stapling them was a real pain.  You need a very stout staple driver.  I suppose you could gang a bunch of them together and drywall screw them in.  But that's a pain, too.

My drywall patch on this job was about 2/3 up the wall.  I would have removed the drywall from floor to ceiling and shimmed, but there is crown molding at the top I didn't want to disturb, and I wanted enough area to feather out the butt joints between the old and new pieces.

I should have put a square into the corner before I hung the drywall to see how far out it was and shimmed then.  But I wasn't that smart, and I wasn't sure how the old and new drywall pieces would match up.  So I didn't, and I've been floating and feathering to make up the difference.

I have yet to see those cardboard shims.  Those would be far easier to staple.  Maybe in the future I'll find them, or I'll rip 2x4 shims on the table saw and glue and pin them before hanging the drywall.

Ironically, it was a drywall shim problem for a glass tile backsplash (that needed to be perfectly flat) that got me interested in the Festool system to begin with.
 
Kodi Crescent said:
Maybe in the future I'll find them, or I'll rip 2x4 shims on the table saw and glue and pin them before hanging the drywall.

Originally, I installed the wood shims with a 15 gauge nailer, then installed some drywall and sure enough, I hit alot of those 15 gauge nails with the screw gun. [mad] So I decided to glue and then use a pin gun on them instead.  [thumbs up]
 
Kodi Crescent said:
I used those Trim Tex shims for one project where I had to replace the drywall from floor to ceiling.  Stapling them was a real pain.  You need a very stout staple driver.  I suppose you could gang a bunch of them together and drywall screw them in.  But that's a pain, too.

My drywall patch on this job was about 2/3 up the wall.  I would have removed the drywall from floor to ceiling and shimmed, but there is crown molding at the top I didn't want to disturb, and I wanted enough area to feather out the butt joints between the old and new pieces.

I should have put a square into the corner before I hung the drywall to see how far out it was and shimmed then.  But I wasn't that smart, and I wasn't sure how the old and new drywall pieces would match up.  So I didn't, and I've been floating and feathering to make up the difference.

I have yet to see those cardboard shims.  Those would be far easier to staple.  Maybe in the future I'll find them, or I'll rip 2x4 shims on the table saw and glue and pin them before hanging the drywall.

Ironically, it was a drywall shim problem for a glass tile backsplash (that needed to be perfectly flat) that got me interested in the Festool system to begin with.

Solves the stapling problem;

http://grexusa.com/grexusa/products.php5?id=A11AD

Tom
 
Oh if you've got that kind of room this is what id do. (I thought you were in a tight corner for some reason)

Mix up some 90 minute dura bond relatively thick. It should be the consistency of peanut butter. Slather it on both sides of the corner and i mean really get it on there. Take an old beat up speed square and pull it down the corner like your screeding concrete. Don't worry about the edges unless they are high. Let it set up overnight and then you'll have a good 90degree corner to skim off of. Take your widest knife and put one end directly onto the corner you made and the other out as far as you can and fill that gap with mud. You can use 90 minute again if its a big gap but you probably don't need to. Then you just need to finish it up and fill any holes that showed up. I like to mix some soap and water into a green top with a paddle mixer for the final coat.
 
rizzoa13 said:
Mix up some 90 minute dura bond relatively thick. It should be the consistency of peanut butter. Slather it on both sides of the corner and i mean really get it on there. Take an old beat up speed square and pull it down the corner like your screeding concrete.

Like the idea with the Durabond and Speed square. [thumbs up]
 
We use 1/8" x 2"x8' Lauan rips for all our counter templates which we borrow from our Granite template guy! We also use 1/4" lauan when we run out of the 1/8". It's cheap, readily available, in 8' lengths, and you can customize the widths to suit your needs. Because the Lauanlauan is wood it easy to score and snap with a utility knife and you can remove material pretty quickly with a sharp block plane. It's quick to use hot melt to fasten the pieces together but if I'm really in a rush I'll staple it with my upholstery stapler. We also use a 1/4" thick white corrugated plastic sheet that is sold as floor protection in one of the lumberyards that we frequent.
Cheers
Curt
 
rizzoa13 said:
Oh if you've got that kind of room this is what id do. (I thought you were in a tight corner for some reason)

Mix up some 90 minute dura bond relatively thick. It should be the consistency of peanut butter. Slather it on both sides of the corner and i mean really get it on there. Take an old beat up speed square and pull it down the corner like your screeding concrete. Don't worry about the edges unless they are high. Let it set up overnight and then you'll have a good 90degree corner to skim off of. Take your widest knife and put one end directly onto the corner you made and the other out as far as you can and fill that gap with mud. You can use 90 minute again if its a big gap but you probably don't need to. Then you just need to finish it up and fill any holes that showed up. I like to mix some soap and water into a green top with a paddle mixer for the final coat.

Great idea!  Why add the soap?  Does that reduce the bubbles that come through the mix and leave those little pinholes?
 
Yea the soap actually really helps with your finish coat and keeping the fisheyes down. I always thought it was some old timer bullcrap but I did it a while back and it produces a real creamy mud for skimming. Also makes it easier to go back over and add a little mud to a low spot that's still wet. Mix it up good with a paddle on a drill and don't be shy with the soap. (Dish soap, hand soap it all seems to work)
 
Back
Top