overkill19
Member
- Joined
- Oct 19, 2016
- Messages
- 25

overkill19 said:This one showed up today ! Thanks amazon!
I think so, I'm somewhat new to this woodworking stuff. Id planned on plunging 1/4 or 3/8 first in attempt to keep final hole cleaner and less tear out.Distinctive Interiors said:Overkill,
The CMT router bit may be 20mm dia, but is it designed for plunging 20mm dia holes...????
overkill19 said:I returned the festool one. If this 20mm one does not work I'm going 3/4" its easier to make home mage dogs with that sizing anyway.
Thanks, I figured that once it showed up. " thats the trouble with buying amazon"greg mann said:Measure the distance between the inside edges of the carbide on the CMT bit. You need to predrill your holes at least that size, preferably more. That bit will not drill from solid. It can still do what you need with that first step.
Do you have a link? I tried a search with no luck.Michael Kellough said:For a little more than the cost of the Festool bit you can buy Peter's dog hole drilling kit with right sized bit included.
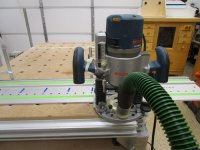
Great stuff!! ThanksDick Mahany said:I recently replicated my MFT top using a variation of the method that Toolify demonstrated in his YouTube video. I used the Festool 20mm euro hinge bit in a Bosch 1618 router on the LR32 plate. A few comments to offer:
1) The holes were indeed a hair larger than the stock MFT holes by ~0.05 - 0.10mm.
2) In a purely qualitative fashion using "feel" only, my Parf dogs did have slightly more play when inserted into the replicated top than the original MFT top, but it was inconsequential because when I slid a square up to them, they were just as stable.
3) I did get some burning. This turned out to be largely from my shop vac that filled up and dust extraction became severely compromised. A new vac bag solved that.
4) I also got a little burning when I didn't have the plunge depth set sufficiently to plunge completely through the 18mm substrate. This left a wafer thin disk of MDF which jammed and spun with the Festool 20mm bit and caused burning when it didn't quite cut cleanly all the way through. Simply setting the plunge depth a little deeper solved that.
Given the results vs the cost, I'm very happy with the results because I only use my MFT to machine wood, and the dogs seem to be just fine for squaring and setting references. I will admit however, that I do like the "feel" of the dog fit better in the OEM top.
[attachimg=1][attachimg=2][attachimg=3]
overkill19 said:Do you have a link? I tried a search with no luck.Michael Kellough said:For a little more than the cost of the Festool bit you can buy Peter's dog hole drilling kit with right sized bit included.
Exactly! The fastest method by far. Added benefit - no burning and/or chipping on the underside.John_ said:[list type=decimal]
[*]Purchase a replacement MFT "Plate" to be used as a template (usually around $90
[*]Clamp the template to your work-piece with a backer board underneath
[*]Use 5/8" drill bit to remove the bulk of the material from the holes
[*]Use a router with a 1/2" flush trim bit (bearing on top) to clean up the holes - leaving a perfect copy
[/list]
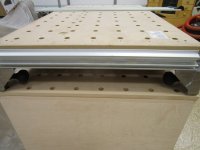
overkill19 said:Dick Mahany said:P.S whats the bigger hole for in bottom left?
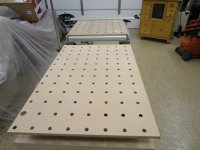
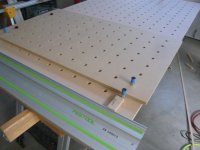
I just happened to have a piece of MDF that had one rogue 35mm hole in it, so I decided to use it for the MFT replicated top. Once it gets trimmed to fit in the MFT frame, the holes along two sides will be cut away. Until then, I can use it as a slightly larger auxiliary top.
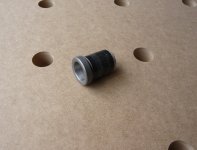
That's clever idea with the bushing for centering.J0hn said:Drill bushing with a wrap of electrical tape so it will fit more snugly in the "template"
View attachment 1
The bushing protects the 'template' from damage, leaving plenty of room for the 1/2" router bit
View attachment 3
Svar said:That's clever idea with the bushing for centering.J0hn said:Drill bushing with a wrap of electrical tape so it will fit more snugly in the "template"
View attachment 1
The bushing protects the 'template' from damage, leaving plenty of room for the 1/2" router bit
View attachment 3
I used 1/2 drill bit and 1/2 router bit. You can still push through the latter through 1/2 pilot hole, but I guess 5/8 is better.