Festool CSC SYS 50 Tablesaw

Vondawg said:
I’m just confused as to why there is a reason to tear apart a brand new saw?
Is festool selling an inferior product ? Is this a saw that can’t be used right out of the box ?

It's an aluminum extrusion (or comprised with a lot of them).  I've had rails from Festool that were out - it happens.  For a jobsite saw, it's calibrated fine out of the box.  However, because of the way they do it, they missed the fact that my sliding bed has a dish.  I'm going to have to file a warranty repair for it, but I figured I'd pull the thing apart to see if there was anything else.  I'm used to taking apart linear rails and movement systems like this so this specific Festool gets special treatment.

 
Thanks for your feedback. I will try again tomorrow using mechanical sqare and not digital angle gauge as i agree probably blade teeth are part of the issue.

ElectricFeet said:
[member=80651]Xere[/member] As others have said, with this saw and the standard blade, you can’t use a digital angle gauge, as it hits the teeth. You could try putting it on the riving knife if you want a little more accuracy.

However, on the subject of digital angle gauges / inclinometers, remember also:

1) While the resolution of the gauge is generally 0.1 degree, they often only have an accuracy of =/- 0.2 degrees (check your manual)
2) Cheap ones are often inconsistent and rarely read the same measurement twice
2) Measuring a tilted blade is different than measuring 90. The gauge must be attached perfectly orthogonal to the up/down axis of the blade. Difficult to explain in words; here’s a picture:
[attachimg=1]

In the first pic, I did my best to get the gauge orthogonal. In the second, I deliberately tilted it backwards to show how the angle changes.

For getting the 90-degree measurement, don’t use a digital angle gauge. Use a good-quality, known-good square, making sure you place it between the teeth. As for the 45-degree measurement, if the 90 degree measurement is good, then trust Festool to do the rest. I’m 99.8% sure(*) that their tilt mechanism is better than any of our digital gauges.

(*) to +/- 0.2 accuracy
 
I will remove it no worries ;-)

ElectricFeet said:
Also, remove that label, which will not be doing you any favours while levelling. It can be re-stuck on the inside of the systainer.
 
Ok I worked on it today... First, it is still a pleasure using this table saw, it is a fantastic tool.

Now i made great improvement with all your comments from my previous post.

1) yes the digital angle gauge is not the perfect tool to measure the angle of the blade due to the teeth.
2) I confirm 90° with square I have Facom mechanical one + Starrett.

Here are the results close to perfection except that I probably short cut one of my wooden piece.


pixelated said:
It has some shortcomings, and some things to "get used to", as do all other machine tools. I'm not regretting buying it, even at the price it comes for. If I were, I'd be hauling back to my dealer to send it back, and picking up a Saw Stop.

They are two completely different (dimensions, weight, corded/cordless, cutting capacity, table size, sliding table versus none) saws with the only commonality being they are tablesaws. I bought the CTS for field use to replace a Dewalt Flexvolt tablesaw. After getting it in the shop I quickly discovered the weight and dimensions of CTS were significantly more than the Dewalt (53 lbs versus 68 lbs) something I should have given more consideration to prior to purchasing. The problem for me with the increased weight is it is not centered on the frame making it awkward to left/move and while I have not measured I do think the table surface of the CTS is incrementally larger or at least it felt that way.

I had originally negated the size of the CSC SYS 50 when I first read about it, but after trying it out at Woodcraft I bought one with the stand. I have used it extensively in the field for few weeks and are 100% happy with the exception being the fence design. There really was not any option for making it better given half of the table folds down, but I am getting my tapping skills back to "A" game level to get past it. You don't realize how good the gear fence system is on a portable saw until you do not have it.

In terms of its use if it is your only tablesaw I am not certain. My in shop saw is an ICS so the size limitations are a non-issue. A tracksaw and CSC could work but for regular use I think most would want a saw with a bigger table.

 
Way back when I worked for Bosch (not their tool department) I bought their table saw. I used it infrequently and it took up a lot of space. all these parts that stick out and weird angles. So i sold it and have worked around not having one, and not missing one either. Until I saw the CSC SYS 50. I mostly bought it because it is cute and brilliantly engineered. I figured I would find uses for it later.

I love. Yes if you have a big shop and work with big slabs of wood, nothing beat a stationary saw. But in the portable category nothing beats the CSC SYS. I do flooring with is and angles on speakers. It is very accurate, smooth. and has loads of options. setting the angle from the display and have preset positions is very handy.

It does wear down the batteries fast, and so does the CTLC MIDI I. so you need to have the double charger with that set up. It sets up fast, faster than the MFT4 with the guides and is more accurate under 1 meter. And I am glad I came here because now i know that the mini Bow feather exists. I ordered one.

 
I checked my saw after unboxing it, and immediately noticed this same issue. I am flabbergasted at Festool as this is such an obvious thing to check on a tablesaw.

I am providing an update on the instructions that were provided by [member=72072]woodferret[/member] and @xeres. They were very helpful, but some folks might find the technical descriptions a bit cumbersome.

1. Unlock the sliding table
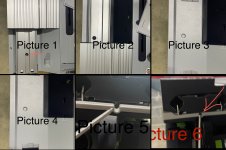
2. Push the table forward (towards the dust port) and in the center of the rail remove the plastic black cap. Caution, the cap breaks easily (see picture 1)
3. Unscrew the black screw underneath the cap using a Torx 20 bit.
4. Slide the table backwards (towards the control panel) and in the center of the rail remove the plastic black cap. Again use caution, the cap breaks easily. (See picture 2)
5. Under the black cap there is a silver 4mm cap head screw. Use a 4mm hex to undo the screw.
6. At this point, you should be able to lift off the table and expose the height adjustment shims located underneath
7. At this point, you can decide what material you want to use for the additional shim. (I first tried copy paper, but wasn’t satisfied with that solution and then tried using gorilla tape. This prove to be too much and I was unable to get the slider flat where it meets the fixed table. So I took everything apart and switched to blue tape and found that, it was the right adjustment so I taped it to the bottom of the shim as shown in the picture 3). After this attempt, I noticed that the back of the sliding table near the dust port was flat however, the front by the controls was still a little low. So I took it apart again, and added a piece of paper, which proved to be too much and ultimately settled on putting a piece of blue tape on top of the shim as seen in picture 4).
8. Reverse the procedure to reinstall everything
9. Once the table is reinstalled, you may have to relevel, front to back, the sliding table by turning the  set screws counter clockwise to raise or clockwise to lower the sliding table (see pictures 5&6)

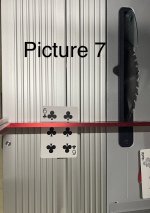
There was a lot of trial and error involved, and while I settled on the blue tape, it will take a number of attempts to get the individual adjustments for each saw just right. ultimately this isn’t a solution as you can see in picture 7, I’m able to put a playing card which is a touch snug but nonetheless able to slide it under the square. Ultimately the combined setup isn’t perfectly flat which means something is still not flat and I’m probably going to always have to tweak and adjust my cut parameters (blade angle) depending on whether the wood is resting in the middle of the sliding table or crosses the entirety of the sliding table.

Further complicating everything is that the blade opening/throat plate is slightly bowed up.

After spending about two hours fiddling with this and settling on the solution above, I did call Festool. When I explain the problem to the “applications” customer service agent his response was that “the sliding table should be higher than the saw body in in order to allow for the clearance necessary for the cut.” I explained several times that what I was describing was that the table itself was not level from right to left but after several minutes, it became apparent that my best course of action is to send the saw in.
 

Attachments

  • IMG_1278.jpeg
    IMG_1278.jpeg
    949.5 KB · Views: 518
  • IMG_1279.jpeg
    IMG_1279.jpeg
    1.9 MB · Views: 450
Pic 7 is what I'm seeing.  CS also sent me the levelling pages from the manual, but at least told me to send it in if those didn't work (of course it doesn't).  I'll get mine back this week sometime, so we'll see if they fixed it.  I think they're seriously backlogged dealing with this saw, as I'm well beyond the 48hr turnaround.

Worst case, I envision there'll be a TSO fritz-franz jig with elevated support brackets that span the entire sled, negating any dishes/warping.  :P
 
I would just return it and buy another one and see if do better the next time. Sending it back seems like a failure waiting to happen. A FedEx or UPS shipping tour might jar loose any microscopic fixes that are made. I'm glad that 1mm height difference, if mine has it, has not made a bit of difference.
 
I think there was a post about a pair of black plastic shims between the sliding table and the interface to the rail.

It seems like the black plastic things are not thick enough to bring the left side of the sliding table up to be coplanar with the main table. You have to add shims between the black plastic and the plate.

If that is the case, sending the machine back to Festool will not solve the problem unless Festool has produced some thicker black plastic things. You’ll have to make those final adjustments yourself.
 
whk said:
Hale1960 said:
Hello,

I recently bought a CSC SYS 50 table saw and must say I’m really pleased. I have a slight issue with the cross cut fence, not in its quality or accuracy but the lack repeat stops. Has anyone made a modification. ....

Regards,
Hal

Here's a link about the repeat stops you asked about.  I hope this is what you are looking for.
https://www.festoolownersgroup.com/...s-50-table-saw/msg701619/?topicseen#msg701619

Will

Thanks for the reference link. I received mine today and the stop fits perfectly and the seller promptly shipped mine. I’m very happy!
 
[member=76944]mcfal12[/member]

Update.  I got my saw back today.  Will not fix.  Apparently from engineering, it was an intentional decision bias mfg defects from the extrusion process to create cupping rather than convex beds.  If this is an issue, use the 30-day return.

I'm past that window because I sent it in**.  I'd recommend you take the saw back to purchase and use that 30-day.  Apparently Ryobi standard beds is within tolerance for a $2k+ saw.

* I should mention that 0.1mm concave should get you within the 0.1 deg for 99% of the cross cuts. The 1% is not safe.  0.2mm+ gets into silly territory.

** Update: they're gonna take pity on me and take the saw as a 30-day given how it's been in transit/service most of its life.  Good sales/CS take and effort.
 
[member=72072]woodferret[/member]. I am sorry to hear that and I’ve never heard of intentionally make a ‘table’ not flat on a saw. Whats even more interesting is their influencers Not Reporting this is a problem or conversely Not Stating this is a design choice. And if a design choice explaining why/benefits, etc.

The bright side is your work combined with @xeres provides a fix that can easily be applied. I can’t see the benefits of this design choice and perhaps someone smarter than me can explain it.

I finally saw a YouTube video in which someone posted about this issue:

I also saw a video of the saw in use annd asked a UK owner of they have the issue and they stated they don’t.

 
The user in the second video doesn't show checking the saw table/sliding table with a straight edge as the user in the first video does, so I can't tell how good the saw table in the second video really is.
 
ChuckS said:
The user in the second video doesn't show checking the saw table/sliding table with a straight edge as the user in the first video does, so I can't tell how good the saw table in the second video really is.

He doesn’t but check the comments. I explicitly asked and he answered that his doesn’t have the out of plane right to left on the sliding table.
 
mcfal12 said:
[member=72072]woodferret[/member]. I can’t see the benefits of this design choice and perhaps someone smarter than me can explain it.

If this is in regards to the dip, it's a cost thing.  Rejecting parts is expensive and all aluminum extrusion processes have stress deformations, normally centered around your design point.  A convex top that rocks is a straight no-go so if you shift your design point ever so slightly towards a concave (dished) table top, most of the extrusion parts will be good-enough.

I believe the extra grooving on the top is meant to bias the stresses.  Normally you'd want all walls to be uniform thickness, but only that top upper wall is grooved.  Mine starts dipping across this region.

It's interesting engineering approach.  I'm pretty sure I'm in the minority of users that wanted this saw for precision work as I regularly deal with stock that's less than the width of the bed.  For fitting and other general construction work, this saw is fine even if you get the deeply dished beds as long as all your crosscuts spans the entire slider.  Even there, I can live with 0.5degree inaccuracies if I'm putting something against a wall.

The bed coming from factory tilted is funny though.  I think those metallic strips affixed under the plastic ramps are actually shim tapes.  There's very likely a laser finder at the assembly bench telling them how out of level that base is and to shim X amounts left and right.  When you put the entire slider bed assembly on top, most of it is designed to be at right angles to this level plane.  The upper most extrusion, not being flat is a non-issue since when you clamp down a reference bar on it, it pulls the extrusion flat.  With the reference bar, the assembly technician can adjust the slider height.  When the bar is taken off, it springs back into dish shape... and when the end-user gets the saw, all heck breaks loose with rulers and YT videos of saw tilts :P

* I'd have to note that if your bed is substantially warped, then depending on whether you like to clamp cross-cuts or do them freehand, it will determine whether you want to add extra shims.  If you're free hander, then the ruler calibration and shim we've outlined will work.  But there's no guarantee you won't start rubbing against the static bed if you clamp your cross cuts down as you're likely tipping your workpiece down into the cut when the bed flexes into its 'flat' position.
 
mcfal12 said:
ChuckS said:
The user in the second video doesn't show checking the saw table/sliding table with a straight edge as the user in the first video does, so I can't tell how good the saw table in the second video really is.

He doesn’t but check the comments. I explicitly asked and he answered that his doesn’t have the out of plane right to left on the sliding table.

Yes, he did say his table was fine in the comments section. But we have different interpretations of tolerance, and I prefer to see for myself a straight edge placed across the tables at different spots to show its table condition. This is no different from some people saying their Kapex were a lemon while some insisting all was good. I'm not saying someone is not being truthful, but seeing (pictures or videos) is believing for me as a woodworker.

For that kind of money, owners of a new saw shouldn't have to look for an after-market or shop-made solution to fix something that is essential to basic woodworking.
 
woodferret said:
[member=76944]mcfal12[/member]

Update.  I got my saw back today.  Will not fix.  Apparently from engineering, it was an intentional decision bias mfg defects from the extrusion process to create cupping rather than convex beds.  If this is an issue, use the 30-day return.

I'm past that window because I sent it in**.  I'd recommend you take the saw back to purchase and use that 30-day.  Apparently Ryobi standard beds is within tolerance for a $2k+ saw.

* I should mention that 0.1mm concave should get you within the 0.1 deg for 99% of the cross cuts. The 1% is not safe.  0.2mm+ gets into silly territory.

** Update: they're gonna take pity on me and take the saw as a 30-day given how it's been in transit/service most of its life.  Good sales/CS take and effort.

Im glad to hear they are taking it back. Are you getting a replacement or refund? Please keep us posted on the replacement if thats the route you go.
 
Hale1960 said:
Hello,

I recently bought a CSC SYS 50 table saw and must say I’m really pleased. I have a slight issue with the cross cut fence, not in its quality or accuracy but the lack repeat stops. Has anyone made a modification. I am also looking for a wider kerf blade to cut kumiko strips, any thoughts?
Hale1960, I guess I never mentioned it, but your question lead us to make flip stops for the CSC SYS 50 table saw.  Here's the info (just in time for Christmas!)https://www.festoolownersgroup.com/...for-csc-sys-50-table-saw/msg701619/#msg701619
 
Back
Top