You are using an out of date browser. It may not display this or other websites correctly.
You should upgrade or use an alternative browser.
You should upgrade or use an alternative browser.
Festool CSC SYS 50 Tablesaw
- Thread starter Hale1960
- Start date
ElectricFeet
Member
- Joined
- Feb 4, 2017
- Messages
- 303
The smug answer would be to run a test piece through and change the blade’s angle so that it comes out at 90. You can electronically change the angle by 0.1 degree increments, so you should be able to hit 90 easily. The direction that the blade slopes favours your use-case.Phil42 said:What would you do to cut these type of narrow stripes with 90° cuts?
It’s not a perfect solution, but a pragmatic one. The siding table gives so many benefits, but the workarounds can be annoying.
That said, in my experience, I spent a lot of time:
- Fine tuning as much as I could the sliding table’s side-to-side and front-to-back slopes. This is a one-time job. The more that the table slopes away from the table, the more it will stick up above the table’s surface on the blade side. There are lots of posts and pics on this.
- Recalibrating the blade angle, every now and again. I’d say that this should be done periodically, depending on how much the saw has been jolted around. Festool may have a recommendation on this, but I don’t know what it is.
If, after all that, you still have problems, then I would suggest that you make a note that a 20mm rip requires a 0.x angle for your saw, whereas a 40mm rip requires a 0.y angle, etc.
You may find also find inconsistencies just due to any downward pressure you put on the material. Most of the time, when I’m doing thin short rips like this, I use a Grrripper (or two). Just the force of pressing down on it will change ever so slightly the height differences.
The presets are useful for defining “what is 90” for specific situations.
ElectricFeet said:The smug answer would be to run a test piece through and change the blade’s angle so that it comes out at 90. You can electronically change the angle by 0.1 degree increments, so you should be able to hit 90 easily. The direction that the blade slopes favours your use-case.Phil42 said:What would you do to cut these type of narrow stripes with 90° cuts?
It’s not a perfect solution, but a pragmatic one. The siding table gives so many benefits, but the workarounds can be annoying.
Yes, this seems obvious but the devil is in the details. If my stock is 60mm wide at the beginning, this stock will be 40mm at the second cut. And the shorter width of 40mm will change the cut angle again because of the concave table and height difference between the two tables...there is jut no end for adjusting the blade angle.
ElectricFeet
Member
- Joined
- Feb 4, 2017
- Messages
- 303
Hence the suggestion of using presets.Phil42 said:Yes, this seems obvious but the devil is in the details. If my stock is 60mm wide at the beginning, this stock will be 40mm at the second cut. And the shorter width of 40mm will change the cut angle again because of the concave table and height difference between the two tables...there is jut no end for adjusting the blade angle.
However, if you are applying steady downward pressure on the main table side, then for thinnish stock with thinnish rips, there are only really two angle settings for ripping — cuts that overlap the sliding table and cuts that don’t. (There’s also the case where the stock is so wide that it is fully on the sliding table and isn’t resting much on the main table, but that’s a rarer scenario on such a small saw.) Maybe something like the JessEm flex guides would help to hold the stock down firmly.
However, do really spend time under the hood and check that the table isn’t slightly sloping down away from the blade. This was the problem several of us had and it exaggerates significantly the difference in heights between the sliding table and the main table. It took me a couple of hours to get mine nailed down to my satisfaction. (And yes, I still have the dip in the middle of the slider.)
And at the end of the day, this is wood you’re ripping. If the wood is even slightly cupped, then the angle will be thrown off that way too.
I have spend some time to adjust the tilting of the table and it might need just a little final little tweak to get it almost perfect level.
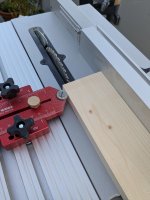
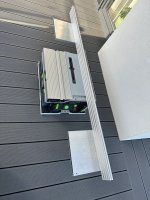
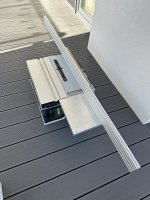
Yesterday i tested the "rip guide" method and the results were at least much better, still not perfect, but maybe good enough for the purpose of woodworking. The main table is not as flat or perfect level as you might expect or wish it were as you can see in picture three.
Yesterday i tested the "rip guide" method and the results were at least much better, still not perfect, but maybe good enough for the purpose of woodworking. The main table is not as flat or perfect level as you might expect or wish it were as you can see in picture three.
Attachments
ElectricFeet
Member
- Joined
- Feb 4, 2017
- Messages
- 303
Yay!Phil42 said:I have spend some time to adjust the tilting of the table and it might need just a little final little tweak to get it almost perfect level.
Yesterday i tested the "rip guide" method and the results were at least much better, still not perfect, but maybe good enough for the purpose of woodworking. The main table is not as flat or perfect level as you might expect or wish it were as you can see in picture three.
Yes, the table flatness is disappointing too. I persuaded a high point in mine down a little bit with clamps. Pic here:https://www.festoolownersgroup.com/...tool-csc-sys-50-tablesaw/msg707196/#msg707196 (not recommending anyone tries this, but it helped a bit for me).
luvmytoolz
Member
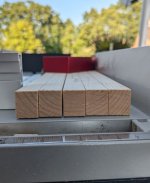
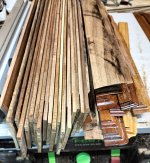
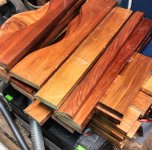
For anyone sitting on the fence about getting the SYS 50, it really is a sensational tool and incredibly handy. I couldn't get to my bandsaw as I have a lot of work going on, so I used the SYS 50 to break down 11 hardwood kitchen cabinet doors to reclaim the timber, and I thought the battery power and run time might be of interest to others.
Starting out with a freshly charged pair of 8ah's, I did 4 rips on each corner to separate the rails from the stiles. I then ripped all the panels along the glue joins, and then ripped the raised moulding off each of the sides cut from the panels to get 6mm thick boards.
The batteries were still showing 2 out of 3 bars capacity, so theoretically I could probably expect to get double or close to, the same amount out of one charge. Overall given the density of the timber and the amount of time the saw was running I'm pretty pleased with the performance.
[attachimg=1][attachimg=2][attachimg=3]
Attachments
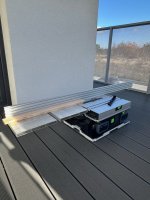
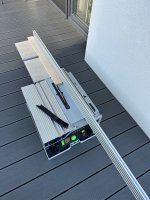
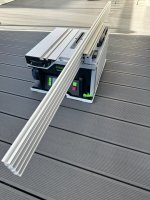
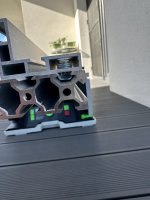
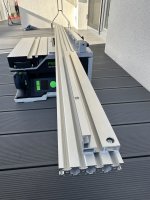
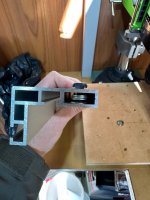
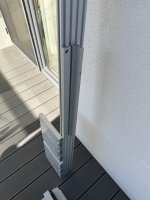
Rip fence + supporting in feed and out feed table, hope photos will be self explanatory. Used aluminium 20*80 v-slot profile 1,5 m (30 $) and two scrap pieces of aluminium profile that I have bought from the same supplier for 2$ each.
[attachimg=1]
[attachimg=2]
[attachimg=3]
[attachimg=4]
[attachimg=5]
[attachimg=6]
[attachimg=7]
[attachimg=8]
[attachimg=9]
[attachimg=10]
[attachimg=11]
[attachimg=12]
[attachimg=1]
[attachimg=2]
[attachimg=3]
[attachimg=4]
[attachimg=5]
[attachimg=6]
[attachimg=7]
[attachimg=8]
[attachimg=9]
[attachimg=10]
[attachimg=11]
[attachimg=12]
Attachments
-
 IMG_1264.jpeg688.1 KB · Views: 1,122
 -
 IMG_1263.jpeg825.4 KB · Views: 1,123
 -
 IMG_1260.jpeg758 KB · Views: 1,126
 -
 IMG_1259.jpeg798.8 KB · Views: 1,118
 -
 IMG_1258.jpeg825.6 KB · Views: 1,123
 -
 IMG_1257.jpeg718.9 KB · Views: 1,132
 -
 IMG_1256.jpeg672.4 KB · Views: 1,121
 -
 IMG_1255.jpeg408.1 KB · Views: 1,129
 -
 IMG_1254.jpeg519.9 KB · Views: 1,138
 -
 IMG_1250.jpeg451.1 KB · Views: 1,118
 -
 IMG_1249.jpeg469.1 KB · Views: 1,128
 -
 IMG_1265.jpeg612.6 KB · Views: 1,115
ElectricFeet
Member
- Joined
- Feb 4, 2017
- Messages
- 303
That’s a seriously nice solution. Wish I’d seen it before buying the Bow Products Xtender fence.Serhii_R said:Rip fence + supporting in feed and out feed table, hope photos will be self explanatory.
The Xtender doesn’t fit “natively” on the CSC SYS 50. That is, it clamps on to the CSC’s fence, as yours does.
The holy grail would be to find a profile that actually fits precisely onto the fence support, as a replacement fence.
[member=59331]TSO Products[/member] hope you’re listening [big grin]
HighlandMarine
Member
- Joined
- Apr 21, 2023
- Messages
- 95
ryanjg117 said:On the topic of cool fence accessories for the CSC SYS 50, TSO just released adapter brackets that allow mounting of the JessEm flex stock guides onto the OE Festool fence:
https://www.festoolownersgroup.com/...ides-on-the-new-festool-csc-sys-50-table-saw/
I’ve got their sys 50 accessory kit coming tomorrow, including a larger miter fence with flip stop, the Jessem guides, mounting brackets, can’t remember if there’s anything else other than a systainer and foam insert beyond that. Really happy with every bit from them so far, the guide rail squares and the domino Bigfoot are fantastic, and I’m confident this kit will improve on an already great saw.
Used to carry a tsc55, fs800/2, and a grs16pe with me everywhere, now it’s just the csc sys 50 for everything. Figured it would be useful, but as a marine contractor it’s indispensable for making small trim panels, bezels, filler strips, and more. Wish the Ctc sys had battery life like the saw, vac has an extra energy set, while the saw rides on one pair for days.
I was really enjoying my CSC 50 until it developed a blade wobble after a few hours of usage. I noticed some noise when entering a cut and the end grain went from smooth as glass to rough with saw marks. I can move the blade left to right almost 0.5-1mm with a soft thunk at each end. Seems like the entire assembly the arbor is on is moving around now, I can also push the assembly where the belt drives are back/forth from the panel under the extension table. I re-ran the reference drive successfully and that didn't do anything. Applications support said this would be a send in fix, but I think I'm returning the whole package since I've only had it a few days. With how tightly packed everything is in the saw I couldn't see anything obvious and didn't want to take it apart any further.
Has anyone else seen this issue? It's making me hesitant to purchase another one despite liking what it offers.
Has anyone else seen this issue? It's making me hesitant to purchase another one despite liking what it offers.
Michael Kellough
Member
mavbo said:I was really enjoying my CSC 50 until it developed a blade wobble after a few hours of usage. I noticed some noise when entering a cut and the end grain went from smooth as glass to rough with saw marks. I can move the blade left to right almost 0.5-1mm with a soft thunk at each end. Seems like the entire assembly the arbor is on is moving around now, I can also push the assembly where the belt drives are back/forth from the panel under the extension table. I re-ran the reference drive successfully and that didn't do anything. Applications support said this would be a send in fix, but I think I'm returning the whole package since I've only had it a few days. With how tightly packed everything is in the saw I couldn't see anything obvious and didn't want to take it apart any further.
Has anyone else seen this issue? It's making me hesitant to purchase another one despite liking what it offers.
That’s what I’d do. The first time I’ve heard of this kind of problem.
luvmytoolz
Member
I use mine a real lot, and must admit I probably don't treat it as delicately as I should, but it's a stellar performer and ultra reliable so far for me. Sounds like a factory fault.
I ended up returning my saw and purchased another one. No issues with the new one (so far) and if anything the sliding extrusion/table are a bit flatter on this one.
I tested the floor model and my new saw, both have the same motor movement side to side, so I'm guessing my first saw had a bad bearing or something that worsened after a few hours of usage. I had a similar issue when I bought my TS60 (terrible cut quality) and trading it in for a new one fixed it right up with no issues since, hoping for the same with this saw since it's working so great now.
I tested the floor model and my new saw, both have the same motor movement side to side, so I'm guessing my first saw had a bad bearing or something that worsened after a few hours of usage. I had a similar issue when I bought my TS60 (terrible cut quality) and trading it in for a new one fixed it right up with no issues since, hoping for the same with this saw since it's working so great now.
Chainring
Member
[member=80195]mavbo[/member]
Curious what the manufacture date is on your CSC SYS 50? I just received one last Friday and it's from Feb 2024.
Curious what the manufacture date is on your CSC SYS 50? I just received one last Friday and it's from Feb 2024.
Today, I bought a saw manufactured in December 2023.
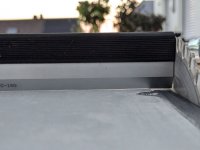
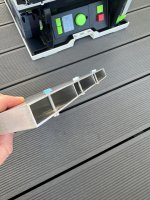
I check the flatness right out of the box: the sliding table is concave at around 0.4 mm in the middle.
I contacted the shop, that forwarded my concern to Festool, which replied:
[list type=decimal]
[*]+/- 0.5 mm of flatness in the sliding table is within specs
[*]it is a jobsite saw (I don't know how to interpret this... so it's not meant to be properly built ?)
[/list]
I do not agree with their vision of precision and think their use of the "precision" term all around the product page is misleading.
There is nothing challenging into ensuring that a 175 mm wide table of a 1700 Eur machine stays flat.
For my first purchase of a Festool product, I'm quite disappointed.
I'm bringing the machine back to the shop tomorrow.
woodferret
Member
Use the 30-day. There's no fighting that tolerance. I went to the store later with a ruler and feeler gauge and went through their boxes (bought enough Festools from them). I saw a 0.5mm in one and it was hilarious. Went home with a 0.2mm that was only on the center rib and could be delt with by tape. The mfg tolerance is insane which reflects their current choice of infuencers.
I went back to the shop and checked their machine in display.
The tolerances were better:
[list type=decimal]
[*]The dip is at 0.35mm at most, and mostly in the center rib of the table
[*]The sliding table is not tilted and perfectly leveled with the fixed table
[/list]
I exchanged my machine with this one, came back home and added two layers of 3M 0.15 mm tape to the center rib.
Checking with my straight edge, it seems now very satisfactory.
By the way, I calculated the angular deviation of a 0.5mm dip in the sliding table, if you attempt to cut a piece of wood that sits in that dip. It is ~0.30 degrees !
It means that without touching anything from your machine, you can obtain those results
[list type=decimal]
[*]With a flat piece of wood that is larger than your machine, you can achieve a perfect angle
[*]WIth a flat piece of wood that sits in the dip, you will have a 0.30 degrees deviation
[/list]
This is nuts, what is the point of being able to tune the machine with 0.1 degrees increment if just changing the piece of wood is having 3 times that effect [tongue]
woodferret
Member
Even more funny was the response I got from Festool about that deviation while in the zone - 'adjust the tilt 0.3 degrees opposite'. I think they failed to recognize that it's a dip and the angle changes depending on length of cut in that zone; pretty quickly I might add. 
To be fair though, I think they were getting exasperated on the front lines too. They were the ones to suggest returning it and try again - even gave me a time allowance on the switcharoo.
To be fair though, I think they were getting exasperated on the front lines too. They were the ones to suggest returning it and try again - even gave me a time allowance on the switcharoo.
Similar threads
- Replies
- 6
- Views
- 1K
- Replies
- 15
- Views
- 586