Festool Domino XL position registration for carcase butt joint

mobdoctor37

Member
Joined
Aug 4, 2020
Messages
2
Question from a novice:

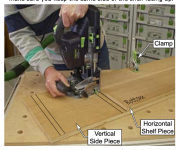
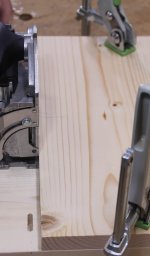
I just got a DF 700 and I'm trying to figure out how to register the position of mortices when plunging the joiner to make carcase butt joints.  In the supplemental user manual there is a guide for making the carcase butt joint by clamping the shelf to the vertical workpiece on a flat surface, rotating the fence 90 degrees to cut mortices for the shelf and rotating the fence back to cut mortices for the vertical piece at the same time.  The registration with the pins is simple to understand -- what I am confused by is how to register the position of the mortice when plunging the joiner downward.  The only workaround solution I've found is to cut a 7.5mm spacer that accounts for half of the 15mm distance between the edge of the fence and the center of the mortice.  It feels like I'm missing something.  Please help!
 

Attachments

  • Screen Shot 2020-08-04 at 3.41.13 PM.png
    Screen Shot 2020-08-04 at 3.41.13 PM.png
    605.3 KB · Views: 323
You need to put pencil line(s) on the shelf piece first to indicate where you want the mortises to be milled. See the (faint) middle placement line in the image?
 

Attachments

  • IMG_0835.jpg
    IMG_0835.jpg
    236.8 KB · Views: 303
As long as your mortice is near enough to the edge: You can register with the pins, in both plunge directions.

In case you want to reference away from the side you can use a pencil line or clamp something into the corner created by the two pieces and reference with the side of the machine against it.
 
Gilbert is right. If you can use the pins on the XL (mine is a DF500) or unless you really need the middle mortises to be centered between edges, use the pins.

Also don't forget to use a wide setting for the middle mating mortise (i.e., one cut narrow and the mating one cut wide).
 
This is all really helpful - thank you!
This solves one part of the problem but I’m still confused about using the xl when it’s fence is at 0 degrees for making the carcase butt joints.  When the fence is rotated at 90 degrees I can register the position of the mortice off of 2 edges quite easily.  I understand that the pins + pencil line gives you that 2nd point of registration but the xl is difficult to hold in place when the fence isn't at 90 so I'm having a hard time getting precise m&t's in that orientation... Thats why I feel like I'm doing something wrong - maybe its something I just have to get used to..  In the supplemental manual theres someone clamping a board (the shelf) to the work surface to act as a straight edge which would provide that second point of registration - but - if I'm using 3/4" material (which I am), calculating where the pencil line and/or clamped piece should be positioned is quite tricky / also leaves a lot of room for error.  Maybe it just requires the seneca adapter plate (which I don't have yet)  but I can't imagine how that would be a complete fix for this issue.
 
The pencil line should reflect the top of the shelf location.  Rather than using the fence at 90 degrees  as the tool registration point, when doing butt joints the bottom of the tool becomes the registration  point.  By clamping the shelf on the pencil line the 90 degree corner formed the shelf and the bookcase side becomes the common registration point.  The mortise done horizontally to the shelf and vertically to the case side aligns the mortises.  Spacing the mortise horizontally  can be done with the pins or by a clamped block mentioned by Gregor.
 
When using the fence to register, whatever the angle: clamp your workpiece so you can hold the 700XL by the fence handle only and have the weight of the machine align the corner made by the fence snugly onto the edge you use for referencing. Then plunge.

When using the front-bottom edge of the machine for registering (regardless of having it sit on the base or stand on the fence): use the hairline on the bottom, the pin or the side-bottom edge for referencing.

When referencing the 700XL using the front-bottom edge of the machine the mortise is created at a 15mm offset, in case you have thin stock you need to shim it up for the butt-joint to be centered, remember to offset the matching mortise in the face accordingly.
 
Back
Top