Festool HL-850 power cord replacement

nautilus33

Member
Joined
Oct 30, 2023
Messages
6
Hi all,
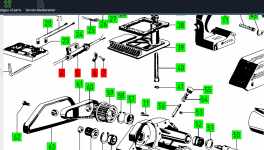
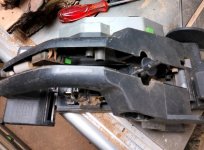
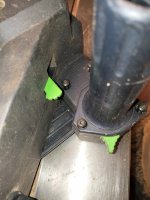
seems my planer needs power cord replacement as it seems to be internally cut just where it comes out of the planer. Removed the screws, but cannot get it apart as it stickes to where the on-off switch is. Do I have to somehow remove the screwthat the dust extractor adapter is tightened to? As I do not see a waz to do that.
 
welcome to the fog. there is a cable clamp,#6 and#7
 

Attachments

  • Screenshot (106).png
    Screenshot (106).png
    187.9 KB · Views: 84
If it's not sorted by the time I get home I'll have a look at mine to see what the trick is.

Btw, CSP Tooling make an absolutely sensational spiral carbide insert cutterhead for the HL850 if you're looking to upgrade it.
 
Thanks, Luvmytooz. No, still not sorted. Would be happy if you can check that for me, as I am out of ideas.
 
Man I can see why you had trouble! I ended up unscrewing all the screws on the right hand side of the planer, as well as the 4 to the left of the height adjustment handle, but while the rear separates fine, it still won't give at the front for some reason. I suspect I might need to remove the front base plate as well which I'm hoping might expose something stopping it coming apart there.

It's certainly put together solidly!
 
luvmytoolz said:
Man I can see why you had trouble! I ended up unscrewing all the screws on the right hand side of the planer, as well as the 4 to the left of the height adjustment handle, but while the rear separates fine, it still won't give at the front for some reason. I suspect I might need to remove the front base plate as well which I'm hoping might expose something stopping it coming apart there.

It's certainly put together solidly!

I was going to comment on this earlier but the site was dog slow and work was the opposite.

In any case, since Festool tools are intended to be serviced *by design*, if something seems like it doesn't want to come apart, don't force it; you probably missed something.  Sometimes the parts diagram is helpful in this endeavor (it usually is to an extent), but not all the time.  Usually with the right prying and inspection, you'll find the fastener that you overlooked or the secondary part that needs to be removed first.

This is much different than some cheaper tools whose body is fully molded and glued together in a manner that is as cheap, disposable, and unfriendly to maintain as possible.
 
I'll be having another better go tonight, but yes definitely not forcing anything with this gear!

I can get to all the motor wiring but just can't separate the shell at the front with all screws removed, so I think under the front base plate there might be some more screws. I'm dead curious to see now, plus I can give it all a good clean while I'm at it.

I was very surprised the belt looks practically new, considering I've been using and abusing this sander for several decades, zero dust in the belt/gear section, very impressive!
 
Same here, I can separate the back half of the right side, but the front from the on switch onwards it just does not come apart. Will be checking too today.
 
Ok, level unlocked!

Undo all the screws on the right hand side, yep, every single one.
Pull the green tab out of the blade guard, and remove the guard assembly.
Shell will now open so you can get to all the wiring!

Optional, you don't need to but might as well undo the front base plate, and the handle assembly on the left side to clean it all.

I'd also recommend removing the cutterhead to avoid damaging it.

In the last pic with the red hex key in the screw hole, this screw didn't come out cleanly and was stopping it coming apart, I had to lever the halves while trying to undo it to get it further out, once I did, it easily opened up!

You also need to just take note of the blade guard spring slots when you insert it in the down position so it's tensioned properly and slides in ok.
 

Attachments

  • HL850.01.jpg
    HL850.01.jpg
    402.2 KB · Views: 50
  • HL850.02.jpg
    HL850.02.jpg
    383.8 KB · Views: 42
  • HL850.03.jpg
    HL850.03.jpg
    337.9 KB · Views: 48
  • HL850.04.jpg
    HL850.04.jpg
    395.6 KB · Views: 39
  • HL850.05.jpg
    HL850.05.jpg
    447.2 KB · Views: 46
Thank you. So, once I unscrew all screws including the one in the blade guard, I simply have to pull the green lever that lifts the blade guard? Did I got it right?
 
Just a follow up- exactlz that green lever was the problem. Thanks to luvmytoolz, it is all sorted now :)
 
Back
Top