Festool RO90, Mirka CEROS 6' 5mm vs Historic Lime Putty rendered walls

Spukhafte

Member
Joined
Mar 22, 2015
Messages
5
TLDR: I need to sand concrete, stone, granite (Actually 1.3 century old Burnished Lime Plaster) with dust extraction and I can't find an abrasive that will chew the surface.  Mirka Ceros 6" or ROTEX90, or Bosch 5" RO?

Abrasives for Lime Putty finished, smooth rendered walls to open pores for limewash, and venetian plaster?

Okay, I've lurked here for 6 months, a lot of good information. Thank you for that. I'm now at a bit of a bind-

Not just a homeowner, I put in 20 years honing trades working with my father before I became a physicist.

I  have an 1885 Victorian, with that is my biggest project to date- to restore our home against 70years of unskilled 'craftsmen' while keeping my family and I relatively safe from hazardous materials. Festool and others have been a welcomed addition to this end. 

However, I've been able to remove the designer's paper beneath layers of paint and horrible "skim coats" of gypsum joint compound down to the finished lime plaster. I've slaked my own high calcium Quicklime to lime putty and aged for over a year so far. The walls are remarkably smooth save some natural hairline shrinkage cracks, and a handful of walls with serious settling cracks. These will have to be addressed with lime and mesh once I finish jacking the house and repairing the Main girt and center supports.

In the meanwhile, I want to finish the walls with pigmented Lime Wash. They are mostly glass smooth, I've removed what glue sizing I could. It is a smooth, burnished surface. Not a lot of mechanical grip for lime. Now I would go across with a devils float, or/and two other methods I've thought up:

shallow 5mm cuts with a ts75, guide rail in a grid array. 15, 10, and 20 mm whole saws run 2-5mm into the surface in a scatter shot pattern to create teeth for a positive mechanical lock, were I ready to mesh and re render a brown and finish coat- but as I'll be moving the load distribution: I'm not there yet.

I want to limewash, and in some small rooms, fairly isolated from the center girt beam- where the walls are pristine: trowel on smooth, pigmented glossy venetian marble lime plaster. If I was not able to get down to the beautiful fished lime rendering, or didn't know about building science: I'd use a quartz primer.

But I don't want to change the vapor handling of of most walls, i.e. forfeit or in the case of quartz primer: retard the hygroscopic nature of the lime render from one side (or any).

SO: I need to sand the surface, and remove the burnish, and any glue sizing, beer or soap or oil etc. that may have been used to seal the finished lime rendered surface, so that I can achieve a sufficient maximum of mechanical and chemical bonding affinity for the lime wash or finish plaster.  To open up the pores of the burnished lime plaster.

I need either
1.Diamond
2.Silicone Carbide
3. MAYBE...a really good aluminum oxide
4.?
I need it to fit a Mirka Ceros 6" or Festool ROTEX90 or a Bosch 5" RO so I can use dust extraction.

The problem is, festool only has Saphir which is Silicone Carbide and Aluminum oxide, and *could* do concrete- But they only make it for Delta pads and other sanders like the planex from what I can tell.  Abranet, Abranet HD, and Abranet ACE don't cut it, Neither does GRANAT.

I will eventually get a Planex, but the Domino XL, TS75, LS130, CT36E, CT36AC, CTMIDI, ROTEX90, CEROS 5mm6", OF1400, Guide Rails, Miller Dynasty 280DX, torches, TIG cooler, Fluke DMM, Paint Shaver Pro, and all the other tools and consumables of a year long spending rampage has me putting that off for a year...

Kinda feel that for what I've spent on premium tools- I should be able to find *something* in the way of abrasives for the $1,000 on the mirka and Festool to leave the angle grinders as primitive solutions, and keep the 2k in Festool Dust extractors: Relevant.

How would you abrade these walls to prep for finish? ....without throwing more money at Festool. [wink]  Starting to think my only solution is to buy a 4" diamond disc, or a pack of planex or ras saphir and recut the dimension and cut out the holes for the ROTEX and CEROS.   


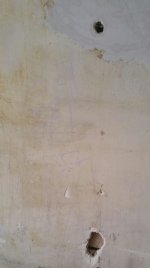
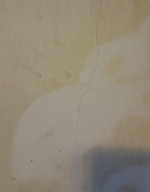
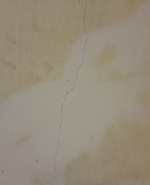
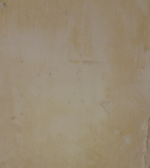
*EDIT: Attached Picture.  Pictured: Lime Plaster wall for referencing the the color and finish and some egregious gypsum skim coat during the removal of paint, paper and patch work.
 

Attachments

  • plaster wall.jpg
    plaster wall.jpg
    464.3 KB · Views: 557
Saphir is available in 5 and 6 inch discs also.

I never worked with Lime, is that stuff really as hard as concrete or granite?

Anyway, I am not impressed with the ability of sanders to do really hard materials. All they can do is scratch the surface a bit, but not serious leveling. For that you need an angle grinder with diamond disc.
 
Thank you Alex! That was quick! I was frustrated with the search for abrasives so I decided to take action, it isn't as hard as concrete or granite but it is quite comparably, as hard as limestone or marble.

As that is what it is made of, it's a thermal decomposition reaction of Limestone or Marble (CaCO3), heated to 900c for hours in a kiln, to produce Quicklime (CaCO) which is full of heat energy, unstable and thirsty for water, you slake it by adding water it a controlled rate to stabilize a volatile reaction as it releases stored energy as heat, becoming Ca(OH)2- in my application (plastering and mortar- you then take this resulting putty after it stops releasing heat and has cooled and screen it if it was with rock quicklime, or simply stir and cover with water to keep it from getting what it now wants: CO2. Storing it, allowing it to slake by hydration swells the lime particles increasing plasticity and work ability and helps eliminate lime blow out. Old roman law dictated lime putty had to be aged for a minimum of 3 years, frescoes and the master plasterers of the 19th century would often age their putty for 10 years for frescoes and final finishing coat of lime. When you apply it, it stays workable for hours, and you allow it to dry slowly, covering with wet cloth, or moistening, as it binds with C02 to revert back to its original state- CaCo3. Limestone or marble. So it is for all intensive purposes- limestone.

It's much more difficult and time consuming to work with, but it has many advantages. I just wish I didn't have to sand it.
 
Update. The first 2 are Reglan Purple Resin Bound 4" P80 belts on a Makita Belt sander for 15 Seconds. Chewed the shit out of it like it was gypsum. Those do the trick, maybe the ~80% dust collection can be improved/acceptable.

The third is an area fresh abranet 5" p80 on the Bosch RO10, after a minute. Still 40% incomplete. It'll be a slow go, if it does stay sharp with that.

The 5mm orbit of the Mirka didn't want to do anything my first try. 

Thinking I wouldn't get far during this test I left the DEs downstairs. I forgot how much I needed them. 
 

Attachments

  • Lime Sand 1a.png
    Lime Sand 1a.png
    926.7 KB · Views: 441
  • Lime Sand 2a.png
    Lime Sand 2a.png
    2.3 MB · Views: 445
another option which I like better is to demo the walls entirely! and you can work on some other worms at the same time.
 
Spukhafte said:
As that is what it is made of, it's a thermal decomposition reaction of Limestone or Marble (CaCO3), heated to 900c for hours in a kiln, to produce Quicklime (CaCO) which is full of heat energy, unstable and thirsty for water, you slake it by adding water it a controlled rate to stabilize a volatile reaction as it releases stored energy as heat, becoming Ca(OH)2- in my application (plastering and mortar- you then take this resulting putty after it stops releasing heat and has cooled and screen it if it was with rock quicklime, or simply stir and cover with water to keep it from getting what it now wants: CO2. Storing it, allowing it to slake by hydration swells the lime particles increasing plasticity and work ability and helps eliminate lime blow out. Old roman law dictated lime putty had to be aged for a minimum of 3 years, frescoes and the master plasterers of the 19th century would often age their putty for 10 years for frescoes and final finishing coat of lime. When you apply it, it stays workable for hours, and you allow it to dry slowly, covering with wet cloth, or moistening, as it binds with C02 to revert back to its original state- CaCo3. Limestone or marble. So it is for all intensive purposes- limestone.

Thanks for the explanation. That process does look quite a bit more complicated and exothermic than normal plaster which of course is also a Calcium compound, so the chemical bound is probably quite a bit stronger.
 
duburban said:
I'd use this polisher with a dust shroud and a resin filled diamond cup wheel. When it comes to removing masonry material you really can't beat the diamonds. An auto clean vac or dust deputy would be nice too. These vendors are just for the images.

http://ussaws.com/7-grinder-vac-polishing-assy-metabo-10-amp-700-2-200-rpm-with-convertible-shroud.html

http://omegadiamond.com/414-747_image

That's a really good idea, thanks. Problem is, it's another tool- and half the price of a planex. though I could probably take one of my grinders and fit a dust shroud. It's a noise and weight balance/distribution thing, I have this weird condition where when I pay 4-500$ for a sander, I expect it to have abrasive selections to meet whatever I'd throw at at. Not less selection than a 50-$200 sander. I'm afraid that with the right abrasive- it's going to hog off material eagerly and then, without ergonomics and balance: it's going to be pretty shaky trying to avoid gouging the walls or doing damage.

I still want flat walls, just a little more porous. I think the 50$ bosch or belt sander might be my best bet, unless I water down hydrochloric acid, do an etch followed immediately by a sodium bicarb, or even sodium hydroxide pH adjustment to revert from acid to alkaline and prevent further degradation... slippery slope.  As you can see, even the bosch took a good minute for only 10% efficacy on a 2'sq. Better than the mirka which  barely nibbled on it. I wouldn't buy a mirka again, their service and defective tools are the worst.

As for tearing down the walls: that's not an option. They are flatter than any plasterer I've seen today could do, they are hygroscobic with moisture handling leading to more efficient and comfortable summers with lower humidity, their alkaline pH means that mold isn't going to have an easy time growing on them, their much denser than gypsum and therefore deaden sound transmission from beyond the walls and outside, their hard as.. stone so they don't dent easy- try putting a fist through lathe and plaster, you shouldn't patch with gypsum because gypsum is much more rigid while lime is able to flex and expand and contract in thermal cycling, lime does autogenous healing where small cracks appear and during small movements the two edges abrade loose lime crystals which reform with humidity to close the crack. gypsum gets wet: It looses 80% its strength and can mold, lime gets wet: it can often dry out retaining all of its strength and doesn't foster mold growth.  It's chemically compatible with lime washes and venetian plaster which are the best wall decorating bar none in my opinion, whereas gyspum is not chemically compatible and wont breath.

If I'm to rip out the plaster I might as well get rid of it and build my own timber framed home. That's the dream. Lime plaster cures for a year pulling CO2 from the house, and they couldn't paint or decorate the walls for at least a year because of the alkalinity of the walls. It took 6 months just to plaster a home and the banks wouldn't release the rest of the funds until the plasterers were done- it's that big of a deal. Then gypsum compunds arrived in the 1900's and offered a quicker set, that lost some craftsman. Finally gypsum wallboard came out in the 40's just as the world war II ended and eager to build their own homes not wait 2 years to start their family a lot of homes and the builders started using gypsum and joint compound. Plastering was an apprentice craft like shipbuilding whereas with gypsum you could pick it up pretty quick and run with it.

It's far superior, but just as portland cement beat out lime mortar in tuck pointing for speed, so did gypsum to lime plaster.
Like you I first planned to rip out the plaster that's withstood over a century and put in gypsum board to a level 5 that won't last 30 years of what the plaster went through. Then I started to research lime plaster, what goes into producing and installing it, and I cant throw out the work of master craftsman who are now ghosts just because it's a pain in the ass. I'm glad I only veneered one wall in 5/8" before I learned that. The plaster is more important than all the old growth SYP the home is constructed of and the painted SYP millwork- I'll sooner toss the millwork and mill my own out of a wood I with more preferential grain aesthetics- and there's people who would lynch me for that. I'll probably rip out the first floor ceiling though and resort to a blueboard with gypsum veneer "plaster". I can get old growth and reclaimed wood, I can't get old plasterwork.

All good ideas. I'm just going to have to rough this one out unless someone knows of a way to make a Mirka do its job or suggest better RO abrasives. The mirka is nice when it works and has the right abrasive. Or another way of abrading opening up the pores in the lime plaster so it will absorb the limewash. I just don't want a chalky limewash that doesn't fully bond or venetian plaster that spalls off. Might have to hand sand with a diamond pad.

Does anyone know if you can switch pads on the ceros from 6" to a 5". I heard no, but I can't see why not. Same threading.
 

Attachments

  • Lime Sand 3a.png
    Lime Sand 3a.png
    770.5 KB · Views: 378
I would just suggest you go elsewhere for your answer. Seems like a specialty topic that you aren't going to get a favorable response to here on the fog. You've already turned down many answers for this or that reason so most likely this forum wont be able to help you answer this question.
 
rizzoa13 said:
I would just suggest you go elsewhere for your answer. Seems like a specialty topic that you aren't going to get a favorable response to here on the fog. You've already turned down many answers for this or that reason so most likely this forum wont be able to help you answer this question.

As with many tasks there are many ways to approach, its always best to hash them all out. Thats ok.
 
Right, the topic has been only alive for 8 hours, on a Sunday nonetheless.

Anyways, I think you want the star attachment for a more controlled removal than the straight segmented cups.

edit: see the scarifier on the RF 14-115.

 
duburban said:
acrylic bonding agent and skim coat?

You are 100% correct, that would work perfectly. Particularly a Quartz primer, as the aggregate gives teeth with an acrylic co polymer binder that's alkaline resistant. with plaster, not only are there finished keys or grooves you trowel in between coats but differing aggregate size mixed with the lime putty binder (usually large to small, but sometimes small to large) from coarse aggregate, sharp masons sand, a smaller sharp sand and then pure lime. It is the least work and a fine solution, one could even use a flat acrylic mixed with quartz. My only concerns were: I'm thankfully able to go down to the lime surface with minimal effort because of the designers paper, would I be hampering my newly regained vapor handling hygroscopic lime render? The Perm of acrylic is ~5.75 perms per ~5mil coating, and that's a whole lot better than Oil at ~.9. according to http://www.uaf.edu/files/ces/publications-db/catalog/eeh/EEM-00259.pdf the perm of plaster on wood is ~11.

With an acrylic I could expect the halve that. I did a lot of calculations when I chose to sheath my home with EPS at 1.5" 5.7 perms, restore the old growth heart redwood lap by removing 30 coats oil to bare wood, sealing with PPG permenizer plus, back and end priming to reattach with a rain screen and face prime with bin123. I filled the  walls succinct to my calculations- a zone 5 home should have a 68/32 split R-18 value between walls and sheathing respectively and should have 5-6 perms of vapor transmission. ...I haven't determined yet if 5-6 balanced on the interior is in fact the best.

If it wasn't my home- That (acrlyic quartz primer)is exactly what I'd use, with full disclosure of course.

rizzoa13 said:
I would just suggest you go elsewhere for your answer. Seems like a specialty topic that you aren't going to get a favorable response to here on the fog. You've already turned down many answers for this or that reason so most likely this forum wont be able to help you answer this question.

Thank you! I agree, everyone you ever meet knows something you don't. Cast a wide net, even if you don't get your answer, you'll learn a lot.

sae said:
Right, the topic has been only alive for 8 hours, on a Sunday nonetheless.

Anyways, I think you want the star attachment for a more controlled removal than the straight segmented cups.

edit: see the scarifier on the RF 14-115.


Wow, that is a nice tool, "For effective removal of plaster, adhesive residues, soft screed and old paint from walls, ceilings and floors"  I really don't want to buy a specialty tool, but I guess it takes a special kind of obstinate fool to insist there's a way to use slotted screwdrivers that makes purchasing mortising chisels pointless..  Kinda reminds me of the paint shaver pro, which I had considered using, but I'd have to skim, and I'll be jacking the house. Nice thing about limewash- you can always change the color and go over it, patch: pretty much no prep or need to remove coatings. Maybe I could use it with a 15amp Variac or install a paddle switch. I like the adjustable milling depth ring and the fact that they have a scarifier meant for it. It makes the price feel a little more justifiable than a grinder with a dust attachment.

Thank you for all your help everyone, I really appreciate it! A lot of good ideas.
 
Back
Top