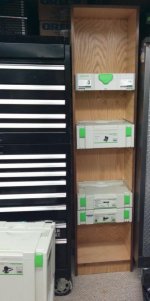
I though I'd share my project for storing my Systainers.
This design attempts to maintain space efficiency, while allowing any box to be removed/replaced in the middle of the stack. Festool offers a steel-frame solution which is half the height/capacity for $650 plus tax/shipping. I also could have built something out of 80/20 aluminum extrusions, but that would have been surprisingly expensive, and it would have involved putting together a materials list of obscure parts, fasteners, joints etc.
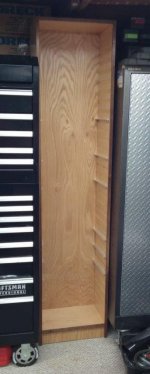
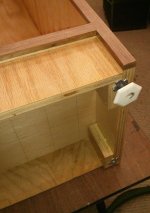
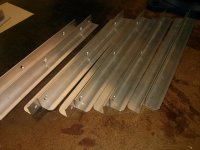
In this solution the boxes rest on inexpensive 3/4 aluminum angle (1/16" thick). The angle is recessed flush into shallow dadoes in the case. The aluminum angle has been prepped to accept 3 screws which hold it in the dado, but the dado bears all of the weight.
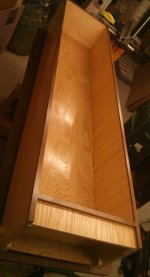
The spacing of the dadoes is slightly greater than the smallest increment in tool box size. This allows the 'shelves' to be re-arranged to hold any combination of Systainers in any order.
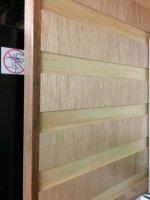
The Walnut edging on the front of the case was ripped from some twisted/warped/bowed 3/4" walnut stock. It would have otherwise become firewood, but it's easy to make it lie down when cut into strips . Of note: The wood is from the estate of the inventor of the BelTone hearing aid.")
Each dado was cut to width in 2 passes using a guide rail and a router. Both sides of the case were cut in the same pass.
I had originally planned to put a piece across the middle "shelf" to prevent the case from bowing, but so far it doesn't seem necessary. Maybe because of the shallow depth.
-Karl
This design attempts to maintain space efficiency, while allowing any box to be removed/replaced in the middle of the stack. Festool offers a steel-frame solution which is half the height/capacity for $650 plus tax/shipping. I also could have built something out of 80/20 aluminum extrusions, but that would have been surprisingly expensive, and it would have involved putting together a materials list of obscure parts, fasteners, joints etc.
In this solution the boxes rest on inexpensive 3/4 aluminum angle (1/16" thick). The angle is recessed flush into shallow dadoes in the case. The aluminum angle has been prepped to accept 3 screws which hold it in the dado, but the dado bears all of the weight.
The spacing of the dadoes is slightly greater than the smallest increment in tool box size. This allows the 'shelves' to be re-arranged to hold any combination of Systainers in any order.
The Walnut edging on the front of the case was ripped from some twisted/warped/bowed 3/4" walnut stock. It would have otherwise become firewood, but it's easy to make it lie down when cut into strips . Of note: The wood is from the estate of the inventor of the BelTone hearing aid.
Each dado was cut to width in 2 passes using a guide rail and a router. Both sides of the case were cut in the same pass.
I had originally planned to put a piece across the middle "shelf" to prevent the case from bowing, but so far it doesn't seem necessary. Maybe because of the shallow depth.
-Karl
Attachments
-
 IMG_20131111_011226.jpg104.4 KB · Views: 1,159
 -
 IMG_20131111_011738.jpg85.6 KB · Views: 872
 -
 IMG_20131111_011411.jpg114.7 KB · Views: 910
 -
 IMG_20131111_010930 (2).jpg72.6 KB · Views: 792
 -
 IMG_20131111_011901.jpg73.3 KB · Views: 831
 -
 IMG_20131103_205836.jpg108.7 KB · Views: 723
 -
 IMG_20131103_225211.jpg99.5 KB · Views: 668
 -
 IMG_20130824_213716.jpg187.2 KB · Views: 905