Finally building the (ridiculously overbuilt) grill-stuff storage cart

rmwarren

Member
Joined
Jul 11, 2010
Messages
3,063
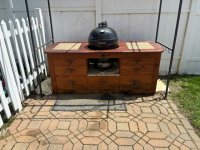
It's odd that the past 15-ish months have left me with more time available for shop projects, yet I've gotten not much done. Finally kicked off a long-delayed grill cart project, for which I made the concrete top pre-C19.

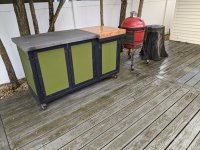
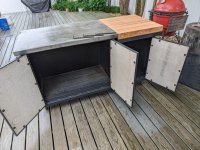
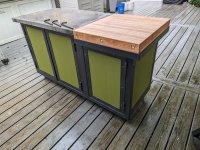
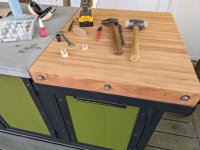
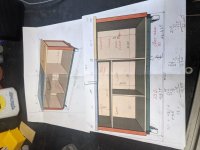
Whacked out a design in SU then went freestyle when I got to the shop, but the idea is to store all the grill accessories, OONI pizza oven, pans, racks, lump and paraphernalia in a weather-tite cabinet.

[attachimg=1]

It turned out a mite overbuilt. Grandpa was a Nevada mineral prospector who sidelined in the construction trades during the winter, his guiding philosophy was "If one nail is good, 3 must be better". Dad was a more subtle artisan type, framing and finish carpenter with 1/64th precision in everything he did. Like pattern baldness, some traits skip a generation. [doh]

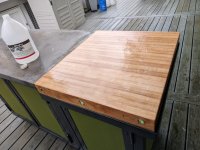
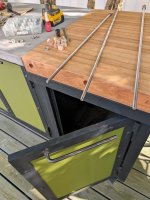
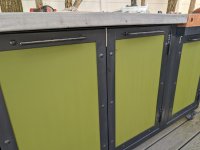
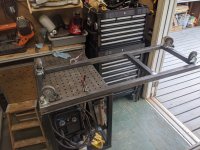
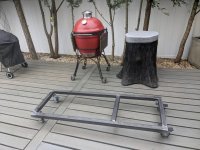
The base is 2" .120 wall tubing, uprights 2" angle, doors will be framed out of 1/8" flat bar. Overall, around 65" by 28", partial concrete top & the open frame will support a 24" by 28", 4" thick maple cutting board.

[attachimg=2]

[attachimg=3]

[attachimg=4]

I'm using up material accumulated over time, found a $50 sheet of OSB., sheet of .040 stainless and some priceless 18mm MDO & 8/4 maple.  Rounded up a bunch of square head bolts/lags from Fazzios' surplus room & I may see if I can get some pallets for wood to make up the door panels and add to the industrial look.

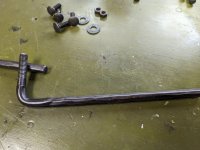
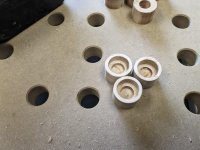
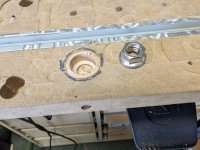
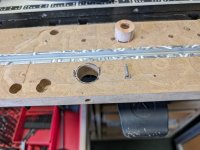
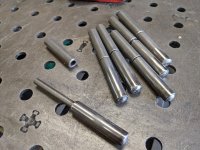
Doors are next, had to make up the bullet hinges from DOM tube & 5/16" CR rod as they are surprisingly hard to purchase.

[attachimg=5]

It feels good to be back in the shop, complete with my steel-toed welding shoes....

[attachimg=6]

RMW


Attachments

  • PXL_20210528_195517859.jpg
    PXL_20210528_195517859.jpg
    87 KB · Views: 1,219
  • PXL_20210528_195450537.jpg
    PXL_20210528_195450537.jpg
    311.8 KB · Views: 1,239
  • PXL_20210528_195720885.MP.jpg
    PXL_20210528_195720885.MP.jpg
    278.6 KB · Views: 1,147
  • PXL_20210626_191156980.jpg
    PXL_20210626_191156980.jpg
    316.2 KB · Views: 1,165
  • PXL_20210626_195639157.jpg
    PXL_20210626_195639157.jpg
    325.4 KB · Views: 1,130
  • PXL_20210626_190306109.jpg
    PXL_20210626_190306109.jpg
    272 KB · Views: 1,164
Only 1,050 days later I can update this to "Almost Finished" [doh]

Still some general clean up, install the handles and shelves and final caulking and weather seal for the doors.

[attachimg=1]

Managed to use up a lot of leftover materials after stuff got so costly. The side & bottom panels are from a sheet of 3/4 MDO I had on hand, then I laminated .040 AL sheet to tile backer board for the doors (should have painted the interior before assembly). Paint is left over from shop cabinets. The maple butcher block is 8/4 material I've had for ~15 years or so.

[attachimg=2]

Handles are some closeout 1/2" Indital ornamental iron I bent and threaded, just waiting for vinegar to strip the galvanization from the nuts and washers to install them. All the hardware is stripped then given a black oxide bath and finished with Penetrol. This holds up really well outdoors.

[attachimg=3]

The maple got 6-8 treatments of mineral oil last year, amazing how much it will soak up. I'd originally planned to run 3/8" all-thread through, tighten it up and bung the holes, then someone here pointed out that may force it to bow if the wood expands much. Rethinking this, I will probably loosely install the rods, bung the front holes and leave the rear open in case I need to adjust anything. I'm mostly worried about delamination but after sitting in the shop for most of a year it's been really stable, may not be an issue.

[attachimg=4]

Seeing this beside the egg emphasized that we are overdue for some maintenance, the deck was due for cleaning and stain last year and the kamado needs new side shelves.

[attachimg=5]

Still need to make some bins for storing lump, racks for stones/grills/griddles and figure out tool hangers, etc. Too many goofs to fess up to all of them, but it's finally time to load it up with all the outdoor cooking gear and order a cover.

The laughing gulls & night herons are back, temps are warming up and summer folks are showing up on the weekends. Pizza night as soon as the first busload of weekend house guests show up! [thumbs up]

RMW
 

Attachments

  • PXL_20240518_205325605.jpg
    PXL_20240518_205325605.jpg
    361.9 KB · Views: 681
  • PXL_20240518_204111345.jpg
    PXL_20240518_204111345.jpg
    296 KB · Views: 677
  • PXL_20240518_203322972.MP.jpg
    PXL_20240518_203322972.MP.jpg
    278.5 KB · Views: 684
  • PXL_20240518_202901671.jpg
    PXL_20240518_202901671.jpg
    386.1 KB · Views: 675
  • PXL_20240518_203022456.jpg
    PXL_20240518_203022456.jpg
    331.5 KB · Views: 670
That's one seriously over-built looking station you have going on there, even if it was quick to build  [big grin] I like it.
 
Crazyraceguy said:
That's one seriously over-built looking station you have going on there, even if it was quick to build  [big grin] I like it.

Yep. Guessing it'll be 250-300# when fully loaded.

I'm not one to unnecessarily rush stuff...  [dead horse]

RMW
 
Fantastic work! Love it!

It ain't worth doing unless it takes 3 people to lift it! ;-)
 
That's a super sexy grill station -- congrats!  Must weight a ton.
 
luvmytoolz said:
Fantastic work! Love it!

It ain't worth doing unless it takes 3 people to lift it! ;-)

3 people wouldn't have a prayer of lifting most of the stuff I build.  [big grin]
 
One of Grandpa's guiding principles, which I inherited, was "if one nail is good, 3 must be better". Similar principle applies to thickness of materials, etc. Pity the crew who'll be charged with loading up all this stuff for the estate sale.

Thanks.

RMW
 
Richard/RMW said:
One of Grandpa's guiding principles, which I inherited, was "if one nail is good, 3 must be better". Similar principle applies to thickness of materials, etc. Pity the crew who'll be charged with loading up all this stuff for the estate sale.

Thanks.

RMW

You should see how I rebuilt our lounge room, I reckon I could take out most of the stumps and the walls still wouldn't sag!

Although my wife has this weird notion I over-engineer things!
 
Richard/RMW said:
One of Grandpa's guiding principles, which I inherited, was "if one nail is good, 3 must be better". Similar principle applies to thickness of materials, etc. Pity the crew who'll be charged with loading up all this stuff for the estate sale.

Thanks.

RMW
A good strategy until you are the one taking it apart ..
[cool]

Last month I was disassembling a worktable which used several layers of screwed together material - the work board was 250 cm x 65 cm x 10 cm (10' x 25" x 4") and weighted well over 300 pounds so was impossible to move. Plus it was screwed-in to the under cabinets and the wall using between-layers screws.

There were ~500 (!) screws connecting the layers. As a bonus, about 50 of those screws has their caps embedded between two glued plywood layers, which I forgot about, so had to have their protruding ends cut off via an angle grinder after the OSB was force-pulled from the plywood. Ehm.

NEVER will I ever again use (lots of) screws in place of glue with the notion "so it can be disssembled and reused if needed".
[unsure]
 
mino said:
A good strategy until you are the one taking it apart ..
[cool]

I almost never design stuff I build for our own house to be taken apart. As I've gotten older I only want to tackle a job once, and never have to revisit it. When I did the lounge I ran heaps of spare conduit in all the walls in preparation for any possible wiring changes later, as there's no way the walls will ever be coming down without major effort!
 
luvmytoolz said:
mino said:
A good strategy until you are the one taking it apart ..
[cool]

I almost never design stuff I build for our own house to be taken apart. As I've gotten older I only want to tackle a job once, and never have to revisit it. When I did the lounge I ran heaps of spare conduit in all the walls in preparation for any possible wiring changes later, as there's no way the walls will ever be coming down without major effort!

20+ years ago I was hired to install a chairlift and build a handicapped ramp for a friend's mother's house.  Several years later she had to move into a care facility so my friend had to sell the house after removing the chairlift and ramp.  He told me later that the person hired to remove the ramp cussed me up one side and down the other because the ramp was so solidly overbuilt.  We laughed up a storm on that one.  [big grin]
 
Burst of energy after work yesterday, looks like the rainy season is mostly behind us, it's the best time of year here.

The handles double as towel/tool hangers:

[attachimg=1]

[attachimg=2]

Installing the tension rods, once again having bored a too-tight hole. I needed to chuck into a drill and thread through the holes, which left ~1" protruding. Thread-locked the nuts on but I doubt it will hold when I try to drive them in the rest of the way. I'll either have to remove the rods or drag out a welder and plug weld the nuts on. Is it worth the brain damage or just risk some glue joints opening up?

[attachimg=3]

The bungs made last year were counterbored for the threaded rod but needed one large enough for the nut. Shaper Origin to the rescue:

[attachimg=4]

[attachimg=5]

[attachimg=6]

[attachimg=7]

Next magnetic door catches and installing the shelves.  [thumbs up]

The 10-day was looking a bit better last night, but still some grilling/pizza weather over the weekend:

[attachimg=8]

RMW


Attachments

  • Screenshot 2024-05-21 072828.png
    Screenshot 2024-05-21 072828.png
    698.1 KB · Views: 471
  • PXL_20240520_220318437.jpg
    PXL_20240520_220318437.jpg
    146 KB · Views: 474
  • PXL_20240520_215712216.jpg
    PXL_20240520_215712216.jpg
    372 KB · Views: 474
  • PXL_20240520_215455983.jpg
    PXL_20240520_215455983.jpg
    225.8 KB · Views: 476
  • PXL_20240520_215340272.jpg
    PXL_20240520_215340272.jpg
    100.4 KB · Views: 471
  • PXL_20240520_223422288.jpg
    PXL_20240520_223422288.jpg
    93.8 KB · Views: 468
  • PXL_20240520_213600418.jpg
    PXL_20240520_213600418.jpg
    260.6 KB · Views: 477
  • PXL_20240520_213643441.jpg
    PXL_20240520_213643441.jpg
    166.5 KB · Views: 473
Really nice work!  Welding is a great complement to woodworking on so many projects.

Like the handle approach!

I assume you drilled the cutting board for the all-thread before you glued it up!
 
Nice, but my peanut gallery comment is concern over your use of mineral oil as an outdoor finish for maple. Yeah, I get you want something food safe for a cutting board, but I would have thought some kind of non-dryer content tung oil at least. And, while I'm at it, I don't get the threaded rod thing at all. When the wood expands, the rods will try to stop that. So, either the rods fail or the wood fibers get permanently crushed, and then when the wood dries, it'll shrink and the rods will be loose. What kind of glue did you use on the cutting board section?
 
neilc said:
Really nice work!  Welding is a great complement to woodworking on so many projects.

Like the handle approach!

I assume you drilled the cutting board for the all-thread before you glued it up!

Thank Neil, yes drilled then I used the holes with some non threaded rod for alignment during the glue up. Should have realized I'd have trouble inserting the threaded rod later.

RMW
 
smorgasbord said:
Nice, but my peanut gallery comment is concern over your use of mineral oil as an outdoor finish for maple. Yeah, I get you want something food safe for a cutting board, but I would have thought some kind of non-dryer content tung oil at least. And, while I'm at it, I don't get the threaded rod thing at all. When the wood expands, the rods will try to stop that. So, either the rods fail or the wood fibers get permanently crushed, and then when the wood dries, it'll shrink and the rods will be loose. What kind of glue did you use on the cutting board section?

I think you are dead right on the rods not helping, another of my brain fart moments. The corollary to the earlier rule is "why keep it simple when complication is so much fun"...

I used TB2 due to the longer open time. It's outdoor rated as long as it not left in full exposure to the elements. The cart will live under a ventilated cover so direct expose will be limited, expansion is just normal swings in humidity. And I had the mineral oil on hand.

I'm going to scrap the rods and just bung the holes and move on.

Thanks.

RMW

 
Very robust design!

I just sadly sold my cart (wood & granite) that was home for my Primo Kamado cooker (got a new pellet grill):

[attachimg=1]
 

Attachments

  • IMG_6138.jpeg
    IMG_6138.jpeg
    156.8 KB · Views: 435
smorgasbord said:
Nice, but my peanut gallery comment is concern over your use of mineral oil as an outdoor finish for maple. Yeah, I get you want something food safe for a cutting board, but I would have thought some kind of non-dryer content tung oil at least.

Or maybe cook up some wax/oil blend. 4-1 ratio of mineral oil to beeswax. It still soaks into the wood. but the wax kind of seals it, so it doesn't dry out as quickly. Mineral oil will never actually polymerize (harden) and it's easily renewable.
 
Crazyraceguy said:
smorgasbord said:
Nice, but my peanut gallery comment is concern over your use of mineral oil as an outdoor finish for maple. Yeah, I get you want something food safe for a cutting board, but I would have thought some kind of non-dryer content tung oil at least.

Or maybe cook up some wax/oil blend. 4-1 ratio of mineral oil to beeswax. It still soaks into the wood. but the wax kind of seals it, so it doesn't dry out as quickly. Mineral oil will never actually polymerize (harden) and it's easily renewable.

Good idea, thanks. I have beeswax on hand also.

RMW
 
Back
Top