For those with the boom arm, cord storage?

Gwerner

Member
Joined
Jan 3, 2015
Messages
260
Question for those with the boom arm on their CT, what have you come up with for storing the CT's power cord since you have to remove the cord wrap bracket from the back of the CT?
 
I spent a few hours looking to see if some of the 3D printer guys have come up with a solution but, haven't found one yet.  Seems that it shouldn't be that difficult. ( I don't own one and have no idea how to use one).

Sent from my iPhone using Tapatalk
 
For the boom arm on the CT 22/33 the cord brackets do come off the CT to mount the handle brackets but attach right back on to the handle bracket.  So you still get the cord wrap feature.  But when I looked in the supplemental manual for some pictures I was surprised to see the CT 26/36 do not have the same feature.  [eek]

Something for me to be aware of if I upgrade.
 
tjskinny said:
For the boom arm on the CT 22/33 the cord brackets do come off the CT to mount the handle brackets but attach right back on to the handle bracket.  So you still get the cord wrap feature.  But when I looked in the supplemental manual for some pictures I was surprised to see the CT 26/36 do not have the same feature.  [eek]

Something for me to be aware of if I upgrade.

Yep, I didn't even think about it before I bought the boom arm. Dumping the cord into the hose garage isn't really convenient since I keep a systainer full of my vacuum accessories on top of it.
 
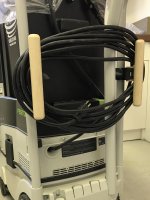
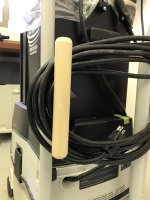
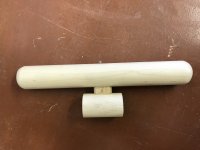
Lately, I've taken to wrapping the cord around the top ends of the two stabilizers that come with the Boom Arm. I don't use the stabilizers, so I keep the tubes tucked in tight along the sides of my CT.  Also, I can place vacuum tools on the top for ready access.
 
Here is a simple cord wrap when using the boom arm kit (496372) with a dust extractor.  Installing the boom arm involves removing the original cord wrap.  My proposed alternative is an improvement.  It is adjustable in the vertical direction meaning no more bending down!!!

Instructions:
- Start with a birch (hardwood) dowel that is 1 1/8" in diameter.
- For each side, cut the dowel.  One section is 8" long and the other is 1 7/8" long.
- Join the two sections with a 8mm x 50mm domino.  I plunged 20mm into each piece which leaves about 9mm between the pieces.
- Attach the cord wrap to the CT handle using Festool "leg attachers".
- The "leg attachers" are included in the boom arm kit (still looking for the part number).
- This cord wrap can be adjusted up and down (height).  Also, the holders can be swung in and out so they don't stick out side wise.


Attachments

  • CT Cord Wrap v02.JPG
    CT Cord Wrap v02.JPG
    682.1 KB · Views: 321
  • CT Cord Wrap v04.JPG
    CT Cord Wrap v04.JPG
    1.9 MB · Views: 268
  • CT Cord Wrap v05.JPG
    CT Cord Wrap v05.JPG
    1.4 MB · Views: 227
  • CT Cord Wrap v06.JPG
    CT Cord Wrap v06.JPG
    2.2 MB · Views: 249
  • Elec Cord Wrap v02 All.pdf
    Elec Cord Wrap v02 All.pdf
    108.6 KB · Views: 98
Back
Top