Garden Sheds - In Progress :)

ilovesunshine

Member
Joined
Jul 22, 2018
Messages
82
View attachment 1Hello All,

New here. Hope you're having an awesome weekend.

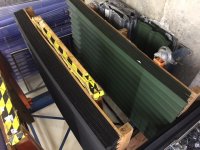
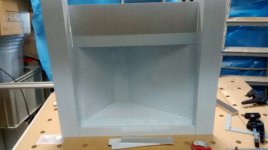
I bought a HKC55 cordless circular saw with a 1400mm guide rail and the angled guide rail too at the Festool roadshow last year in Twickenham.

Ashamed to say it sat brand new in it's box for quite some months as I'm not a carpenter or builder just a girl who likes woodworking as and when the mood takes me - but now it has been very well used and is the best thing I've ever bought and am now looking at other Festool products.

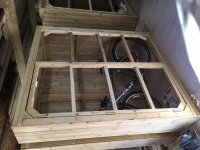
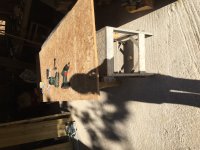
Have imposed myself on my parents in Cornwall to make use of Dad's Big Man Shed (!) so that I can finish these - they are a bespoke size (approx 80cm deep x 210cm tall at the tallest point and 180cm long) and each one is slightly different but very nearly the same size.

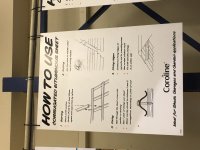
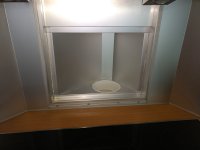
Just making the doors today and been wondering what the best roof material is - will probably just do felt but don't want it to rip on the corners and don't want to use the gas torch thing. Would gratefully take any recommendations for this.

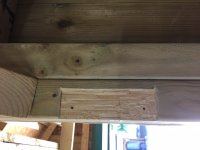
Anyway everything was cut with the circular saw even the small angles - it's probably sturdier than it needs to be but I like that :-) Bit of inherited Dad Engineering (you can see how he built his shed / workshop in the background!!)

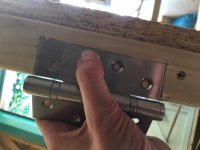
If anyone has any recommendations on what to use on the wood to treat it, would be gratefully received. Don't want to paint it as would like to preserve the grain of the wood if possible. So thinking some kind of oil or stain.

Thanks for any replies. If anyone's interested I can post finished photos :-) Enjoy the sunshine :-)
 

Attachments

  • IMG_1045.JPG
    IMG_1045.JPG
    132.6 KB · Views: 526
Welcome to FOG and great first post.  Are you planning to move those to the final location?  They look nice but hope they aren’t too heavy.

A simple roof would be corrugated metal here in the US and very inexpensive and easy to install.

Look forward to seeing progress.

Neil

 
Nice job! The wood does look too nice to cover with paint.

Nice to see the little corner blocks at the bottom. They’re rarely included in projects like this but they do add a surprising amount of resistance to racking.

Another benefit of the metal roofing Neil suggested is that it will weigh less than anything else that offers comparable durability.
 
Hey thanks for the replies :-)

Yes - I had considered a metal roof but the problem with that is, these are going back to London and will be in a garden that

1) the 2nd floor people above us might drop the odd cigarette butt on (not an issue for metal roofs but was considering EPDM and then dismissed it when I thought of that)

2) faces into the middle of a square which comprises 185 flats - and it is surprisingly VERY quiet at night so when it rains which it does a lot here in the UK, I am concerned it might be too noisy with a metal roof.

So I have marine ply that was going to be cut to size tomorrow or whenever I'm ready and then screwed onto the roof frame that's already attached to the tops of the wall pieces to give them stability while I put the cladding on and then was going to put whatever roof covering on top of that.

Felt seems to (reluctantly as I don't like it and especially don't like the corners as I am worried they will tear in not that long at all) be the best option considering the noise and cigarette butt possibility!!

I did however spy these at our local shop (attached) - I like the idea of them because if they get knackered you can just unscrew them and put a new one one, plus they seem to be the exact right size for my boxes quite randomly!

View attachment 1

So I'd put them on top of the marine ply. Thoughts?? Should I treat the marine ply first? I have this Zinsser all coat exterior paint which I had originally planned to paint the whole box with but it's black and garden faces west so not so sure about that now - don't really want to buy *more* of it in a tinted colour- but if I painted the marine ply black and then put black or green roof stuff on - would that be good??

The guy at the shop said its fibre board coated with some sort of tar stuff - so I guess really a little bit inferior to felt just easier to put on and change over and no corner detailing headaches!! I bought this stuff to stick the felt on with which is great when you first put it on but I built these super sturdy to last so don't want to be messing around with trying to scrape that off in 10 years time or whatever!!

Like the idea I could just switch those corrugated wavy type things over - but, are they rubbish?? If they are then maybe I won't bother!

Would love some advice on what to use on the outside though - good brands of stain or oil and how many coats and how often to reapply.

Thank you so much :-)

Oh and, hahahahahaha - yes weight is a problem, hahaha, the original plan was to make them here, then take them apart in panels with the cladding on, and squish them into my trusty Volvo estate and take them one at a time back to London. I did this with my previous Big Box that measured 3.2m long x 85 ish cm deep x 1.1m tall approx - another bespoke creation haha! Amazingly that all fitted in my car in it's pieces, obviously the 3.2 was in half - if you look at this shed the back is in 2 pieces for that reason. Plus if I have to assemble it myself the other end I couldn't carry the whole back piece in one bit I don't think.

Anyway I'll have to measure the exact pieces and my car but I am doubtful it will fit in, I think each piece is 5-10cm too big so will probably hire a van. A nice, sturdy van, suitable for really chunky heavy wood shed things. hahaha!

Thank you so much for your replies - checked out someone else's project here and seems a lot more professional!! Still you have to start somewhere :-)
 

Attachments

  • IMG_1022.JPG
    IMG_1022.JPG
    131.6 KB · Views: 296
Look into an automotive type noise-deadening or undercoating products.  Typically comes as an adhesive mat or in a spray can.
 
The stuff in the picture looks like a tar based material and can still burn, not as fast as EPDM (which is thinner so it needs less energy to ignite) but once it's going it'll continue. Also still somewhat noisy.
RustE said:
Look into an automotive type noise-deadening or undercoating products.  Typically comes as an adhesive mat or in a spray can.
The spray/paint on variety could be used as glue (onto the lower ply sheets) for flat aluminium sheets to make a cigarette proof and reasonably quiet roof, by removing the ability of the aluminium to vibrate freely it'll remove the drum effect.
 
Hi Clare

You might like to consider Onduvilla which is an easy to lay tile system:


I have found it easier to use the screws to fix it rather than nails as a tile can then be reset or removed if needed.

Peter
 
Two part epoxy will waterproof wood and still be transparent to see it. You'll have to work fast to get it spread on a large surface before it kicks, and it's smelly stuff. People around here use it on plywood kyacks, it will definitely waterproof it.
 
RustE said:
Look into an automotive type noise-deadening or undercoating products.  Typically comes as an adhesive mat or in a spray can.

Thanks RustE - sorry if this is a silly question - feel silly asking this as you guys are all super carpenters and builders on here - do you mean use only that or in a combination of it with something else? Would you mind sending some links of what you recommend in entirety (ie if its an underneath thing what to put over it?)

My partner is a building surveyor so has been helping tell me what's good and what isn't (LOL and told me just use felt) but is super busy and about 250 miles away back in London!! Plus then that messes up the door open cladding that I've not put on yet - :-)

Im sure I'm massively overthinking this as it's only a couple of garden sheds, just keen to learn and see what options are out there :-) Thank you :-)

Oh and, thought about just painting the wood - he suggested I think it was chlorinated rubber paint that seems pretty cheap to buy on ebay but it's all for underwater so when I told him that he said no that'll crack in the sun - so not sure if there are other types as from reading it seems that same stuff is road paint too but has to go on hot?

LOL, so many options :-)
 
Gregor said:
The stuff in the picture looks like a tar based material and can still burn, not as fast as EPDM (which is thinner so it needs less energy to ignite) but once it's going it'll continue. Also still somewhat noisy.

Hmmm.... really?? It's definitely tar based - would it burn or just char or melt a bit? I'll ask the other half ;-) Would EDPM ignite?  I thought it would just melt a hole. That's interesting. I'll ask him about that too :-) It's sort of soft and sticky to the touch - a little bit - strange stuff. It's called Coroline. (news to me, you guys probably know all about it!)
View attachment 1

Looks really like the stuff Peter posted in the video, will reply to that shortly :-) Thanks so much :-)

RustE said:
Look into an automotive type noise-deadening or undercoating products.  Typically comes as an adhesive mat or in a spray can.
The spray/paint on variety could be used as glue (onto the lower ply sheets) for flat aluminium sheets to make a cigarette proof and reasonably quiet roof, by removing the ability of the aluminium to vibrate freely it'll remove the drum effect.
[/quote]

HMMMMMMMMM interesting... like I didn't have enough options to think about. I like this idea.... they are all good ideas and thank you all - this sounds interesting and probably quite expensive.... if you could possibly spare the time might you be able to expand on this so I could understand how this would look and what I would do to make this?? Part of the consideration is I need to get everything ordered, here, assembled, stained, disassembled, and hopefully driving back up to London by next Monday or Tuesday :-)

Thank you so much :-)
 

Attachments

  • IMG_1069.JPG
    IMG_1069.JPG
    659.2 KB · Views: 163
Peter Parfitt said:
Hi Clare

You might like to consider Onduvilla which is an easy to lay tile system:

I have found it easier to use the screws to fix it rather than nails as a tile can then be reset or removed if needed.

Peter

Hey Peter,

Thank you SO MUCH for the reply and posting such an informative and helpful video. You know, they had something that looks EXACTLY like that in the shop I bought the big things from. Driving home with them bouncing around the car I did chuckle watching your video thinking how much easier the smaller ones woudl have been!!

So a few thoughts if it's OK:

- Is Onduvilla made from a 'bituminous sheet' like the Coroline?? If you know Coroline is it the same, better or worse quality? Is there a life expectancy? I collared a random dude looking at the same stuff in the shop who looked like he had made a roof or 2 and he said it should last around 5-10 years which if I can replace easily I'll be happy with :-)

- Good call with the screws not the nails - but - what do you cover the tops of the screws with to stop water getting in? I bought the nails with the plastic caps on but totally agree with you screws are AWESOME and nails are a bit too permanent!!

Do you think I could use either Coroline or Onduvilla on my sheds at the pitch is definitely less than 10 degrees. Highest point is around 206cm and lowest around 200. Let me work that out...http://www.pagetutor.com/trigcalc/trig.html
Hmm well that reckons less than 2 degrees as sheds are only around 180cm long -

Would it still work, would the water still run off OK?? Can't really build them higher and don't want to make the short bit shorter!!

- Do you need damp proof stuff between the ply and this stuff on top or is it optional?? Question for the other half too !

- Interesting and good to see you screwed your panels on on EACH high ridge bit - I had thought that but the Parents ( I suspect they are slightly more concerned with me finishing this and giving them their workshop back than me building the best shed ever, hahaha) told me don't bother. (I don't listen to them all the time though haha!)

- TOTALLY AGREE with you about the battery on the Festools - I am presuming but don't know that the battery on your drill that you said in the video did the whole roof is the same battery in my circular saw - I have changed my battery once in this whole project so far and it wasn't fully charged when I came down here and it's not dead now. Very VERY impressed with that - have cut lots of things twice as all the cladding I cut a slight angle on which sometimes I did the first time and other times I cut a 90 and then trimmed another sliver off which is SO EASY with the circular saw - one of many reasons why I absolutely love it :-)

AND I got my second 1400 guide rail today with the joining together thing so when I cut the roof ply it will be EXCELLENT and SUPER EASY :-) Happy :)

- Last question!! Would you mind sharing what the plastic type stuff you used on the edges was?? That looks great - I hadn't quite thought of what to do there and that seems a nice option if I stick with this tar stuff :-)

Thank you SO MUCH for the replies everyone, it's a bit rough but I'll post some photos I took earlier.
 
Master Carpenter said:
Two part epoxy will waterproof wood and still be transparent to see it. You'll have to work fast to get it spread on a large surface before it kicks, and it's smelly stuff. People around here use it on plywood kyacks, it will definitely waterproof it.

Hey thank you this is another AWESOME idea - like the weird underwater paint but better :-) Awesome!! I've only ever used the 2 part epoxy as glue and I hate using it - it dries super fast in a tiny area and is quite lumpy and didn't squish out when I stuck the 2 things together - clearly, the issue was probably with me rather than the glue -

Might you be so kind as to share a link to a suitable product (ideally one available here in the UK if you know the type of stuff that works)

I really like the idea of just putting something on the ply as I'd like my door cladding to go as close to the marine ply roof as possible (bar maybe 10mm or something so it has clearance to open OK) as then it'll cover where the roof frame is screwed to the top of the door frame and look nicer IMHO.

 
Hey so here's some progress from today, was out all morning buying bits and it takes ages in Cornwall so only managed about 5 hours work today!

[attachimg=1]

That's my not very professional work area - liked the shadow at the end of the day haha!

[attachimg=2]

Here's me trying to cut out a hinge - having 3 per door as I'm worried they will warp. Not sure whether to put the angled things on or not - would welcome any suggestions for this :-) I cheated as I'm not very good with a chisel yet and used my Fein tool multicutter with a wood blade (sorry am I allowed to say that on a Festool forum, lol) to cut around the outside of what I had drawn in pencil around my hinges...

[attachimg=3]

Here's one I cut out of the frame - managed to do all 12 on the doors and 3 on one frame but needed help to locate where exactly the doors needed to hang which Dad very helpfully produced a car jack to rest them on while pontificating on this :-) Need to do the other 9 of these tomorrow :-)

[attachimg=4]

Here's one of the hinges in place - unfortunately I got a bit impatient - I did the 3 on the frame with a chisel and it looks pretty decent - hinge looks flush, seems a decent depth uniformly - phew ...

However trying to chisel it out with the doors, I did partly by chisel (being honest about 10% and partly with the multi cutter again (90%!!) so unsurpisingly in hindsight I have ended up with the cut out for the hinges in the doors being great in places and too deep in others..... DOH and ooops - So I guess I'll need to look at putting some sort of packers in tomorrow - I knew this part would be difficult. I will do all the door frames with a chisel.

If anyone reads this - how do you cut out hinge insets professionally - do you use a router with some sort of jig?? (other than just being awesome and learning carpentry properly which I would love to do ASAP if I can find a suitable course!!)

[attachimg=5]

Anyway doors are hung - the frame hinges are screwed on in only 2 places not flush with the frame so I need to draw round them tomorrow and take them off so i can cut them out as carefully as patiently as I can!! The Fein multicutter is good for the edge bit at least! (I think so anyway!)

I might once I put the doors back on after the hinges are all sorted out tomorrow - make the door frames a little smaller so there is more of a gap between them and the top and bottom of their frame - I'll see what I end up with :-)

[attachimg=6]

A slightly better one of the closest shed! :-)

Cheers for your replies awesome Festool people :-) Will update tomorrow :-)
 

Attachments

  • IMG_1080.JPG
    IMG_1080.JPG
    909.5 KB · Views: 1,096
  • IMG_1081.JPG
    IMG_1081.JPG
    1,016.9 KB · Views: 1,049
  • IMG_1076.JPG
    IMG_1076.JPG
    676.7 KB · Views: 1,089
  • IMG_1072.JPG
    IMG_1072.JPG
    814.6 KB · Views: 1,028
  • IMG_1073.JPG
    IMG_1073.JPG
    904.7 KB · Views: 1,054
  • IMG_1078.JPG
    IMG_1078.JPG
    1.2 MB · Views: 1,047
Nice progress.  Your mortises and overall work look good.  By the time you've built a few of these and friends commission you for their work, you'll be an expert!

For cutting hinge mortises, I use  trim router.  Variable speed ones are ideal if you have that option.  A Dremel tool with a router base is even smaller and works well too.

I first place the hinge on the door or frame, optionally screw in one screw to hold it and and use a knife to mark the edge on the outside.  Remove the hinge and set the router to the hinge leaf depth and then remove the bulk of the material with a 1/4 or 3/8" router bit.  You can then use a chisel to clean up the remainder using the flat bottom as a reference for light easy strokes.  Consistent, fast, and with a little care they turn out great.
 
Hi [member=68412]ilovesunshine[/member]

Yes, the Onduvilla is made from the same bituminous material as Onduline and Coroline. I used Onduline on my current shed when I built it 31 years ago. It lasted 26 years and survived the 1987 hurricane.

Your pitch is a bit low but with a damp proof membrane under the roofing material it might be okay. I use the thick plastic used for over site work (under concrete etc). I know that it is too late now but the next time you make a shed use this or a similar damp proof membrane over the framing before you put the T&G or shiplap on. It only needs to be held in place with staples as the T&G will hold I well.

The edging was also an Onduline product - check out their web site.

Peter

 
ilovesunshine said:
Gregor said:
The stuff in the picture looks like a tar based material and can still burn, not as fast as EPDM (which is thinner so it needs less energy to ignite) but once it's going it'll continue. Also still somewhat noisy.

Hmmm.... really?? It's definitely tar based - would it burn or just char or melt a bit? I'll ask the other half ;-) Would EDPM ignite?
Sorry, confused EPDM with the thin transparent PVC stuff (which is way thinner, thus can't absorb as much concentrated heat).
Nevertheless, fun with EPDM and fire:

RustE said:
Look into an automotive type noise-deadening or undercoating products.  Typically comes as an adhesive mat or in a spray can.
The spray/paint on variety could be used as glue (onto the lower ply sheets) for flat aluminium sheets to make a cigarette proof and reasonably quiet roof, by removing the ability of the aluminium to vibrate freely it'll remove the drum effect.

HMMMMMMMMM interesting... like I didn't have enough options to think about. I like this idea.... they are all good ideas and thank you all - this sounds interesting and probably quite expensive.... if you could possibly spare the time might you be able to expand on this so I could understand how this would look and what I would do to make this??

In case you have a flat roof (with slope or not) the idea is to use the automotive type noise-deadening or undercoating products as glue for aluminium sheets (they don't need to be that thick, 1mm would already be plenty) directly onto the ply of the rood. Just miter them onto each other, no need for overlap, the black undercoating stuff below will do the waterproofing.

As the total roof size isn't that big you won't get big problems with thermal expansion, but should anything hot fall onto the roof (cigarettes, fireworks, ...) the aluminium will spread the out heat (so bringing the stuff under it to the respective ignition point would need way hotter stuff). Also the aluminium is inert to UV (which might get to be a problem with the epoxy idea).

A TS 55 will cut aluminium sheets without problems (with the #496306 blade), plus you can use it with a rail to easily create fold lines (45° bevel and 1/2 - 3/4 of material depth, on the inside of the corner, to create a weak line along the sheet will bend straightly), so in case you would want to pull the roof over the corners it wouldn't be that big of an issue.

This corner fume hood for my kitchen was created like that, cut to size and bend lines created with a TS55 (first picture prototype assembly wrongly oriented, second picture installed with filter and front bezel removed - seams sealed with sikaflex and some wooden supports for the corners):
 

Attachments

  • 710512931_47549.jpg
    710512931_47549.jpg
    77.6 KB · Views: 269
  • IMG_20180724_170414191.jpg
    IMG_20180724_170414191.jpg
    68.9 KB · Views: 241
Hey All
Thanks for replies. Will respond properly later! Went and bought a dremel tool but thought cordless would be good...
which it is but now my battery has died and shop didn’t have spares so having a break!!
 
Hey so I can officially announce as you all probably already knew that the dremel 10.5v battery is p**s poor although to be fair I think routing is quite power intensive which is why festool don’t make cordless routers ... I think Axminster tools told me that ... all good info to learn! Hinges still in progress! Update later 🙂
 
Dog groomers evidently use dremels to grind dog's nails.  They say it works well and they're cheaper and better than ones made specifically for dogs.

I don't believe anyone really makes "real" cordless routers (yet) aside from small trim routers since they do require so much power.
 
Back
Top