Garden Sheds - In Progress :)

neilc said:
Nice progress.  Your mortises and overall work look good.  By the time you've built a few of these and friends commission you for their work, you'll be an expert!

For cutting hinge mortises, I use  trim router.  Variable speed ones are ideal if you have that option.  A Dremel tool with a router base is even smaller and works well too.

I first place the hinge on the door or frame, optionally screw in one screw to hold it and and use a knife to mark the edge on the outside.  Remove the hinge and set the router to the hinge leaf depth and then remove the bulk of the material with a 1/4 or 3/8" router bit.  You can then use a chisel to clean up the remainder using the flat bottom as a reference for light easy strokes.  Consistent, fast, and with a little care they turn out great.

Hi Neil,

Thanks so much for reading and for taking the time to reply. Haha, yes the more you practice the better you get - that's what I'm hoping anyway! Just buying a house with my partner and will have My Own Workshop there - can't wait!! So excited!!! :-)

I too your advice and went and bought a Dremel - had seen them for years but always thought they were for more hobby type stuff or small models - and I guess they are really - I went for the cordless model in my ignorance and couldn't have picked a more gutless machine to chunk out the door hinges - plus am finding a few issues with holding the base totally square to the work as the 'work' is vertical - and the router base when I am cutting near the top or bottom, can slip off into the already cut bit from the other end of the hinge - and then if I hold the router base on the wood that is still the full height - some of this is the next bit of frame which isn't totally flush with the bit I am cutting - so my nice depth on my practice bit turns out to
not be totally what I had hoped - still this is all good experience - I am still glad I went for the cordless one as it's so easy not having cables - I just need at least 1 more battery ideally!!

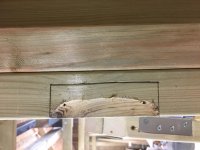
In the meantime there is plenty to keep me out of trouble (!) - trying to rescue the hinge mortises I cut out of the doors yesterday for one!! Partner suggested good quality 2 part wood filler as some bits are perfect, others are to deep.

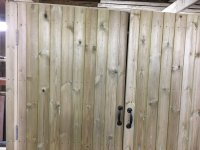
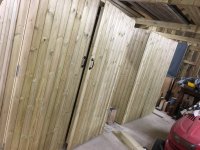
Anyway this is all likely elementary stuff for all you master carpenters, haha, I'll post some photos when I have something more impressive to post and more progress!! Hopefully with the doors all hanging nicely with a nice uniform gap around them all by end of tomorrow so I can commence the door cladding - thank you so much for the help and encouragement :-)
 
Cut some pieces of cardboard to raise the hinges up.  A cereal box, for example can yield multiple thin pieces to backfill behind a hinge that has a mortise cut too deep.

I actually use a cordless Dremel in a router base and it works fine as long as you are not too aggressive.  Apologize if you bought the wrong one for your needs.  I happen to have an 'uptick' from the standard Dremel router base however - https://microfence.com/product/micro-plunge-base-w-light-ring-kit/

That base is WAY overkill for what you are doing and EXPENSIVE.  I use with the router for inlay work as well as for clearing out dovetails after making the main cuts.  I like the size, take my time and it gives a nice cut.  Plus cordless is nice.

Your better choice would be a simple trim router like the Bosch colt.  Useful for simple routing, edge treatment, etc.

You'll get the feel with hand tools.  Our first mortises are frequently a challenge but in time you'll get the technique.  The knife blade around the edge is a good idea even if you are using chisels.  And try the cardboard trick to raise the hinge.

I'd bet there are plenty of homes around the world with hinges that may have a piece of cardboard behind hinges to bring them into alignment.

neil
 
Hey everyone 🙂

I’m winning with the hinges 😀😀

Will update later, learned loads 😀

I’m just cutting my door frames to size now they’re hung - hinges are all flush albeit some with lots of (waterproof!) packers!!

Just had a question:

What would anyone reading this recommend to best stop th doors from racking?

I’m putting bolts top and bottom of the left door of each cupboard and the cladding will help loads but not sure what to do?

I used more diagonal 2x2 on my Big Box and doors were half the height of these and even with that and cladding they still have warped a little.

I have 2 x 6, 2 x 4 and 2 x 3, but thinking weight - would some metal long strips be better or more like 8 x 1??

Help would be massively and gratefully appreciated!!

Thank you 😀😀
View attachment 2
 

Attachments

  • 4D51C9DE-3907-412C-9C72-6CDABCCB5A49.jpeg
    4D51C9DE-3907-412C-9C72-6CDABCCB5A49.jpeg
    2.3 MB · Views: 308
  • 5A5C11B2-E8E7-4A7F-8824-A8476BE71A5F.jpeg
    5A5C11B2-E8E7-4A7F-8824-A8476BE71A5F.jpeg
    2 MB · Views: 138
Gregor said:
The stuff in the picture looks like a tar based material and can still burn, not as fast as EPDM (which is thinner so it needs less energy to ignite) but once it's going it'll continue. Also still somewhat noisy.

Sorry, confused EPDM with the thin transparent PVC stuff (which is way thinner, thus can't absorb as much concentrated heat).
Nevertheless, fun with EPDM and fire:

In case you have a flat roof (with slope or not) the idea is to use the automotive type noise-deadening or undercoating products as glue for aluminium sheets (they don't need to be that thick, 1mm would already be plenty) directly onto the ply of the rood. Just miter them onto each other, no need for overlap, the black undercoating stuff below will do the waterproofing.

As the total roof size isn't that big you won't get big problems with thermal expansion, but should anything hot fall onto the roof (cigarettes, fireworks, ...) the aluminium will spread the out heat (so bringing the stuff under it to the respective ignition point would need way hotter stuff). Also the aluminium is inert to UV (which might get to be a problem with the epoxy idea).

A TS 55 will cut aluminium sheets without problems (with the #496306 blade), plus you can use it with a rail to easily create fold lines (45° bevel and 1/2 - 3/4 of material depth, on the inside of the corner, to create a weak line along the sheet will bend straightly), so in case you would want to pull the roof over the corners it wouldn't be that big of an issue.

This corner fume hood for my kitchen was created like that, cut to size and bend lines created with a TS55 (first picture prototype assembly wrongly oriented, second picture installed with filter and front bezel removed - seams sealed with sikaflex and some wooden supports for the corners):

Hey Gregor - thanks for the reply sorry for the delay - the hinges got the better of me yesterday but I think I equalised today  [wink]

Wow thats mad seeing the EPDM burn like that - to be fair it's quite an intense flame on it - would a cigarette butt do that?? Either way, won't be using EPDM that's good and most interesting to see :-)

Thanks for the photos - that looks great :-) And thank you so much for the tips on how to nicely cut a bending line - will save that for a time I might need it - I think just due to time and getting things here I will stick with the coroline for now...

Although just went back to the Trigonometry calculator as I had thought about raising the high end just with some extra wood - it told me I needed it to be 33cm higher to get the 10 degree pitch - that would be silly so I think I will take my chances with how it is or when I get round to the roof - which hopefully should be either tomorrow or Friday now, I might still go for felt!! :-)

Thank you so much for your input :-)
 
ilovesunshine said:
Wow thats mad seeing the EPDM burn like that - to be fair it's quite an intense flame on it - would a cigarette butt do that?? Either way, won't be using EPDM that's good and most interesting to see :-)
A cigarette butt likely won't be enough to light it, a bengal fire/flare might.
And thank you so much for the tips on how to nicely cut a bending line - will save that for a time I might need it
In case you want to do the aluminium sheet bending: Keep in mind that you'll cold form it at the bend line, cut too deep and it'll break, too shallow and it won't cleanly bend (or also break as too thick material isn't that flexible). Better do some tests with cutoffs first.
Although just went back to the Trigonometry calculator ... told me I needed it to be 33cm higher to get the 10 degree pitch
10° pitch is 18% elevation, given 33cm for the raise would mean the roof is ~180cm long, which means that the pitch goes along the long side of the roof (given the pictures you posted). IMHO it makes more sense to pitch a roof along the short side (front/back in your build).
 
Hi Gregor,

Thank you so much for the reply. I’m going to use either the coroline or the felt for the roof just as I have it here and it’s easy. 99% definitely the Coroline.

Worked until around 10.30pm today - didn’t start until just before lunch though.

Definitely need to be precise with the cutting depth. I found out a lot more today about what this saw does! I’ve only ever needed to cut straight things so far and the most I’ve done is a straight cut at maybe 45 degrees.

I found out how to cut a 45 along the length of my cladding (for where the doors open) and also how to adjust the depth of the cut. And that there’s a little Allen key for changing the blade in the handle, clever and nice! Thank you new brit workshop and Peter parfitt - great helpful videos with great info on how to actually change the settings and what every single bit does!

So I’ve learned loads today. I’ve taken lots of in progress photos but as it’s late I’ll just post the last one!

Sorry anybody I’ve not replied to yet, when I have more time to sit down I will do 🙂
View attachment 1
 

Attachments

  • 2E42313D-6220-4DFF-8E4D-B69C6A10725B.jpeg
    2E42313D-6220-4DFF-8E4D-B69C6A10725B.jpeg
    2.2 MB · Views: 144
Hey Gregor just to add - thanks so much for helping and commenting on the roof slope - that’s super helpful thank you 🙂 yes the sheds are both around 180 long.

Totally agree it would’ve been better to put the pitch the other way round - I just did it this way because

1. The old crappy sheds that were there before were this way round! Not really a valid reason, haha, but I quite liked them like that! But hence the low slope! So there’s more space inside!

2. On one side if the roof slopes back any water would end up in the neighbours garden and on the other side there’s a really dense hedge and fence and it’s right bang uk against that too so I just thought it might rot the base faster.

Would’ve been loads easier to make the doors your way though!

The next shed I build I’m doing it you way! 🙂
 
GoingMyWay said:
Dog groomers evidently use dremels to grind dog's nails.  They say it works well and they're cheaper and better than ones made specifically for dogs.

I don't believe anyone really makes "real" cordless routers (yet) aside from small trim routers since they do require so much power.

Hahaha!!! Whether you’re joking or not, either way it’s funny!!

Yes everything in the box of attachments that came with it is so teeny!!

I love the router though! It’s a nice girl sized easy to handle thing - I’m very impressed with it. Except the battery life but I gave it a long overnight full charge and it was a lot better. So much better than chiselling!! This was the first day using it when battery died!

View attachment 1

Had never used a router before and that’s actually how my festool thing started - builder let me down on a project and needed to cut a groove behind skirting for internet cable - looked into routers - festool were coming up as best

Ended up hiring a carpenter and putting cable just above skirting! Then was looking awhile later and at the roadshow last year and that’s how I found Peter parfitt as he does great comprehensive reviews that’s perfect for people who would use all the settings and super helpful for people still learning like me so I can find out new things!!

Thank you so much for reading and commenting on my amateur post 🙂
 

Attachments

  • F8B12659-C01F-4D24-8E5D-FB011946F3BA.jpeg
    F8B12659-C01F-4D24-8E5D-FB011946F3BA.jpeg
    2.1 MB · Views: 141
ilovesunshine said:
Would’ve been loads easier to make the doors your way though!
I hadn't noticed from the photos that the sheds are not square but have a slope over the long side (if I understood it correctly). I'm impressed that you pulled that off, it's way easier to create the slope for the roof with a triangular section above rectangular gates/doors.

Nice work!
 
Hey Gregor,

Thank you! 😀 yes it’s a bit of a shallow slope so hope the coroline is ok. I think I’m going to screw the marine ply in from the inside so it’s easy to take off if needed.

Just took a photo - nearly finish cladding around the first shed doors. Going left to right and had to take the door off (taking great care not to disturb the carefully cut hinge packers lol) to fit the last bit of cladding around the hinges.

One more piece and I’ll move on to shed 2! 😀😀

Then it’s just locks, (she says flippantly, like the hinges were “just” the hinges, lol!) and roof and staining!

I’ve measured and I think there’s an outside chance the pieces of one shed will fit in the Volvo estate so really hoping that’ll work! 😀😀

Hope this shows the slope - it’s about 6cm lower on the low end - tried to get left side of camera image vertical 🙂 and the handles are level - I checked with a spirit level ! Just the doors open a bit. Clamped the doors hugely while putting cladding on so haven’t further reinforced them - hoping bolts inside the top and bottom of left door and outside top and bottom of the right door (putting on last!) will help 🙂

View attachment 1


Attachments

  • 06A94E87-D31E-436B-AB8D-37E6ACB8B2F7.jpeg
    06A94E87-D31E-436B-AB8D-37E6ACB8B2F7.jpeg
    2.2 MB · Views: 153
Proud of this! My new 45 degree cutting skills, and it fits quite neatly around the hinge 🙂 had to fiddle with the first ones to minimise the gap 🙂[attachimg=1]
 

Attachments

  • 66DB0DB7-45C7-4AA3-AE56-543853E8406F.jpeg
    66DB0DB7-45C7-4AA3-AE56-543853E8406F.jpeg
    2.2 MB · Views: 521
ilovesunshine said:
GoingMyWay said:
Dog groomers evidently use dremels to grind dog's nails.  They say it works well and they're cheaper and better than ones made specifically for dogs.

I don't believe anyone really makes "real" cordless routers (yet) aside from small trim routers since they do require so much power.

Hahaha!!! Whether you’re joking or not, either way it’s funny!!

Yes everything in the box of attachments that came with it is so teeny!!

LOL I was being serious.  2 different pet stores suggested that we go to a hardware store to buy a Dremel instead of a dog nail grinder.  I thought it was "safer" to get one with a guard and ended up buying the Oster Gentle Paws, which is broken after half of 1 use.  I guess I need to buy a cordless Dremel now  [big grin] or maybe we'll just keep taking our dog to the store to have the pros do it.
 
GoingMyWay said:
ilovesunshine said:
GoingMyWay said:
Dog groomers evidently use dremels to grind dog's nails.  They say it works well and they're cheaper and better than ones made specifically for dogs.

I don't believe anyone really makes "real" cordless routers (yet) aside from small trim routers since they do require so much power.

Hahaha!!! Whether you’re joking or not, either way it’s funny!!

Yes everything in the box of attachments that came with it is so teeny!!

LOL I was being serious.  2 different pet stores suggested that we go to a hardware store to buy a Dremel instead of a dog nail grinder.  I thought it was "safer" to get one with a guard and ended up buying the Oster Gentle Paws, which is broken after half of 1 use.  I guess I need to buy a cordless Dremel now  [big grin] or maybe we'll just keep taking our dog to the store to have the pros do it.

Haha wow - never realised !! What sort of dog or dogs do you have? 🙂

We got a clipper for removing our Maine coon cats fur balls - they aren’t thrilled about the noise it makes but will allow a short bit so you have to be very strategic about it!! Lol maybe the dremel has a clipper attachment!!

Wasn’t impressed that the router bit I bought was too wide to fit in the hole it needed to and on calling them they said “oh. you need a special collet” well ffs why not just make the router bit with a thinner shank to fit in the tool to begin with?!! Luckily I’d bought another thing which did fit and worked and Dad had some mini router bits too which was excellent!
 
Today’s progress😀

Finished all door cladding except the last bit on the right side of the far door - the one I’ll have to take the door off to fit. It was getting late and the bit of cladding I’d cut had a huge knot in it and was quite warped when I halved its width so I’ll use a new bit tomorrow.

[attachimg=1]

So tomorrow I’m planning to:

Get up super early and go buy some sadolin classic wood stain as recommended by Peter Parfitt (thanks Peter if you’re still reading this thread)

Will have to take my chances with the colour as sadolins samples still haven’t come and I ordered them Monday 🙁

After a dark green ideally or mellow lighter green. Nothing too bright.

If any of you have used any of these and have photos that’d be great! Please Share! Total long shot but you never know!

Then come home, do last bit of cladding, start the locks!

I did them before for my Big Box (the 3.2 long x 1.1m tall x 85cm deep thing) and they’re still ok so I’ll take it slowly and carefully! 🙂

Hopefully I’ll have time still to cut the roof ply and attach and do one coat of stain at some point.

I also need to cut the corner pieces and put on the front 2 Bolts on each door and the far cupboards handles.

I also thought using my new router and new router basic skills (?!) I could repurpose 2 bits of cladding to make a double rounded edge thing to attach to the right hand door of each cupboard to cover the join between the 2 doors. There’s probably a name for it - weatherproofing strip?

🙂 will update tmrw 🙂


Attachments

  • 885F379B-B952-4F67-879D-18B0FFEB549B.jpeg
    885F379B-B952-4F67-879D-18B0FFEB549B.jpeg
    2.3 MB · Views: 485
This all went in my Volvo in pieces. 😉 just 😅

Took a few tries!!

Ready to go...

[attachimg=1]
 

Attachments

  • 01C33EA4-76E4-4107-B640-7DBE0B5ADD62.jpeg
    01C33EA4-76E4-4107-B640-7DBE0B5ADD62.jpeg
    2.2 MB · Views: 480
Where it still lives now 😀 locks are still good nearly 2 years later. It’s pretty covered and dry in its new home though 🙂 its been and still is, MOST Useful 🙂 learnt loads doing it. 🙂

[attachimg=1]
 

Attachments

  • 725C76CE-E4EC-4D19-A081-DB488AF2D5B9.jpeg
    725C76CE-E4EC-4D19-A081-DB488AF2D5B9.jpeg
    2.7 MB · Views: 456
Those look nice.  And the earlier low units have stayed looking nice as well.

I have visions of these on top of your car going down the road to the new home.  Good luck with that next step!
 
ilovesunshine said:
Haha wow - never realised !! What sort of dog or dogs do you have? 🙂

We got a clipper for removing our Maine coon cats fur balls - they aren’t thrilled about the noise it makes but will allow a short bit so you have to be very strategic about it!! Lol maybe the dremel has a clipper attachment!!

Wasn’t impressed that the router bit I bought was too wide to fit in the hole it needed to and on calling them they said “oh. you need a special collet” well ffs why not just make the router bit with a thinner shank to fit in the tool to begin with?!! Luckily I’d bought another thing which did fit and worked and Dad had some mini router bits too which was excellent!

We have a 7 1/2 month old Mini Labradoodle named Parker.  I actually made a post back in January asking about getting a dog.  There's a picture of Parker the day we brought him home in this specific post.

We tried to get him exposed to the sound and vibration of clippers and grinders at a young age so he doesn't seem to mind too much when a professional does it.  He doesn't like to sit still at home when we try.  One of the groomers said it's common for dogs to behave like that when they're at home in their own territory.  We also tried using just regular dog nail clippers, but it was hard because we were scared of cutting too deeply and the nails we did manage to cut were rather sharp, hence grinding seems better!

I've been planning on making a new post to update everyone on how much Parker has grown.
 
Funny you should mention that. Bought a roof rack today. Just in case 😉

The black box all fitted inside the car - nothing on the roof at all 😀 in pieces obviously!
 
Back
Top