Here is a link to a simple of drawing I found on Pinterest of the cable turnbuckle concept. https://pin.it/jpn323neutrbl4
You are using an out of date browser. It may not display this or other websites correctly.
You should upgrade or use an alternative browser.
You should upgrade or use an alternative browser.
Garden Sheds - In Progress :)
- Thread starter ilovesunshine
- Start date
Hi [member=68412]ilovesunshine[/member]
First of all you need to be proud of your efforts because you have not only had a go at something quite new to you but you have set out to learn from the experience. On top of that you have had the courage to have your work scrutinised by your fellow FOGgers.
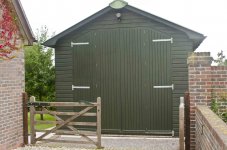
My 'shed' in my recent picture is nearly 5 m tall. The opening is about 3 m wide and I had to go for a bi-fold approach as the doors had to open outwards and the ground there was sloping upwards. You will see the 3 strap hinges on each side and then the inner doors are each on 6 ball bearing 4" butt hinges.
View attachment 1
Yes, the cross bracing works well and is a must for shed doors and gates. If the field of a door is made of (say) MDF or plywood then no cross bracing will be needed.
Peter
First of all you need to be proud of your efforts because you have not only had a go at something quite new to you but you have set out to learn from the experience. On top of that you have had the courage to have your work scrutinised by your fellow FOGgers.
My 'shed' in my recent picture is nearly 5 m tall. The opening is about 3 m wide and I had to go for a bi-fold approach as the doors had to open outwards and the ground there was sloping upwards. You will see the 3 strap hinges on each side and then the inner doors are each on 6 ball bearing 4" butt hinges.
View attachment 1
Yes, the cross bracing works well and is a must for shed doors and gates. If the field of a door is made of (say) MDF or plywood then no cross bracing will be needed.
Peter
Attachments
Just in case you cannot open that link I found another one just so you can see examples of cable turnbuckles. https://www.s3i.co.uk/turnbuckles.php
The turnbuckle and cables would be considerably more expensive in stainless steel but given the very wet nature of the climate in England if you went this route you would probably be well advised to go with Stainless.
The turnbuckle and cables would be considerably more expensive in stainless steel but given the very wet nature of the climate in England if you went this route you would probably be well advised to go with Stainless.
RustE
Member
ilovesunshine said:RustE said:Look into an automotive type noise-deadening or undercoating products. Typically comes as an adhesive mat or in a spray can.
Thanks RustE - sorry if this is a silly question - feel silly asking this as you guys are all super carpenters and builders on here - do you mean use only that or in a combination of it with something else? Would you mind sending some links of what you recommend in entirety (ie if its an underneath thing what to put over it?)
...
Sorry, the past weeks turned a bit hectic.
The products that I mentioned would be applied to the under-side of the metal roofing material.
Here is an example of a spray-on product:http://designengineering.com/boom-mat-spray-on/
Here is an example of a mat from a regional source:https://www.deadening.co.uk/products/dodo-barrier-mlv-2-5m-roll
Note: I have no affiliation with the manufacturers or the retailers.
Hi [member=66185]Alanbach[/member]
You idea of the cables inside is EXCELLENT. DO you mean with a metal cable? Ill have to look up what a turnbuckle is sorry I am quite a novice at all this. Is it sort of like a rachet strap but with metal cable?? That sounds light and excellent - I will ask about this. And did you mean to put it on EVERY diagonal (or just say the main 2 per door? As I have 4 possible mini diagonals on each door as I added the extra framing so I'd have more places to screw the cladding.
Yes, so ultimately it would be two pieces of cable attached diagonally from the top corner on the non hinge side to the bottom corner on the hinge side. The two pieces of cable are then joined to each other in the middle with a turnbuckle. The turnbuckle can then be tightened as the door sags.
You probably already know this but the best way to check a door frame like this for square is to measure opposing diagonals. If they are the same the door is square if they are not square then using a method like this to shorten the long diagonal with square up the door.
I chose to start with the cable high on the non hinge side because this is where gravity is most likely to pull the door down. This choice assumes that the door starts out square. Be sure to measure the diagonals to determine which dimension needs to be shortened. You can cross cross two cables if needed but it just raises the cost of the hardware.
You don’t need cables on each of your diagonals within each door. Only over the entire span of each door.
If your doors are square (or even if they are not) and they open and close properly then you probably don’t need this for now. If they start to sag and hang up in the future then this is a fairly easy fix and then allows for ongoing adjustment as needed. Door starts to sag, you measure, diagonals out of equal you tighten the cable, measure again, wallah!
ilovesunshine
Member
- Joined
- Jul 22, 2018
- Messages
- 82
Hey thanks for the replies everyone! This is my last night in Cornwall and my optimistic not just screws bed frame design needs more thought and time and now doesn’t have either of those so need to crack on finish the basic tried and tested positive design  and wood stain the sheds one last time all before crashing out so it’s dry in time by around 6pm tomorrow (it’s 21.50 now!) to take apart and see what will fit in the trusty Volvo for the long trek back to london...!
Thanks for the nice words - holy s**t it’s that big??!! I’ll reply properly later - was hard to get a scale... that’s MASSIVE!!! And awesome!!
Even more impressed!! You could have 2 storeys in there!!!
Will update when I have time. Still totally chuffed my locks work - lol
and wood stain the sheds one last time all before crashing out so it’s dry in time by around 6pm tomorrow (it’s 21.50 now!) to take apart and see what will fit in the trusty Volvo for the long trek back to london...!Peter Parfitt said:Hi [member=68412]ilovesunshine[/member]
My 'shed' in my recent picture is nearly 5 m tall. The opening is about 3 m wide and I had to go for a bi-fold approach as the doors had to open outwards and the ground there was sloping upwards. You will see the 3 strap hinges on each side and then the inner doors are each on 6 ball bearing 4" butt hinges.
Peter
Thanks for the nice words - holy s**t it’s that big??!! I’ll reply properly later - was hard to get a scale... that’s MASSIVE!!! And awesome!!
Even more impressed!! You could have 2 storeys in there!!!
Will update when I have time. Still totally chuffed my locks work - lol
ilovesunshine
Member
- Joined
- Jul 22, 2018
- Messages
- 82
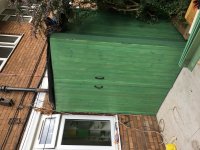
lol and the weird turquoisey green is somehow growing on me!!
ilovesunshine
Member
- Joined
- Jul 22, 2018
- Messages
- 82
Peter Parfitt said:Hi [member=68412]ilovesunshine[/member]
First of all you need to be proud of your efforts because you have not only had a go at something quite new to you but you have set out to learn from the experience. On top of that you have had the courage to have your work scrutinised by your fellow FOGgers.
My 'shed' in my recent picture is nearly 5 m tall. The opening is about 3 m wide and I had to go for a bi-fold approach as the doors had to open outwards and the ground there was sloping upwards. You will see the 3 strap hinges on each side and then the inner doors are each on 6 ball bearing 4" butt hinges.
View attachment 1
Yes, the cross bracing works well and is a must for shed doors and gates. If the field of a door is made of (say) MDF or plywood then no cross bracing will be needed.
Peter
Hi Peter,
How do you lock your shed?
And on the one with the open doors - is it the same shed? It looks like they are a different colour but I'm in a bit of a hurry - on the one with the open doors it looked like you have these metal things running all the way to the top and bottom of each door - but some sort of a latch - curious how you secure it and what you used?
The green closed doors look brilliant - would love to learn how you made those.
")
ilovesunshine
Member
- Joined
- Jul 22, 2018
- Messages
- 82
Alanbach said:Here is a link to a simple of drawing I found on Pinterest of the cable turnbuckle concept. https://pin.it/jpn323neutrbl4
Hi Alan,
Thanks - that's interesting - don't you need one going each way? What's to stop the wood warping in the opposite direction after you put it under tension?? Or do you just keep a close eye on it? And how would you get one going each way?? Im still wondering is there a neat way to tension the wire as if it's wire that's not the easiest to pull taught in your hands - there must be some mechanical advantage thing with it - I'll check the other posts
Thank you so much for your input - great to learn new things ilovesunshine
Member
- Joined
- Jul 22, 2018
- Messages
- 82
Alanbach said:Just in case you cannot open that link I found another one just so you can see examples of cable turnbuckles. https://www.s3i.co.uk/turnbuckles.php
The turnbuckle and cables would be considerably more expensive in stainless steel but given the very wet nature of the climate in England if you went this route you would probably be well advised to go with Stainless.
Hi [member=66185]Alanbach[/member] thanks for this - that's informative - I notice they didn't show how you squish the awkward unwieldy metal cable into the thing i the first place - haha - those product videos always make it look so effortless and easy - haha!!
I think I will stick with what I have for now - next shed - and oh yes, there will be more
I will make Peter's type of doors if I can figure out how to make them and Gregors easy sloping back roof - and maybe try the aluminium roof with the automotive stuff under it - need to check those links again when I get back to London which all being well - with or without the full shed in the car - will be a lot later tonight!LOL - I will take a photo of what fits in - I MUST take the roll of vinyl flooring that is in there - and I MUST take the single bed frame - LOL - so that doesn't leave as much room as I'd like for shed - but either way I'll fit as much as I can - roof rack still TBC as it's a long way to go with that sort of stuff on top!!
and I dont' have a spare articulated lorry to take it all, haha...
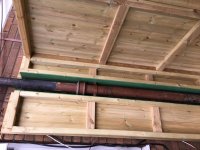
Just today I am cutting the marine ply for the roof (finally - it was too nice and flat asn assembly / work table platform when I was used to the sterling board all this time haha) and figuring out how to get the coroline on
And then taking it all apart and seeing what will fit
ilovesunshine said:Hi Peter,
How do you lock your shed?
And on the one with the open doors - is it the same shed? It looks like they are a different colour but I'm in a bit of a hurry - on the one with the open doors it looked like you have these metal things running all the way to the top and bottom of each door - but some sort of a latch - curious how you secure it and what you used?
The green closed doors look brilliant - would love to learn how you made those.
Hi Clare
Those large doors are secured from the inside with bolts at the top and the bottom. As the doors are about 3.5 m high I made up some long bolts from 12 mm (I think) reinforcing steel that runs in oak blocks inside of which I put some 1/2" copper pipe as a bearing. I welded on some handles which may show in the picture. So a total of 8 bolts keep those big doors secure.
When the doors are open I use a combination of another pair of home made bolts which go into 1" diameter copper tubing set in the ground and a pair of stays attached about chest height on either side.
The side door is like any normal door and has both a Yale latch and a mortice lock. The space inside was originally designed for a caravan but provides a useful large space when I build other sheds. I have lighting and power in there.
I never keep anything valuable in a normal shed but I still use a mortice lock.
Peter
ilovesunshine
Member
- Joined
- Jul 22, 2018
- Messages
- 82
Hello All
Hope you’re well! So I got the whole of one shed minus the largest half of the back panel in the Volvo estate plus the 3 m long roll of vinyl flooring, plus the double bed frame - managed to mitre one corner but the bolts idea didn’t quite work haha - when I’ve come up with a better design I’ll post it here
So shed 1 is ready to go - turned out my biggest underestimation was how to do the roof - no clue - so thats one for my partner - I’ve brought the pieces back and I think we have a plan - namely just how edge the long slope nicely and so it’s watertight and so the doors still open!
I’ll post the finished sheds when they are up! The floor is quite a tight fit around the drainpipe but I think it’ll be ok
So I just had a couple of unrelated but wood themed questions if any of you could be so kind to share your excellent knowledge didn’t think it was worth making a whole new thread just about this! Thanks in advance if you can and I’ll post the final shed pics in a week or so
Hope you’re well! So I got the whole of one shed minus the largest half of the back panel in the Volvo estate
plus the 3 m long roll of vinyl flooring, plus the double bed frame - managed to mitre one corner but the bolts idea didn’t quite work haha - when I’ve come up with a better design I’ll post it here So shed 1 is ready to go - turned out my biggest underestimation was how to do the roof - no clue - so thats one for my partner - I’ve brought the pieces back and I think we have a plan - namely just how edge the long slope nicely and so it’s watertight and so the doors still open!
I’ll post the finished sheds when they are up! The floor is quite a tight fit around the drainpipe but I think it’ll be ok
So I just had a couple of unrelated but wood themed questions if any of you could be so kind to share your excellent knowledge
didn’t think it was worth making a whole new thread just about this! Thanks in advance if you can and I’ll post the final shed pics in a week or so ilovesunshine
Member
- Joined
- Jul 22, 2018
- Messages
- 82
[attachimg=1]
So question 1 [member=11196]Peter Parfitt[/member] [member=53905]Gregor[/member] [member=66216]GoingMyWay[/member] and anyone else
What do you suggest putting on this decking? It’s been down around 18 months with no treatment at all thanks to my partner not bothering - I was thinking to clear it (obviously!) pressure wash it, let it dry, and then use the Osmo UV Oil that Peter Parfitt recommended for some tables I made - will share in next post - 2 coats - is this ok? We have some wood treatment stuffhttps://www.screwfix.com/p/sika-wood-preserver-clear-5ltr/47030
What would you recommend? Thank you so much
Attachments

ilovesunshine
Member
- Joined
- Jul 22, 2018
- Messages
- 82
[attachimg=1]
And Question 2 to anyone everyone else
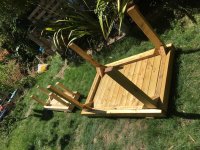
I came by a LOAD of tannelised mostly 2 x 4, already cut to various lengths- plus lots of 1 x 4 type kind of cladding but not really - so this was my first table design!
Was kind of going for something like thishttp://www.ana-white.com/2010/04/plans-simple-outdoor-dining-table.html
The one by eWood I really liked - but obviously mine is chunkier! And heavier
Anyway might you guys have any better design ideas for the legs - Ana always uses a pocket hole jig to hide the screws on internal corners - are they good? Would they be strong enough for something this chunky??
I really like not having anything lower down as it gets in the way but obviously then it’s harder to make the legs stable - would love some suggestions for future tables!
I’ll make a new thread with photos if all the wood ive got and see what I can make from it!
Thanks and have a great week! Clare
And Question 2 to anyone everyone else
I came by a LOAD of tannelised mostly 2 x 4, already cut to various lengths- plus lots of 1 x 4 type kind of cladding but not really - so this was my first table design!
Was kind of going for something like thishttp://www.ana-white.com/2010/04/plans-simple-outdoor-dining-table.html
The one by eWood I really liked - but obviously mine is chunkier! And heavier
Anyway might you guys have any better design ideas for the legs - Ana always uses a pocket hole jig to hide the screws on internal corners - are they good? Would they be strong enough for something this chunky??
I really like not having anything lower down as it gets in the way but obviously then it’s harder to make the legs stable - would love some suggestions for future tables!
I’ll make a new thread with photos if all the wood ive got and see what I can make from it!
Thanks and have a great week! Clare
Attachments
Hi Clare
I assume that Osmo will have a decking oil in their lineup. If not you could try other makers.
Do not worry about tables being "chunky" as it stops them blowing around the garden in a gale.
Peter
I assume that Osmo will have a decking oil in their lineup. If not you could try other makers.
Do not worry about tables being "chunky" as it stops them blowing around the garden in a gale.
Peter
ilovesunshine
Member
- Joined
- Jul 22, 2018
- Messages
- 82
Hey so the sheds are up in their final spot minus the roofs that my partner needs to help me with probably next week. They have a temporary roof on until then! Relieved they fitted ok in their spot!! Was a little tight in places but they did fit, phew!!
View attachment 1[attachimg=1]
View attachment 1[attachimg=1]
Attachments
ilovesunshine
Member
- Joined
- Jul 22, 2018
- Messages
- 82
Like a glove... haha!! Didn’t notice the extra wide connecting the rainwater drain pipe to the wall bit and that it was wider than the drainpipe joining bit!! Luckily I’d allowed a small margin for such things!!
[attachimg=1]
[attachimg=2]
[attachimg=1]
[attachimg=2]
Attachments

Similar threads
- Replies
- 15
- Views
- 1K
- Replies
- 4
- Views
- 2K