Hand plane 101

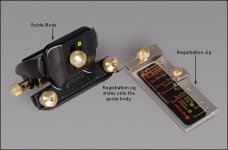
It looks like the Veritas version might be a better deal, though, since it has a 1" capacity rather than the 7/8" of the LN, and they offer right and left handed as a set -- which I now understand is not just a hand preference issue, but can help deal with different grain situations.
http://www.leevalley.com/US/wood/page.aspx?p=54862&cat=1,41182,48945,54862
 
After spending a week with Garrett Hack talking planes at Marc Adams, he was encouraging us to learn to plane square, rather than relying on planes like the right angle LN or the LV magnetic shooting board.

A solid vise and a good eye, even using a cross piece to give you a reference for a 90 degree edge off to the side where you are planing is a better way to learn to plane at right angles. 

I have the LN right angle plane and use it on occasion, but am far more comfortable with my 62 or even a smoother for truing edges straight and square.  One useful technique is to plane the two pieces you might be edge joining for glue together side by side in the vise at the same time.  Gives you a wider base and any slight variation is cancelled when you lay them flat.

 
I didn't read all three pages (got to go....); sorry.

Woodriver /Woodcraft planes are Stanley Bedrock based designs, use good thick blades (IBC iirc).
V3 are the improved models, offer a good value, good function.

For general knowledge, do a search for "Patrick's blood and gore" web page.  LOTS of Stanley history and model descriptions. That will give you a lot of basic information.

Plenty of info out there on tuning up an old plane. Most brands used the Stanley numbering system for size; many were even made by Stanley. Stanley made several lines with different improvements over the years. Aside from tuning up, newer blades (thicker and better materials) and chip breakers are available and will often substantially improve the performance of the plane. 

It can be fun, vexing, but pleasing to bring a tool that put food on a mans table for his family. 
Nothing against buying a 'ready to go' tool either.

Enjoy!
 
Got the veritas edge trimming plane in the mail this morning, and so spent some time getting it in shape.  I was kind of surprised to find: 1) the PMV-11 blade wasn't ground with a square edge, and so it took a long time to redo the primary bevel, and 2) there's a small concavity in the sole, .002 at it's maximum right in front of the blade.  Is this within acceptable tolerances?  After honing the blade I was able to make excellent shavings, though I haven't yet tried to push it to the thinnest possible and test whether that concavity is making a difference.  I'm also not 100% convinced the sole is completely square with the edge/fence.  I checked it with multiple engineer's square and could see a sliver of light coming through at the top of the fence, but the plane is so small that I'm not sure if it's just a function of my incorrect placement of the square on such a small surface.  This being my first decent plane I'm reticent to blame the tool first rather than my ability to gauge it properly.  What I'll probably do is plane the edges of two different boards and see how they match up. 

Gonna spend some more time with it later.
 
I've made a few videos on youtube about using the LN edge trimming plane. Maybe it would be helpful for you if you checked them out to see how to set it up etc.

Also, it's not very important that the edge is square to the sides as there is some lateral play in the plane. What is important is that the blade is straight across not cambered, and that the edge is square to the plane's fence.

When planing an edge square, I use a jack plane or jointer to get me close to square and straight, then refine it with the edge trimming plane. Because of the short sole of this plane, it is not good at leaving an edge straight along its length, so it helps if the edge is straight before you tackle its squareness.
 
Thanks.  I'll check them out.  Got the links?

RL said:
I've made a few videos on youtube about using the LN edge trimming plane. Maybe it would be helpful for you if you checked them out to see how to set it up etc.

Also, it's not very important that the edge is square to the sides as there is some lateral play in the plane. What is important is that the blade is straight across not cambered, and that the edge is square to the plane's fence.

When planing an edge square, I use a jack plane or jointer to get me close to square and straight, then refine it with the edge trimming plane. Because of the short sole of this plane, it is not good at leaving an edge straight along its length, so it helps if the edge is straight before you tackle its squareness.
 
It scares me that I made those 4 years ago. Where did the time go?
 
[member=7882]RL[/member] Have you used the Veritas edge trimming plane before?  I got it because it has a slightly larger cutting capacity than the LN.  It has a wheeled depth adjustment, but I'm wondering how you find the levered depth adjustment in comparison?

The other thing I'm not completely sure of is what the balance is between tightening the blade with the cap screw vs. fixing the blade with the level cap knob.  Or to put it another way, how loose should the cap screw be?

EDIT: It would be nice if LN offered the same sort of deal on buying both the LH and RH edging planes at once as LV does.
 
Edward A Reno III said:
[member=7882]RL[/member] Have you used the Veritas edge trimming plane before?  I got it because it has a slightly larger cutting capacity than the LN.  It has a wheeled depth adjustment, but I'm wondering how you find the levered depth adjustment in comparison?

The other thing I'm not completely sure of is what the balance is between tightening the blade with the cap screw vs. fixing the blade with the level cap knob.  Or to put it another way, how loose should the cap screw be?

EDIT: It would be nice if LN offered the same sort of deal on buying both the LH and RH edging planes at once as LV does.

I don't mind the levered adjustment. I tighten the cap screw very lightly, then adjust the blade depth and evenness by holding the plane firmly with my thumb on the cap iron, and when everything is set right I tighten the cap screw. The cap screw should never be so tight as to prevent some blade adjustment. I can't think of a single plane where there is an exception to this.

I've never needed more than one edge plane, although I do wish it was able to handle edges up to 1 1/4" wide.
 
Got the Lie Nielsen planes yesterday and did some shavings this morning.  Tested out the jack plane on making a long bevel in what will be the base of a lamp I'm making.  Actually this is just the test piece put together from scraps -- real one will be a solid piece of wood.  So far so good -- except for some issues I'm now encountering with the MKii honing guide, where it's skewing the microbevel.  Since I'm just starting learn this stuff, my first instinct was not to blame the tool but rather my technique.  After I double and triple checked all the variables -- square blade, squarely set in the honing guide, flat diamond stones -- and after seeing that these were all good I set down the assembly on the flat cast iron top of my table saw, and noticed that the edge was out of parallel with the surface, which is what is creating the skew.  This problem wasn't happening with the narrow blade assembly, so I guess it has something to do with the standard, plane head.  I recreated the problem on multiple out of the box LN blades.  So I called Veritas and spoke with customer service, and am waiting to hear back from them with a solution.

I was able to hone a good edge by pressing slightly more on one side, but I'm worried if I continue to do this I'll ruin the edge of the blade.


Attachments

  • Skewed MicroBevel.jpg
    Skewed MicroBevel.jpg
    164.4 KB · Views: 490
  • Blade out of parallell on TS.jpg
    Blade out of parallell on TS.jpg
    258 KB · Views: 468
  • 20160610_095202.jpg
    20160610_095202.jpg
    285.2 KB · Views: 476
  • 20160610_110602.jpg
    20160610_110602.jpg
    401 KB · Views: 528
Okay now you need to buy some waterstones. I can see my face in the back of my plane blades.  [eek] 6000, then 8000, 10000 and a final wipe on a 12000 stone before a polish with Chromium Oxide.

I use a Veritas mkII guide, looks like you have a bum one, you could obviously skew the blade in the holder to rectify the offset but then that would become quite tiresome, have tried to sharpen the main bevel? Maybe best to just the photos to Veritas and get them to send you a new one.
 
Do you have a small engineers square?

[attachimg=1]

If you do you may be able to attach the registration Blade jig, completely remove the clamp screws to take the clamping plate off and then see if the jig is square to the roller, the jig may not be cast/cut correctly and be holding the chisel out of square.
 

Attachments

  • image.jpg
    image.jpg
    41.5 KB · Views: 802
Thanks [member=59697]danbox[/member] I'll check that when I get home.  I did use a small engineer's square to check the squareness of the registration jig relative to the assembly with the clamping plate still attached and it checked out.  But maybe with the clamping plate off I might get a better reading.

danbox said:
Do you have a small engineers square?

[attachimg=1]

If you do you may be able to attach the registration Blade jig, completely remove the clamp screws to take the clamping plate off and then see if the jig is square to the roller, the jig may not be cast/cut correctly and be holding the chisel out of square.
 
Yeah -- that microbevel was only the first step after the 1200 grit Duosharp.  I was eventually able to get it razor sharp and polished stepping up to the 8000 grit Shapton stone and then the 1 micron Dia paste.  Other than polishing a back bevel with the ruler trick, I didn't bother honing the primary bevel beyond what it was out of the box, as the blade was already pretty sharp, so I just focused on the microbevel.

I thought about skewing to compensate, but then I realized it would be difficult to reproduce exactly every time I wanted to rehone the blade.  So yeah, I've sent pictures to Lee Valley and am awaiting their response.

danbox said:
Okay now you need to buy some waterstones. I can see my face in the back of my plane blades.  [eek] 6000, then 8000, 10000 and a final wipe on a 12000 stone before a polish with Chromium Oxide.

I use a Veritas mkII guide, looks like you have a bum one, you could obviously skew the blade in the holder to rectify the offset but then that would become quite tiresome, have tried to sharpen the main bevel? Maybe best to just the photos to Veritas and get them to send you a new one.
 
Edward A Reno III said:
Since I have nothing else to do but twiddle my thumbs and imagine the possibilities as I wait for the planes to arrive, wondering if anyone has tried out the Veritas jointer fence on their other planes? I'm going to get comfortable with the jack plane before I get into something heavier like a jointer or fore plane, which means I will probably do some edge planing work with the jack, and so am wondering if the jointer fence might be a good investment?
http://www.leevalley.com/US/wood/page.aspx?p=41716&cat=1,41182

I have it attached to my bevel up Veritas jointer plane. I wavered before purchasing thinking it might be a bit gimmicky. But after setting it up properly (getting the perfect 90 degree angle with the adjustment screw) it works fantastic in my opinion. I don't have a mechanical jointer so for now this is how I get my first edge true/ flat. The only draw back is you are limited to stock at least 2 1/2 inches wide or wider or the fence will impede the contact with the face to be jointed. The vice won't have enough "meat" to hold the stock securely.
 
Just an update.  Veritas is sending me a new jig, no charge.
 
Guess I should ask for a new one also because my micro-bevels are all a little skewed. However, in the instructions they indicate that this may happen and that it doesn't make any difference. Given that all my research and experience (somewhat limited) which hand sharpening always showed a "perfectly" straight secondary bevel I was skeptical. Since I go directly to the micro step without removing the chisel from the MKII, I couldn't understand it. I asked that very question of the Fine Woodworking guys and, while I suppose they aren't the final word, they unanimously agreed that this skewing of the micro bevel isn't performance degrading. And, to be honest, my chisels sharpened with the jig are so much sharper than anything else I have used, I stopped worrying about it. (Of course, it could be that my other sharpening methods were just that much worse, but the bottom line is that I'm happen even though the micro isn't straight across.)  Thanks for the heads up though. I might just contact Veritas and ask them about it.
 
Back
Top