You are using an out of date browser. It may not display this or other websites correctly.
You should upgrade or use an alternative browser.
You should upgrade or use an alternative browser.
Help repairing MFT/3 tabletop
- Thread starter wolfie
- Start date
I went into my sawdust pile, mixed with glue and sloshed it into the groove, sanded when hard, flipped the top and tuned end to and as you suggested.
I guess by now, you have found out that a whole bunch of FOGers have run into the same problem. I hope you don't take offense when i tell you i laughed when i first read your OP. When i got to the part where you showed the grove into your FT frame, i was satisfied to know I am not the only one who has done the same. It's called "Redesigning"
Way back when I was learning my trade (masonry), I worked with a man who was reputed to be one of the finest carpenters and masons in the area. Whenever I would make a mistook, he would tell me, "A good craftsman is an average guy who can talk or work his way thru any mistake he makes" You are taking a big step towards becoming a good craftsman. Keep going.
Tinker
To be clear the only reason I suggested screws was to remove the MFT top from the leg section, but to first attach it to another board so it doesn't break. The screws would get removed once the repair is completed. Gluing the insert in is the only method that will bring back it's strength.wolfie said:So Bondo sounds super easy, and at first I though routing a groove for an inlay might be too time consuming / overkill / beyond my skill level, but the more I think about it, the more I’m interested in trying this. I wouldn’t want to keep screws in my tabletop (for a removable insert) as I wouldn’t trust myself not to cut into those at some point. So I would glue the insert in.
I like your thinking! I would suggest setting everything up, and running it down a piece of scrap to make sure you don't side load, or otherwise cause unwanted movement. Then once you feel ready go for the MFT. It is going to take at least two passes depending on your router.wolfie said:I have a router attachment for my guide rail. I’ve not used it yet, and this could be the perfect opportunity to try it")
No need to go wider than the current kerf cuts which I can't eyeball from a photo. Bondo doesn't really have much strength. It is a lightweight filler that sands very easily.wolfie said:I was thinking maybe a 3/4” wide, 1/2” deep groove. I’m too nervous to make a groove as deep as the kerf, as that would only leave an 8th of original mdf intact. This means there would be 1/8th kerf under my inlay (i.e. a hollow spot). I think this would probably be okay, given my impression that 1/4” kerfs in the top don’t seem to weaken the table severely. Also, my glue would fill this void, which might help mitigate any weakness it might cause in the table top. I thought about filling with Bondo or wood filler first, then routing, but wasn’t sure if this extra step would be warranted.
It should fit snug, but be removable. The MDF is going to swell quickly once you put glue on it. Apply glue to the MDF last.wolfie said:I’ve never made an insert. Should I make it slightly undersized on the sides to account for glue? If yes, how much? Maybe a 16th (32nd on each side)?
Just use what you have at home. No need to spend money for a repair. Tablesaw is perfect for cutting it (At some point build a tablesaw sled. There are plenty of YouTube videos). Although there is nothing wrong with Titebond 3, I have found Titebond II easier to work with, as you have a longer working time and easier cleanup. If you only have Titebond 3 use it. FWIW waterproof and MDF are never used in the same sentence.wolfie said:Does it matter which material I use for the insert? I have lots of pine. I might have some oak. I don’t mind purchasing mdf if that makes sense. I would use my tablesaw to cut it down to size. I’d use tight bond 3 for the glue up.
Should work. There is no damage worth discussing to the aluminum base. Use it as a reminder that saws cut stuff, and think what is under the blade before pulling the trigger. (I have my own stories to tell about kickbacks.)wolfie said:One advantage to routing 1/2” deep is that I would just clear the aluminum on the sides of the table, which means I could do this in place (without removing the table).
One of the most important things my mentor taught me was "Don't point out your own mistakes...ever". Most people will not spot them.
Birdhunter
Member
- Joined
- Jun 16, 2012
- Messages
- 4,108
The two part wood epoxy comes in a plastic tube of about 3” long. The stuff comes as a cylinder that has a core section and and exterior section. The sections have different colors. I cut off what I need and knead the piece until the two colors become fully merged. The stuff hardens quickly. I have used bondo and greatly prefer the epoxy.
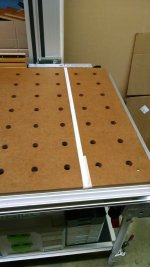
i got a second hand mft3 and the user had repaired it with a poplar insert like this one pictured except it was glued in place. mft still works great
DIY WoodWerx said:Maybe route a groove for removable insert. When the kerf gets worn then it’s replaceable.
I found this idea reading different posts. Did it to my DIY MFT top
I routed a dovetail groove in my table for the kerf. You can see the mistake I made in the offset at the leading edge, vaselined the strip and filled with bondo. The strip is UHMW dovetailed and can be slid out (difficultly). Made the strip first and then routed the table. I do not cut angles on this table as I have a large 64" x 104" cutting table that I consider sacrificial. I can cut off 27.5" on this table as my Incra 52" fence is mounted over the side extrusion.
View attachment 1
View attachment 1
Attachments
sancho57
Member
- Joined
- Jan 13, 2011
- Messages
- 6,903
For my replaceable insert, I used a dove tail bit to route the groove, then the insert I cut a bevel on the sides. I made it wider so I could screw it in place and remove it when it needed replacing.
The wood bondo should work no matter what you choose
The wood bondo should work no matter what you choose
Tinker said:Way back when I was learning my trade (masonry), I worked with a man who was reputed to be one of the finest carpenters and masons in the area. Whenever I would make a mistook, he would tell me, "A good craftsman is an average guy who can talk or work his way thru any mistake he makes" You are taking a big step towards becoming a good craftsman. Keep going.
Tinker
Don't listen to Tinker - his hobby is digging big rocks out of the ground and watching new ones grow. [big grin]
bertv
Member
I use MDF Filler. Bondo could be tough on the sawblade, I think.
sprior said:Tinker said:Way back when I was learning my trade (masonry), I worked with a man who was reputed to be one of the finest carpenters and masons in the area. Whenever I would make a mistook, he would tell me, "A good craftsman is an average guy who can talk or work his way thru any mistake he makes" You are taking a big step towards becoming a good craftsman. Keep going.
Tinker
Don't listen to Tinker - his hobby is digging big rocks out of the ground and watching new ones grow. [big grin]
When I throw water on them, they grow into big piles
/Users/wayne/Documents/STORIES:MY TRUE/WORK/Fire Place:W.Tisbury,MA .pdf
Attachments
DavidCBaker
Member
- Joined
- May 31, 2010
- Messages
- 535
wolfie said:Sadly (and embarrassingly) I've accidentally cut a very deep kerf into my MFT/3 tabletop.
Come on [member=67737]wolfie[/member] I want to hear how this happened. My own mistakes are easier to laugh at if I can laugh at yours.
Similar threads
- Replies
- 4
- Views
- 537
- Replies
- 10
- Views
- 569
- Replies
- 14
- Views
- 1K
- Replies
- 17
- Views
- 16K