Home Office Remodel

[member=65062]DynaGlide[/member]  Wow! That is really great looking.  The crown moulding adds a nice touch.

Thanks for posting your progress and all the photos.  I learned a lot.

Mike A.
 
mike_aa said:
[member=65062]DynaGlide[/member]  Wow! That is really great looking.  The crown moulding adds a nice touch.

Thanks for posting your progress and all the photos.  I learned a lot.

Mike A.

Thanks Mike, I really appreciate it.

After the sun went down I realized I'm not done painting the crown. In the daylight it looks mostly okay, but once the room became dark and I put the lights on it's apparent the crown is a much cooler white than the cabinets and the rest of the trim in the room. As it stands, the crown has in this order 1) Cover stain 2) ProClassic Acrylic-Alkyd White Semi-Gloss 3) SW Emerald Urethane High Hide White Gloss.

The cabinets were sprayed with SW Kem Aqua+ in their semi gloss white, I can't remember the code they use for this but I have the can if needed.

Where do I go from here? Scuff sand and apply (insert product)? Prime again, different primer (insert primer), then apply top coat (insert product here)? Finished space so brushing is the only option for me.

[member=4105]tjbnwi[/member] any input?

Thanks all,
Matt

i-ZK8RSNt-XL.jpg


i-6BxwxPd-XL.jpg
 
[member=65062]DynaGlide[/member],

To start with, great iob. Everything looks really nice.

For the crown, scuff sand, wipe down, spary KA+ over it. The issue arises in the base of the various products. The products may be all SW, but the titanium whites vary slightly from product line to product line.

You don't have to strip it, just scuff sand with 240 to give the KA+ something to hold on to. None of the waterbornes burn in, they need tooth to grip one coat to the next.

Tom
 
tjbnwi said:
[member=65062]DynaGlide[/member],

To start with, great iob. Everything looks really nice.

For the crown, scuff sand, wipe down, spary KA+ over it. The issue arises in the base of the various products. The products may be all SW, but the titanium whites vary slightly from product line to product line.

You don't have to strip it, just scuff sand with 240 to give the KA+ something to hold on to. None of the waterbornes burn in, they need tooth to grip one coat to the next.

Tom

[member=4105]tjbnwi[/member] Hey Tom,

I'd love to use KA+, but can't spray in my finished space. Any other ideas?

Also thank you for the compliments. Means a lot coming from someone like you.

Edit: Local store that sold me the KA+ recommended I try the Emerald Designer series in an Ultra White base. He said that's the brightest white they can offer.
 
I have too ask——why can’t you spray in your finished space? I may have suggestions to mitigate your concerns. It’s not something I like to do but at times I have to. Always seems to be issues with crown that call for spraying in place.

Had to go out and do this one at 2 AM. Takes some work but it can be done.

KA+ does not brush or roll well.

Take a door or finished piece, if you have one, to your SW dealer, they may be able to match the sheen and tone in another product.

You can try a BM dealer to see if they can match it also, BM’s white bases are different than SW’s.

Tom
 

Attachments

  • 5EB24989-4A25-4046-84A7-9804F9267E68.jpeg
    5EB24989-4A25-4046-84A7-9804F9267E68.jpeg
    74.5 KB · Views: 339
Looks great, Matt!  Congrats on the finish line - or almost the finish line with the recoats!

Appreciate you taking all of us along for the ride!
 
[member=65062]DynaGlide[/member]

I appreciate the CISCO IP Phone on your desk. Is it a 7945G? I have the CISCO 8841.
 
Really nice job Matt... [thumbs up]...too bad about the paint thing, that's a real bummer.  [mad]

For the average Joe that only does this stuff on the weekends, who'd have thunk?

Hey Tom [member=4105]tjbnwi[/member] when you say KA+ doesn't brush or roll well, what does it look like? Does it alligator, orange peel or something else?

What gun did you use to shoot that crown molding? HVLP, turbine or a small Graco Fine Finish? I ask. because there isn't a lot of masking so the gun would have to have some pretty defined cut-off areas.

Matt, on the last issue I really like Tom's suggestion to color match the paint at SW for color & sheen. Their color match system is pretty incredible.
 
[member=44099]Cheese[/member],

KA+ dries very quickly, you can't keep a wet edge, it pulls and will not lay out.

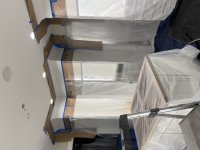
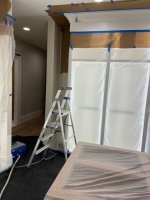
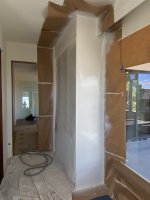
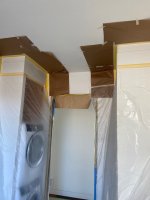
Fuji Q5 with a T-75  gun, 1.4 tip. The gun allows me to adjust the pattern and fluid, I modified the connector so I can control ir pressure to the tip but still have full pressure to the cup. First pic you can see the turbine on the floor and the repairs necessary. This large cove crown is the nemesis for many. Not unussual for us to have to fix it once the installers are done.

Second pic is the room completed, this is her closet in the 2021 Parade home. I didn't have a completed picture, had to get this off our Instgram page.

Another one I had to go fix....

Tom
 

Attachments

  • IMG_4336.jpeg
    IMG_4336.jpeg
    74.9 KB · Views: 544
  • IMG_0220.jpeg
    IMG_0220.jpeg
    91.6 KB · Views: 541
  • IMG_4471.jpeg
    IMG_4471.jpeg
    63.8 KB · Views: 528
  • IMG_4470.jpeg
    IMG_4470.jpeg
    58.7 KB · Views: 489
Thanks Tom...I'm still impressed at how little overspray there is on the paper.
 
[member=167]neilc[/member] [member=7493]Sparktrician[/member] [member=44099]Cheese[/member]

Thank you for the kind words. The paint on the crown only really shows in dark conditions. In day light it looks fine to me. Next time there's a big sale I'll pickup the Emerald Designer Ultra White, stuff is expensive, and take a door off a cabinet with me to check while I'm there. I will say the Emerald that's up there feels really smooth and looks great even though I used an old clumpy brush to apply it.

[member=4105]tjbnwi[/member] I'm too scared to spray indoors. It isn't worth the risk to me of overspray where I don't want it. If I ever get into a bigger install like my basement I'll give it a hard look. It's a much, much larger room. Thank you for sharing how you mask everything off, though, and again thank you for the compliments. I'm just a one man band with no carpentry background learning as I go. First woodworking tool was about 6 years ago.

Matt
 
Well after 4 years of the desk being too high I did some research and tackled lowering it this past weekend. It was way more work than I wanted but it needed to be done. When I originally built everything I must've had a brain fart and didn't account for the stackup of measurements of the cabinet, legs, and counter plus any drop in the floor across the room. I wanted it lower but I couldn't do it with the legs I had on. The trickiest part was trying to support it while I took cabinets out and re-level them with it in the way. Surprisingly minimal damage. I started Friday afternoon and wrapped up around 3pm Sunday just in time to get back to work today. Oh and having to make a new back for my corner cabinet with the outlet and ethernet ports was not fun either.

The old feet only adjusted down to 3 7/8". The Hafele Axilo 78 have a 2" option which is what I went with. With some careful adjustment I was able to drop the desk height down to 29 1/4" from 31 1/4". I absolutely love the Hafele adjusters and the tool used with them and will be switching over to their feet in all future cabinet builds.

i-SR9CB6c-X2.jpg


i-B8B5L49-X2.jpg


i-fWF4rWR-X2.jpg


i-x7zf6CZ-X2.jpg


i-FX4mPMr-X2.jpg


i-qJSh3d5-X2.jpg


i-QVgWrRQ-X2.jpg


i-LNPvpQS-X2.jpg


i-Wpc8sW3-X2.jpg


Old legs:

i-XgSnQ2R-X2.jpg


New legs:

i-HdWm8bd-X2.jpg


Lowered:

i-dXBSzm4-X2.jpg


i-TTsJkhp-X2.jpg


i-nDZk6Cv-X2.jpg


Caulked/painted/ready to go:

i-5R8rTRC-X2.jpg


Live and learn! The lower height is such a huge relief on my back and shoulders.
Matt

 
Great work!  Amazed you were able to do that and not break anything.  That top has to be pretty heavy!

So the Hafele long reach tool allows you to adjust the height?  Curious how that works as I see the drill connected to it in one pic.  does it have a gear drive that turns a cog at the interior end?

 
DynaGlide said:
[member=167]neilc[/member] [member=7493]Sparktrician[/member] [member=44099]Cheese[/member]

Thank you for the kind words. The paint on the crown only really shows in dark conditions. In day light it looks fine to me. Next time there's a big sale I'll pickup the Emerald Designer Ultra White, stuff is expensive, and take a door off a cabinet with me to check while I'm there. I will say the Emerald that's up there feels really smooth and looks great even though I used an old clumpy brush to apply it.

[member=4105]tjbnwi[/member] I'm too scared to spray indoors. It isn't worth the risk to me of overspray where I don't want it. If I ever get into a bigger install like my basement I'll give it a hard look. It's a much, much larger room. Thank you for sharing how you mask everything off, though, and again thank you for the compliments. I'm just a one man band with no carpentry background learning as I go. First woodworking tool was about 6 years ago.

Matt

I stopped using Sherwin Williams paint after I asked for cabinet paint (Emerald) and he sold me the wall paint version. I has to repaint it all and they assumed no responsibility. 

I now use Benjamin-Moore’s Advance and I too brush if on-site.  I spray, otherwise.  There is a learning curve, especially for vertical surfaces as they are subject to drips and runs.  But after a bit, I got a hold of the technique and to my eye, it is impossible to tell from sprayed. 

I would note that Advance is a very low viscosity paint.  I used nylon brushes Taklon Gold to get the best results.  But that choice is specific to Advance.  I don’t know what brush I would use for Emerald. 

I would note that I got these as a three brush set for about $6.00 (1”, 2” & 3” wide).  I did not expect much from them, but they are now my go-to brushes.  But they do not carry a lot of paint, so frequent brush dipping into the pail.
 
neilc said:
Great work!  Amazed you were able to do that and not break anything.  That top has to be pretty heavy!

So the Hafele long reach tool allows you to adjust the height?  Curious how that works as I see the drill connected to it in one pic.  does it have a gear drive that turns a cog at the interior end?

It was a bit of a nail biter at times for sure. Yes the Axilo system uses that tool. It’s incredibly useful. Their toe kick attachment spring clips are really nice too. I’ll be doing those next.
 
Back
Top