Horror show stairwell

ear3

Member
Joined
Jul 24, 2014
Messages
4,341
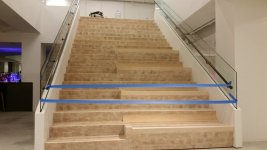
I was hoping to solicit some advice on the project I've been working on, which is a large stairwell.

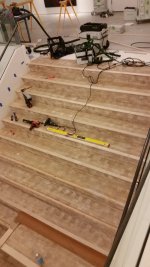
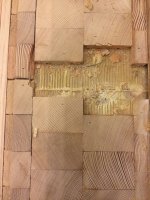
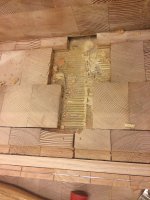
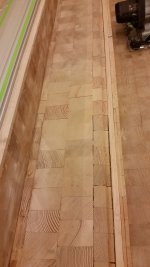
Some background -- this is actually the second time this year we've worked on the stairs.  It's covered with these 3/4" thick end grain doug fir tiles, and had these thin maple caps at the front of the tread.

View attachment 1

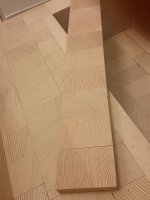
View attachment 2

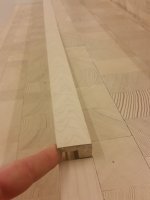
View attachment 3

You'll see that the thick part of the maple cap is a lot narrower than the channel it's supposed to fit into.  Not only that, but the front edge of the wooden tile where it meets the cap is actually back beveled 5-10 degrees, so there is all this additional space between the cap and the tile the lower you go.  There are many other features of how the stairs are constructed that just kind of make you scratch your head.  They were also originally stained white, so they scuffed up very quickly.

They have had problems with the stairs almost from the moment they were installed.  So we were asked last year to sand down and fill the gaps that had developed especially near the front of the treads (almost certainly, as we just recently found out, because of the spacing between the maple cap and the front row of tile on the tread), as well as reattach the maple caps that were coming up in a few places.  We did so, but with the warning that there might be more serious issues with the stairs that a cosmetic resurfacing was not going to solve.

Well, a year later, we're back, and dealing with the exact same problems.  The problems have been exacerbated by the fact that the custodial service has apparently been mopping the stairs with copious amounts of water.  They didn't want to do a complete overhaul, so we settled on a partial rehab, with disclaimers that this still may not be a long term fix, and recommending too that the stairs won't be mopped like they were.

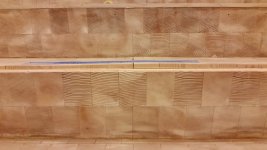
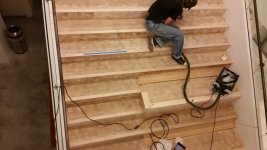
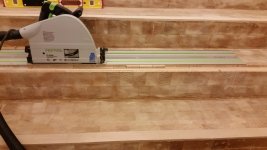
The main part of the fix involves redoing the maple caps -- cutting a channel in the front of the stairs with the tracksaw (and finishing up with the Vecturo on the ends) so that they're actually resting on and can be secured to the wooden tiles, as opposed to just butting up against them (and also filling in the gap left by the previous maple cap, and using a generous layer of adhesive and fasteners to make sure the new cap doesn't come loose).  A router would have been more efficient, but there were too many variables to control (nails in the path of the channel, the bowing out of some of the stairs) to make it that much faster such that it would justify the risk you take with one errant move of the tool.

View attachment 4

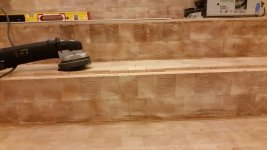
I made the caps wider and a consistent thickness (which is thicker at the edge than they previously were).  This should cut down on the movement in the front of the treads that was causing the filler to disappear and gaps to open up.

View attachment 6

But we've now run into a problem with one of the stairs, where the subfloor itself is actually coming up.  The subfloor is just a layer of 3/4" ply over the concrete structure of the stairs. 

View attachment 5

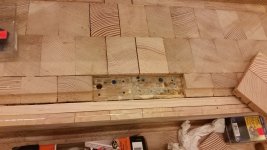
It's not clear whether it's coming off of the concrete or just delaminating, but we're going to have to take out some of the tiles to investigate.  So my question is whether a repair can be done that doesn't involve ripping out the plywood subfloor of that entire stair.  Since the plywood is itself resting on the solid surface of the underlying concrete, it's not a question of degraded structural integrity, but simply flatness -- so wouldn't it be possible to remove tiles in a few strategic places, then secure the ply to the concrete using something like tapcon/blue screws?  What about shooting some additional adhesive under the ply where the screws go to up the holding power to the concrete?

What would you guys do to make the best of what is this less than optimal situation?


Attachments

  • 20160110_181323.jpg
    20160110_181323.jpg
    134.1 KB · Views: 731
  • 20151228_153817.jpg
    20151228_153817.jpg
    232.7 KB · Views: 520
  • 20151228_153858.jpg
    20151228_153858.jpg
    143.8 KB · Views: 532
  • 20161221_185603.jpg
    20161221_185603.jpg
    1 MB · Views: 429
  • 20161224_185918.jpg
    20161224_185918.jpg
    1,007 KB · Views: 465
  • 20161224_170748.jpg
    20161224_170748.jpg
    815.2 KB · Views: 639
Your plan seems like a plan. Since the stairs are concrete it is probably the ply or the tiles themselves buckling up. Probably from the copious amounts of water they have been subject to.
I would cut out some tiles first, see what the ply looks like, but I think you already know. You may have to remove a section of ply and install a new piece. I would use the best PL glue or maybe the marine grade epoxy glue. You can't trust future cleaners to follow directions.
Best of luck.
 
Squeeze glue in wherever you can and use tap one or a shotgun with washers to get the ply to stay put. (If it's right on the edge of a concrete stair nose don't use the shotgun 😳). The real fix is to redo the whole thing and properly seal the concrete with some type of roll on membrane, but you already know that and they don't wanna pay for it!
 
For re-glueing the subfloor to the underlying concrete I'd suggest injecting hot melt glue from Pamtite (Fastenmaster) it is crazy strong and sets up to full strength in 5 minutes. Originally designed to install tackless carpet strips (called smooth edge here) and the carpet can be power stretched in 5 minutes instead on glueing with PL with requires 24hours to set up before power stretching (some concrete you can't nail the strips down if there is in-floor heating in the slab.

I do insurance restoration and repairs as well as New Home Warranty claims and on one job I did last year I successfully drilled a 1/16th" diameter hole and with a similarly sized glue nozzle injected glue under a 1 foot diameter small void where an expensive engineered tiger wood floor that was squeaking every time you walk on the area. I saved having to replace $20k of flooring. The hole small injection hole was placed in a dark mineral streak and filled with a coloured hard wax to match and you can't see the hole at all.

I also did a similar repair to a single tile 24"x24" that had a small hollow sound near a grout line and I drilled a number of 1/16" holes in the grout line adjacent to the void and inject Pamtite glue there too. After the repair I re-grouted the repair area and it was perfect. Saved them $10K as this was a large Ensuite with the same tile on the walls of the 7 foot shower and around the soaker tub.

I even use the glue gun to attach MDF base to my projects as it saves me a ton of time. No nail heads to fill, sand a paint. I take ALL of my base measurements ahead of time and I cut all of the base in the shop and the base is then pre-painted in the shop ready for installation at site. I also use a caulking kit that I've previously added the matching paint to so that way I don't even need to much if any paint touch ups at site
 
I didn't know about the PAMTite.  That stuff looks slick, and the injector is small enough -- gonna look into that as a possible solution.  Thanks.

BMAC said:
For re-glueing the subfloor to the underlying concrete I'd suggest injecting hot melt glue from Pamtite (Fastenmaster) it is crazy strong and sets up to full strength in 5 minutes. Originally designed to install tackless carpet strips (called smooth edge here) and the carpet can be power stretched in 5 minutes instead on glueing with PL with requires 24hours to set up before power stretching (some concrete you can't nail the strips down if there is in-floor heating in the slab.

I do insurance restoration and repairs as well as New Home Warranty claims and on one job I did last year I successfully drilled a 1/16th" diameter hole and with a similarly sized glue nozzle injected glue under a 1 foot diameter small void where an expensive engineered tiger wood floor that was squeaking every time you walk on the area. I saved having to replace $20k of flooring. The hole small injection hole was placed in a dark mineral streak and filled with a coloured hard wax to match and you can't see the hole at all.

I also did a similar repair to a single tile 24"x24" that had a small hollow sound near a grout line and I drilled a number of 1/16" holes in the grout line adjacent to the void and inject Pamtite glue there too. After the repair I re-grouted the repair area and it was perfect. Saved them $10K as this was a large Ensuite with the same tile on the walls of the 7 foot shower and around the soaker tub.

I even use the glue gun to attach MDF base to my projects as it saves me a ton of time. No nail heads to fill, sand a paint. I take ALL of my base measurements ahead of time and I cut all of the base in the shop and the base is then pre-painted in the shop ready for installation at site. I also use a caulking kit that I've previously added the matching paint to so that way I don't even need to much if any paint touch ups at site
 
I've also used it to fasten down threshold transition strips. It also states that the American New Wood Flooring Assoc. has approved it for wood flooring starter strips.

Although it's not your Grandma's hobby glue gun it's still priced decently at about $115 here in Canada (less for you I'm sure) and glue sticks are about $15 a pound at my flooring supply distributer. You must use the Pamtite gun as the heat has to be something like 395 F. Just remember to wear at least some disposable latex gloves when using as the hot glue doesn't feel to good when you accidentally come in contact with it (yup, happened to me...).

Good luck Edward

Bruce
 
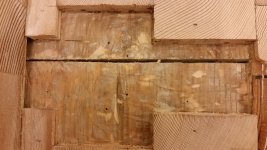
We took out a few of the tiles on that problem stair today to get an idea of what we were dealing with. I actually wasn't on site but will be going in tomorrow to attempt the fix. It's hard to tell from the pictures since there is so much adhesive underneath the wooden tiles, but it looks like the ply is still intact.  You can see, however, that the buckling was occurring right at the seam of two pieces.  We got the PAMTITE and so will use that with a few fasteners to resecure the ply. Depending on what I find tomorrow when I'm actually looking at it, I may even consider cutting a small slice off one of the pieces of ply to relieve some of the pressure that was causing the buckling. I assume that would be an Ok thing to do - just a sliver, not a huge channel, and something that can be filled to prevent water from dropping underneath.

BMAC said:
I've also used it to fasten down threshold transition strips. It also states that the American New Wood Flooring Assoc. has approved it for wood flooring starter strips.

Although it's not your Grandma's hobby glue gun it's still priced decently at about $115 here in Canada (less for you I'm sure) and glue sticks are about $15 a pound at my flooring supply distributer. You must use the Pamtite gun as the heat has to be something like 395 F. Just remember to wear at least some disposable latex gloves when using as the hot glue doesn't feel to good when you accidentally come in contact with it (yup, happened to me...).

Good luck Edward

Bruce
 

Attachments

  • IMG_2635.jpg
    IMG_2635.jpg
    390.3 KB · Views: 518
  • IMG_2637.jpg
    IMG_2637.jpg
    431.2 KB · Views: 503
Hey Edward...not trying to be cocky, but there's a reason most subfloor providers/manufacturers  stipulate at least a 1/8" gap between adjoining sheets of subfloor. It's a time proven process.
 
Lol.  So I guess I'll bring it up to spec then!  Like I said, there were many things with the design/construction of the stairwell that are curious to say the least.

Cheese said:
Hey Edward...not trying to be cocky, but there's a reason most subfloor providers/manufacturers  stipulate at least a 1/8" gap between adjoining sheets of subfloor. It's a time proven process.
 
Edward A Reno III said:
Lol.  So I guess I'll bring it up to spec then!

[thumbs up]...ya that's all you can do. Sometimes wood, as much as we think we own it...really owns us. Metal I can control...wood however, it never dies. It's only dead relative to our conception of death. That's many times the love/hate relationship with woodworking.
 
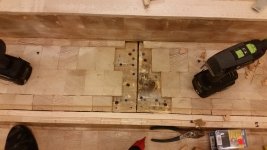
Well, went through with the fix yesterday.  After clearing out all the adhesive and various gunk, turns out they had left some space in between the underlayment

View attachment 1

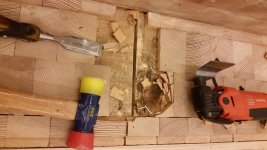
Even so, I cut a little off one of the edges to slightly widen the gap so it would make the adhesive application easier.  The plywood was fine -- no delamination -- but it was definitely coming up off the concrete structure of the stair.  So I decided to peel back a few more pieces of tile, working carefully with the Multimaster armed with a scraper blade to undercut the adhesive, and then a chisel to bust it into pieces, so as not to disturb the adjacent tiles

View attachment 2

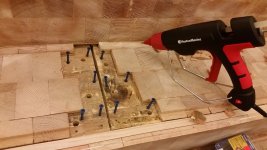
Added some access holes for the PAMtite further from the edge (I realize now that I made the holes too large -- I'll do it right next time), and predrilled the holes for the tapcon screws -- I couldn't get all the way to the front edge with the screws, because there was a thick metal strip at the front edge of the stair that I didn't feel like messing around with, but I felt comfortable with how much anchoring I was able to set up elsewhere on the board.

View attachment 3

View attachment 4

Not sure if I worked too slowly (the PAMTite sets REALLY fast), or if I used too much glue, but when I locked everything down, the boards were not completely flat, and there remained a slight undulation.  The ply is locked in place however, so I just decided to work around the problem at the final stages.

I filled the gap with caulk, then pieced the tile back in, using the PAMTite so it would be ready to work on almost immediately:

View attachment 6

Then used the RAS to flatten out the undulation, which worked quite brilliantly

View attachment 7

Set the tracksaw to cut the channel/rabbet in the overhanging pieces

View attachment 8

And voila, it's like nothing ever happened

View attachment 9

View attachment 10

I put the maple cap on shortly thereafter, and tomorrow we will come back and fill it in preparation for final sanding

View attachment 11

So thanks again [member=40924]BMAC[/member] for the word on PAMTite -- really a remarkable adhesive, that we will no doubt make use of in the future now that we have the kit.
 

Attachments

  • 20161229_203615.jpg
    20161229_203615.jpg
    804.7 KB · Views: 339
  • 20161229_191902.jpg
    20161229_191902.jpg
    1 MB · Views: 348
  • 20161229_191849.jpg
    20161229_191849.jpg
    978 KB · Views: 304
  • 20161229_191323.jpg
    20161229_191323.jpg
    965 KB · Views: 199
  • 20161229_190732.jpg
    20161229_190732.jpg
    970.7 KB · Views: 272
  • 20161229_182028.jpg
    20161229_182028.jpg
    870.6 KB · Views: 276
  • 20161229_182019.jpg
    20161229_182019.jpg
    1.2 MB · Views: 473
  • 20161229_170815.jpg
    20161229_170815.jpg
    1,013.5 KB · Views: 248
  • 20161229_165105.jpg
    20161229_165105.jpg
    1.1 MB · Views: 305
  • 20161229_145612.jpg
    20161229_145612.jpg
    1.2 MB · Views: 307
  • 20161229_142357.jpg
    20161229_142357.jpg
    1 MB · Views: 288
Edward A Reno III said:
Not sure if I worked too slowly (the PAMTite sets REALLY fast), or if I used too much glue, but when I locked everything down, the boards were not completely flat, and there remained a slight undulation. 

This PAMTite stuff is rather interesting, the Flex 40 in the green package, has only 40 seconds of open time and it fully cures in 5 minutes.
 
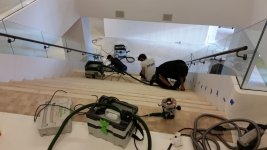
We finished up all the prep work yesterday, and will begin applying the finish over the course of the weekend. At one point yesterday we had 4 vacs going at once, which included my ct26 and the CT sys I just picked up specifically for this job -- three people sanding and me rounding the corner of the maple caps with the of1010.

View attachment 1

Thankfully it looks like the nightmare is over and we will bring this job to a successful conclusion.
 

Attachments

  • 20161230_142934.jpg
    20161230_142934.jpg
    700.6 KB · Views: 345
Nice work.  The design of the stairwell, and in particular using end grain for treads, is certainly challenging.  I can see where there is a much higher risk of water damage.  Nice job on the repairs.

What are you going to use to finish the treads to mitigate the risk of future water damage?  I can see two options - something that sinks down relatively deeply into the grain to plasticize it, and/or something really tough and impermeable that sits on the top.  Also, are you doing anything to keep water from seeping down to the sub-floor layer.  If water does get down there, is there a good way to dry it out?

Also, what is the purpose of the shelf about half way down the stairs.  Is it permanent or temporary?
 
Nice job Edward.  Great pictures, too.  The end grain stairs reminds me of some old factories and shops that had wood block floors.

Also, thanks to BMAC for recommending PAMtite.  That is a new product to me and could be useful on some of my future jobs.
 
>>>Also, what is the purpose of the shelf about half way down the stairs.  Is it permanent or temporary?
 
[member=37411]Edward A Reno III[/member] 

Great repair job! Looks like a lot of hours but a fantastic result for the client.

Yup the Pamtite adhesive system is pretty versatile and yes, you have to work quick! I should've mentioned that it's beneficial to experiment of a number of scraps pieces.

I just picked some of the 40 second open time glue sticks (something newer). I usually use on MDF base boards installs the 1 minute open time sticks. Every once and a while I need an even slower open time and they do have 2 minute open time sticks. All of the various "open" time glue sticks reach full cure in 5 minutes.
 
Thanks for the compliments. Theres actually three of those "shelves", which are part of the original design. They get covered by cushions as quasi stadium seating for presentations or movies that can be projected on the large white wall opposite the landing.

Not that I mind, but the people who will walk up and down the stairs -- while they might be able to tell a slight difference in terms of the larger maple caps -- will have no idea just how much work and pain went into bringing the stairs back to status quo. It's almost more trouble to fix someone else's workmanship rather than scrap it and build it from scratch, since you're boxed in by all the choices they made.

I'm not very knowledgeable about finishes, so I didn't end up choosing it, but we're using a product called lecol loba 2k:http://www.floorsalesonline.com/lecol-loba-2k-invisible-protect.html

The main goal was to get as natural looking a finish as possible, which this finish is apoarently good at.  The one extra water protection measure we are using is to run a small bead of clear caulk along the edge where the train meets the riser.
 
Scott in San Diego said:
The end grain stairs reminds me of some old factories and shops that had wood block floors.

End grain block floors were almost always laid in/on sand, just like the parquet floors of old. My guess is that the sand takes care of a lot of the moisture problems that might occur. Using them on stairs, like in this example, would be more problematic.
 
Back
Top