How not to tile a shower...

Michael Kellough said:
What is the goo used to seal patches in the wall?

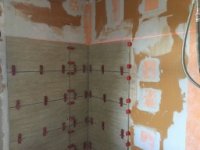
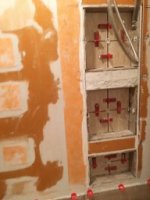
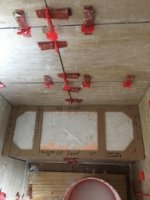
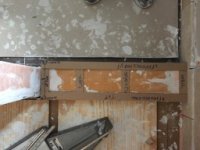
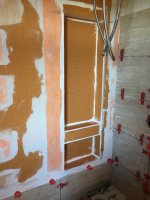
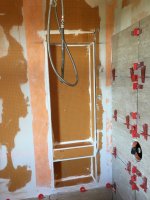
I'm not Tom, just answering your second question since I've used Kerdi a fair bit as well.  Kerdi is applied with thinset (example if you are applying the membrane to cement board).  When you overlap or use the thin bands of membrane (e.g. at the corners of the pan), also thinset.  Or, in Tom's photos, the patches of Kerdi membrane on top of the Kerdi-board to cover the screws are also applied with thinset.  This works because the membrane is kind of a fleece-like material sandwiching the impermeable core.

Schlüter also sells an [expensive] silicone caulk called Kerdi-fix for use on drain flanges, metal trim, pipe and valve seals, etc.
 
The typical Kerdi Board install is 1/2" thick on the walls.  It is screwed directly to the studs. I typically cut it with the TS55, low speed and a 28t blade.  Cuts easy enough with a utility knife and a straight edge too.

Live4 has it right about the patches.  They are Strips of Kerdiband applied with unmodified thinset.

The KerdiFix caulking IS NOT silicone and it's advised to not use silicone in the assembly.  Or it used to be anyway.  I don't know what's in that kerdifix , but it's expensive , smells awful, and sticks to everything like nobody's business. It's now available in smaller tubes so there's less waste if you don't use a full tube.  It has a short shelf life once opened.  I know guys found an alternative from Sika that was a spitting image to the Kerdi product , but I'm pretty sure it's been discontinued.

 
antss said:
The KerdiFix caulking IS NOT silicone and it's advised to not use silicone in the assembly.  Or it used to be anyway.  I don't know what's in that kerdifix , but it's expensive , smells awful, and sticks to everything like nobody's business. It's now available in smaller tubes so there's less waste if you don't use a full tube.  It has a short shelf life once opened.  I know guys found an alternative from Sika that was a spitting image to the Kerdi product , but I'm pretty sure it's been discontinued.

Sorry, technically it's a proprietary "silane-based polymer," didn't mean to imply it's the same as any random silicone caulk. 
 
Michael Kellough said:
Ditto Alan.

Tom do you cut Kedi board with a knife or saw?

What is the goo used to seal patches in the wall?

Depends, normally the TS-55 with a 48 tooth blade.

The goo is tile mortar, Schluter All-Set to be exact. I'm not calling it thin set because Schluter claims you can set LF and LFH tile with it. I'll find out how true this is soon.

Tom
 
Alan G said:
[member=4105]tjbnwi[/member] Tom- In these showers that you show what thickness is the Kerdi Board on the walls? And you are screwing that right to the studs or is there something in between?

1/2"

Directly to the studs.

Tom
 
antss said:
The typical Kerdi Board install is 1/2" thick on the walls.  It is screwed directly to the studs. I typically cut it with the TS55, low speed and a 28t blade.  Cuts easy enough with a utility knife and a straight edge too.

Live4 has it right about the patches.  They are Strips of Kerdiband applied with unmodified thinset.

The KerdiFix caulking IS NOT silicone and it's advised to not use silicone in the assembly.  Or it used to be anyway.  I don't know what's in that kerdifix , but it's expensive , smells awful, and sticks to everything like nobody's business. It's now available in smaller tubes so there's less waste if you don't use a full tube.  It has a short shelf life once opened.  I know guys found an alternative from Sika that was a spitting image to the Kerdi product , but I'm pretty sure it's been discontinued.

Schluter All-Set is a specially formulated modified mortar. It's been on the market about 6 months.

Tom
 
1/2"

Directly to the studs.

Tom
[/quote]

I'm sure it is since that's what is spec but I would not think a 1/2 foam panel would be rigid enough for tile on that wall. Did you ever have that concern?
 

1/2"

Directly to the studs.

Tom
[/quote]

I'm sure it is since that's what is spec but is a 1/2 foam panel rigid on that wall?
With large format tiles I could see it but with a mosaic I would worry the wall would be spongy.
[/quote]

It's a very dense compacted foam. Not that flexible.

I've never done a full wall or large area of mosaics over it.

Tom
 
This has been a very interesting discussion.  Thanks for the education Tom.  Altho it has been well over 30 years since I had anything to do with the trowel trades, it is amazing to me the improvements that have been in materials. if i were to start in again, it would take a lot of educatin' just to catch up. My grandson is just starting in college with his major in construction management. Every time I see him (weekends) I have lots of questions to ask.
Tinker
 
Schluter All-Set is a specially formulated modified mortar. It's been on the market about 6 months.

Oh great.  [eek]

Has Schluter changed their tact and moved away from unmodified ?  Or have they just bowed to pressure from the large format manuf. , most of which require modified setting material for install?

Is the  All-Set for use between the Kerdi layers too - or just for setting the tile onto the membranes and mats ?
 
antss said:
Schluter All-Set is a specially formulated modified mortar. It's been on the market about 6 months.

Oh great.  [eek]

Has Schluter changed their tact and moved away from unmodified ?  Or have they just bowed to pressure from the large format manuf. , most of which require modified setting material for install?

Is the  All-Set for use between the Kerdi layers too - or just for setting the tile onto the membranes and mats ?

They have not changed their stance on the modified/un-modified mortars.

All Set is the only modified they approve for their system. The primary difference between this and other modifies is they got it to cure in 12-16 hours between the two low vapor permeance surfaces.

I aware of two years of All Set's development. My guess is it took them at least four years.

When I use modified (I'm a big fan of Mapie) with Schluter products I plan at least 48 hours from set to grout. I prefer 72 hours.

As the name implies, All Set can be used to set everything.

Tom

 
Alan G said:
I'm sure it is since that's what is spec but I would not think a 1/2 foam panel would be rigid enough for tile on that wall. Did you ever have that concern?

That’s one of the issues that I had, that made me decide to continue to use cementious based product. If I’m hanging 10mm thick, 24” x 12” porcelain tiles off a 1/2” thick foam board...it may work for a while, it may even work forever, however we’ll not not know this until 20-30 years from now...but after 20 years of gravity working its wonders..I want to make sure the tile substrate doesn’t feel the need to bow or sag on my watch. If I were 10-15 years younger I may have rolled the dice and taken the chance, however at my age I just don’t feel the need to gamble on future results. Especially as I will be the person that will have to rectify the issue.

This issue rather reminds me of the problems with the exterior stucco problems that were rampant during the 90’s to early 2000’s. The industry had literally thousands of testimonials that their application methods were sound, yet the devastation was consistent and on-going. If I remember correctly, a class action suit was eventually brought forth and honored.  I just don’t want to be on the end of a potentially stinky situation...I just want to update the bathroom and go forward.

The statement “an ounce of protection is worth a pound of cure” still holds true.
 
Cheese said:
Alan G said:
I'm sure it is since that's what is spec but I would not think a 1/2 foam panel would be rigid enough for tile on that wall. Did you ever have that concern?

That’s one of the issues that I had, that made me decide to continue to use cementious based product. If I’m hanging 10mm thick, 24” x 12” porcelain tiles off a 1/2” thick foam board...it may work for a while, it may even work forever, however we’ll not not know this until 20-30 years from now...but after 20 years of gravity working its wonders..I want to make sure the tile substrate doesn’t feel the need to bow or sag on my watch. If I were 10-15 years younger I may have rolled the dice and taken the chance, however at my age I just don’t feel the need to gamble on future results. Especially as I will be the person that will have to rectify the issue.

This issue rather reminds me of the problems with the exterior stucco problems that were rampant during the 90’s to early 2000’s. The industry had literally thousands of testimonials that their application methods were sound, yet the devastation was consistent and on-going. If I remember correctly, a class action suit was eventually brought forth and honored.  I just don’t want to be on the end of a potentially stinky situation...I just want to update the bathroom and go forward.

The statement “an ounce of protection is worth a pound of cure” still holds true.

The exterior stucco (Dryvit) issues were primarily install issues. Properly installed the Dryvit system works very well.

Tom
 
Tile has arrived. Install has commenced. Templates for the granite company have been made.

Tom
 

Attachments

  • IMG_2184.jpg
    IMG_2184.jpg
    18.8 KB · Views: 691
  • IMG_2188.jpg
    IMG_2188.jpg
    20.6 KB · Views: 674
  • IMG_2191.jpg
    IMG_2191.jpg
    20.5 KB · Views: 689
  • IMG_2192.jpg
    IMG_2192.jpg
    19.7 KB · Views: 686
  • IMG_2194.jpg
    IMG_2194.jpg
    21.3 KB · Views: 672
[member=4105]tjbnwi[/member] I tried to look at the pics but could not zoom in enough to see....How did you do the ledges in the niche? Kerdi board again with some framing for support?
 
Hey Tom,
Are those 36” tiles and what leveling system are you using?
 
Alan G said:
[member=4105]tjbnwi[/member] I tried to look at the pics but could not zoom in enough to see....How did you do the ledges in the niche? Kerdi board again with some framing for support?

[member=65868]Alan G[/member]

Hopefully these two will expand. I had my export setting at medium instead of large.

The niches are in a plumbing wall, it is a double 2x4 deep wall (7.5" without faces). A vent runs through the channel created by the lower of the dividers.

I used Kerdi Fix to adhere Kerdi backers to the edges of the studs (3.5" back from the face of the show wall). Kerdi board was then glued to the backers at full stud bay width and taller than what was needed for the niche height Strips of Kerdi board were glued to the edges of the studs, Kerdi board supports were glued on to the stud Kerdi board and back Kerdi board, tops and bottoms cut to fit, Kerdi Fixed to the supports, face sheet supports front edge.

There is a slight drainage pitch on the bottom pieces.

The white goo in the pictures is Kerdi Fix, do not get it where you don't want it, it does not come off without a lot of work and chemicals...

If this was not a plumbing wall, I cut the back and glue it right to the back side of the drywall on the opposite side of the work being done.

I built the boxes faster than I typed this.....

I finished the tile in the niche today, there are 48 tile pieces in it...not counting the glass mosaic that covers the channel faces...

Tom
 

Attachments

  • IMG_2185.jpg
    IMG_2185.jpg
    291.4 KB · Views: 682
  • IMG_2186.jpg
    IMG_2186.jpg
    280.6 KB · Views: 657
I've gotta say that the Hardi / hydro ban system still looks a lot more simple. There's something about sealant that I've been taught not to trust for a lifetime, I guess the same logic could be used to question the lifespan of hydroban.

I am intrigued by the pre-sloped pans though! 

 
A few tile left to set after the granite goes in on Monday.

Tom
 

Attachments

  • IMG_2207.jpg
    IMG_2207.jpg
    263.4 KB · Views: 726
  • IMG_2208.jpg
    IMG_2208.jpg
    189.2 KB · Views: 699
Back
Top