How square are your clamps?

4nthony

Member
Joined
Feb 23, 2021
Messages
772
If you're buying Jorgensen clamps, be sure to check the squareness of the head as sometimes they're perfect, sometimes they're way off.

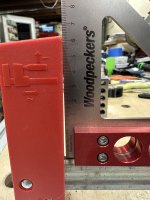
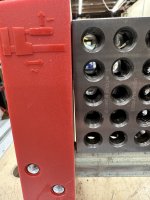
It's been awhile since I've done a cabinet glue-up and I was reminded with how frustrated I am with my Jorgensen Cabinet Master clamps.

The majority of them are just not square at the head.

Monosnap_2023-01-07_09-09-29.png


I added a shim to put pressure at the joint and not throw my side panel out of square while under pressure.

Monosnap_2023-01-07_09-12-45.png


I bought these when they went on sale at the local Big Box and noticed how off they were months later after the receipt was long gone.

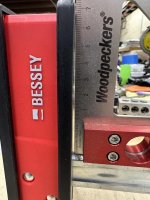
Shoulda bought Bessey...  [oops]
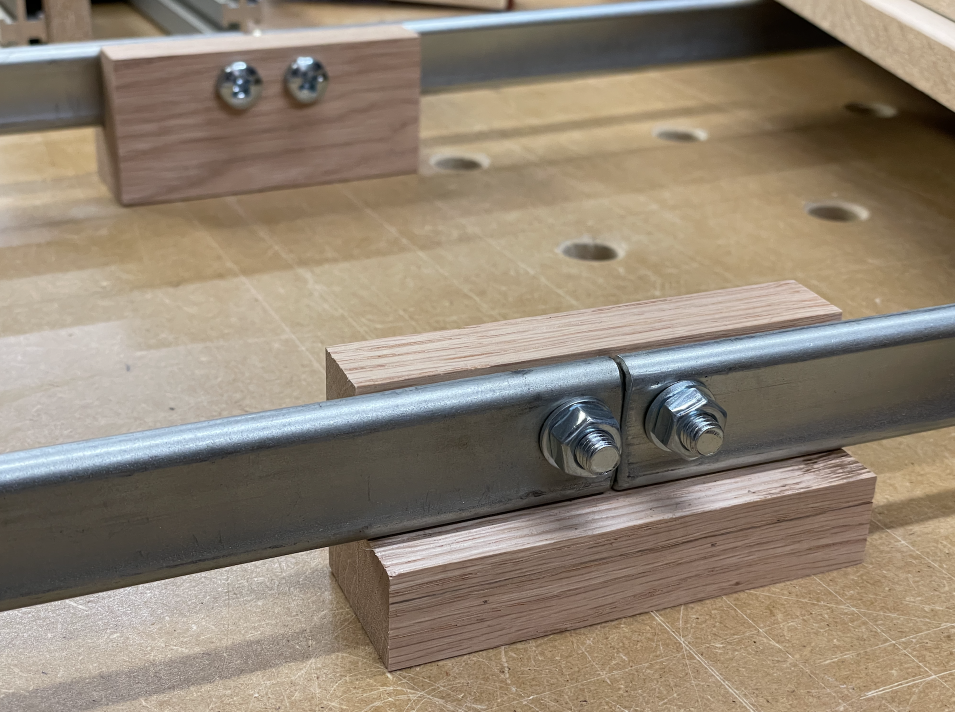
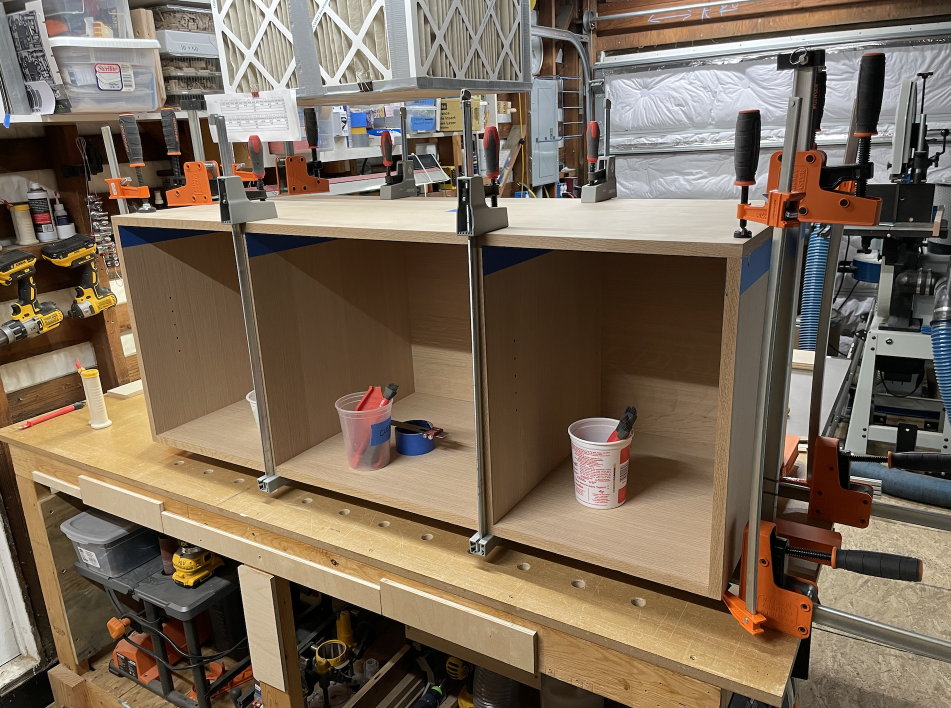
 
Most of my Bessey’s aren’t square either.
When tightened the bar will bend some making the head a bit more square.

If it’s really an issue you can rip a hardwood dowel (same diameter as the board) in half and place that between the fixed head and the board. That way the pressure is distributed across the full face of the board edge instead of just one corner.
 
I just bought a couple of 48" Jorgensen clamps right before Christmas.  I just checked and one is right on, one off a bunch.  I still have the receipt so will see if I can exchange the one.  Yes, I could shim it, but if I can find a good one in stock, might as well exchange. 
 
The best way to check a clamp for square is to clamp a workpiece with square ends and observe the parallelism of the clamp jaws to the ends of the workpiece.  The jaws are usually toed-in a bit unloaded.
 
The squareness is also a product of the clamping pressure.  Depending upon how hefty the bar is, it will bow under pressure. 

My cheap Harbor Freight clamps will do that to a noticeable degree.  The Bessey clamps require a great deal of pressure to bow, but they will. 

The clamps on my pipe clamps are so close to the axis that I doubt that there is any bowing at all. 

Take angle measurements while the clamp is under pressure and see if they are still angled in.
 
Thanks for the replies.

If a slight toe-in is the norm, maybe I'm using the wrong clamps for the type of glue up I was doing today. Or I oriented the clamps in the wrong direction. With the sides unsupported at the top, the 2° of toe-in threw them out of square with even the lightest amount of clamping pressure. Having the clamping squares didn't make a difference.

I should've elevated the cabinet on bench cookies and turned the clamps on their sides. This would've put the entire clamping surface along the glue joint and not pointed up on the panel.

I have one more of these cabinets to glue up so I'll learn from these mistakes and hopefully make the next glue up a little more stress free.

Monosnap_2023-01-07_16-49-02.png


ChuckS said:
First,https://www.leevalley.com/en-ca/shop/tools/hand-tools/clamps/bar/72719-anti-slip-parallel-jaw-clamps  are what I've checked on. I also have Bessey clamps, but didn't put a square to them.

[member=57948]ChuckS[/member] those Lee Valley clamps look a lot like the Semble clamps at Woodpeckers.
 
My anti-slips have the same squareness as shown in the WP video at the 1:08 or so segment. Those two different brands may come from the same factory in Taiwan, just like the case in which several different brands of scrollsaws have almost everything identical except the brand name and color.
 
4nthony said:
Having the clamping squares didn't make a difference.

I wonder if:
• Placing the clamping squares on the insides would have been better AND
• Using two clamps per clamping square side

would have helped more.

That said, I think the clamping squares for this use are probably too small to have enough leverage to counter the pull of the strong clamps. I think your idea of using the clamps turned sideways so they exert pressure just at the joint, and still use the clamping squares, is a worth a try. And, you can obviously do this with a dry fit only.
 
I see Domino mortise cuts on top edge of left vertical (as pictured) panel. Is there a matching horizontal top panel?  If so, installing that panel while gluing would help.

I’ve have good results dry fitting the fourth side of boxes when gluing a pair of joints like you picture. Nominally this will maintain a parallelogram and keeping corners 90 degrees is a bit easier than with unsupported panels hanging in the breeze.  Also allows use of 4 more clamping squares at the dry fit joint if you choose.
 
What is the advantage of those clamping squares over picture framers’ corner squares?
I have 8 or 10 of the picture framers squares and if there is any shortcoming it is that they only go up to about 3=1/2” width.

They are accurate, clamp securely (with no parts to misplace) and (most of all) they are cheap. 

I would consider those corner clamps, but I don’t understand the advantage.
 
4nthony said:
Thanks for the replies.

If a slight toe-in is the norm, maybe I'm using the wrong clamps for the type of glue up I was doing today. Or I oriented the clamps in the wrong direction. With the sides unsupported at the top, the 2° of toe-in threw them out of square with even the lightest amount of clamping pressure. Having the clamping squares didn't make a difference.

I should've elevated the cabinet on bench cookies and turned the clamps on their sides. This would've put the entire clamping surface along the glue joint and not pointed up on the panel.

I have one more of these cabinets to glue up so I'll learn from these mistakes and hopefully make the next glue up a little more stress free.

Monosnap_2023-01-07_16-49-02.png


ChuckS said:
First,https://www.leevalley.com/en-ca/shop/tools/hand-tools/clamps/bar/72719-anti-slip-parallel-jaw-clamps  are what I've checked on. I also have Bessey clamps, but didn't put a square to them.

[member=57948]ChuckS[/member] those Lee Valley clamps look a lot like the Semble clamps at Woodpeckers.

Laying the clamps down is the easiest solution but if there is a good reason to keep them upright all you need to do is lay a caul (stick in this case) across the bars. The caul should be no taller than the bottom piece of wood to prevent the clamp heads influencing the angle of the joint.
 
kevinculle said:
The best way to check a clamp for square is to clamp a workpiece with square ends and observe the parallelism of the clamp jaws to the ends of the workpiece.  The jaws are usually toed-in a bit unloaded.

To Kevin's point...

The most recent Bessey with a Woodpeckers square and then a 123 block installed.

[attachimg=1]

[attachimg=2]

And then the clamp handle was given a 1/4 turn.

[attachimg=3]

A very very old Bessey with the wooden handles.

[attachimg=4]

[attachimg=5]

And then the wooden clamp handle was given a 1/4 turn.

[attachimg=6]

So this condition has been around for a long time and is just getting noticed.
 

Attachments

  • 12745.JPG
    12745.JPG
    335 KB · Views: 630
  • 12746.JPG
    12746.JPG
    736.9 KB · Views: 635
  • 12747 1:4 turn.JPG
    12747 1:4 turn.JPG
    714.8 KB · Views: 630
  • 12748.JPG
    12748.JPG
    737.5 KB · Views: 637
  • 12749.JPG
    12749.JPG
    777.2 KB · Views: 630
  • 12750 1:4 turn.JPG
    12750 1:4 turn.JPG
    770.7 KB · Views: 633
I only have 2 Bessey K body clamps that are out of square, and they are just 24".  Oddly enough, they are the only ones I bought at a local Home Depot? However, they are out the opposite direction. I don't know if they were some kind of "seconds" that were sold at a discount, through those types of retailers? (if they even do that) or it was just as manufacturing error that got past QC? I should have returned them, but I didn't notice it until it was too late. I actually saw it when they were in the rack. There was enough difference to see it, being wider at the outside.

I haven't seen it for years, but Bessey used to place advertising pictures in woodworking magazines showing 2 wooden balls clamped together. They were not touching the bar, so unsupported. This was supposed to illustrate the perfect parallelism between the jaws.
 
Vtshopdog said:
I see Domino mortise cuts on top edge of left vertical (as pictured) panel. Is there a matching horizontal top panel?  If so, installing that panel while gluing would help.

I’ve have good results dry fitting the fourth side of boxes when gluing a pair of joints like you picture. Nominally this will maintain a parallelogram and keeping corners 90 degrees is a bit easier than with unsupported panels hanging in the breeze.  Also allows use of 4 more clamping squares at the dry fit joint if you choose.

That's a great idea that didn't even cross my mind. Not sure why I didn't just dry fit the top while assembling the sides. D'oh! [doh]

I'll use that on the next one.

Michael Kellough said:
Laying the clamps down is the easiest solution but if there is a good reason to keep them upright all you need to do is lay a caul (stick in this case) across the bars. The caul should be no taller than the bottom piece of wood to prevent the clamp heads influencing the angle of the joint.

I added the shims which helped and prevented the clamp head angle from influencing the joint.

Once the glue went on, I started rushing and the anxiety kicked in. I didn't lay the clamps on their side at the time because I made some DIY clamp connectors (my longest clamp is 48" and this cabinet is 51"/1300mm) and thought the screws would get in the way of the piece laying flat. I'll have to countersink the screws and also use shorter screws so they'll lay flat when on the side.

Monosnap_2023-01-07_16-53-11.png


Cheese said:
So this condition has been around for a long time and is just getting noticed.

Thanks for that, Cheese.

I'll have to make sure I'm only using these when supported by a joint and not rely on them for keeping things square as well.

Did I mention glue ups give me anxiety?  [scared] [big grin]

Anyhow, it's glued up now. When the top went on, I turned the Jorgensen's around and used the shorter edge on the back/bottom of the heads.

Monosnap_2023-01-08_08-49-06.png


Did I mention glue ups give me anxiety?  [scared] [big grin]

lol
 
I don’t really understand the need for the deep jaws on a bar clamp that is being used to assemble cabinet boxes ( or that type of construction for other projects.

All the clamping pressure needs to be applied to the bottom 3/4”.  That’s where the joint is.  Clearly there are better ways to square up you boxes than relying on the deep jaws. 

I use picture frame clamps, and I square up where required using a clamp across the diagonal.

All the clamping force needs to be directly on the joint. I like the pipe clamps that have legs.

I use these:

images


Note:  If you buy this type of clamp from Amazon, buy the pipes locally.  The black pipe they sell on Amazon is not plumbing grade; they are for decorative purposes. (Like for farmhouse style shelf supports).  The Amazon sourced pipe is too flimsy for use with pipe clamps.
 
Packard said:
I don’t really understand the need for the deep jaws on a bar clamp that is being used to assemble cabinet boxes ( or that type of construction for other projects.

I have a set of pipe clamps but they're also less than the length I needed. I could've picked up longer pipes (or a shorter pipe and a coupling) to get the length I needed.

When flipped to the side or reversed, the parallel clamps provide a similar depth of clamping surface as the pipe clamps. As mentioned, I should've turned my clamps. I also could've rotated the workpiece on its side.

My clamping game still needs some work.

 
Packard said:
I don’t really understand the need for the deep jaws on a bar clamp that is being used to assemble cabinet boxes ( or that type of construction for other projects.

All the clamping pressure needs to be applied to the bottom 3/4”.  That’s where the joint is.  Clearly there are better ways to square up you boxes than relying on the deep jaws. 

I use picture frame clamps, and I square up where required using a clamp across the diagonal.

All the clamping force needs to be directly on the joint. I like the pipe clamps that have legs.

I use these:

images


Note:  If you buy this type of clamp from Amazon, buy the pipes locally.  The black pipe they sell on Amazon is not plumbing grade; they are for decorative purposes. (Like for farmhouse style shelf supports).  The Amazon sourced pipe is too flimsy for use with pipe clamps.

For me, the point of deeper jaws on parallel clamps is that they can "reach" over each other. That way you can clamp in both directions at the same time.
I rarely use pipe clamps because of the smaller metal pads. There are newer versions that have plastic  covers. I have also seen where guys have screwed or glued wooden pads, but I just haven't bothered.
I don't even own any, but I do use the 10' ones that the company has occasionally.
 
Packard said:
I don’t really understand the need for the deep jaws on a bar clamp that is being used to assemble cabinet boxes ( or that type of construction for other projects.

All the clamping pressure needs to be applied to the bottom 3/4”.  That’s where the joint is.  Snip.

From the product description at Lee Valley:

"The parallel-jaw design maintains the squareness of the object being clamped, and the large jaw area (2" wide by 5 3/4" long with a throat depth of 3 3/4") distributes force, eliminating fiber crushing. The size of the jaws also lets you use fewer clamps for a job (an entire drawer back can be done with one clamp) and allows you to clamp material parallel to the flat of the bar, helpful for large, flat pieces."

My go-to clamps are Dubuque bar clamps, and their smaller jaws are big enough for most tasks and in most cases.
 
Packard said:
What is the advantage of those clamping squares over picture framers’ corner squares?
I have 8 or 10 of the picture framers squares and if there is any shortcoming it is that they only go up to about 3=1/2” width.

They are accurate, clamp securely (with no parts to misplace) and (most of all) they are cheap. 

I would consider those corner clamps, but I don’t understand the advantage.

The clamping squares or braces work like an extra pair of hands for assembly jobs. They do not replace clamps in a glue-up.

When this brace first came out (owner Jerry sold them at trades shows -- 20 years ago?), people found it interesting. Like tracks (tracksaw tracks), they were popular.https://www.leevalley.com/en-ca/shop/tools/jigs-guides-and-fixtures/51101-90-assembly-braces

Jerry now sells braces of different sizes too.

 
Back
Top