How square are your clamps?

ChuckS said:
Packard said:
What is the advantage of those clamping squares over picture framers’ corner squares?
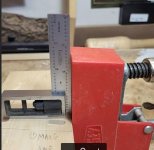
I have 8 or 10 of the picture framers squares and if there is any shortcoming it is that they only go up to about 3=1/2” width.

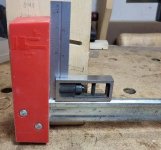
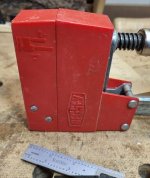
They are accurate, clamp securely (with no parts to misplace) and (most of all) they are cheap. 

I would consider those corner clamps, but I don’t understand the advantage.

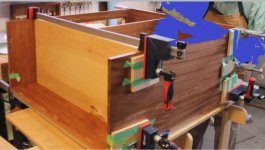
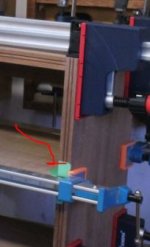
The clamping squares or braces work like an extra pair of hands for assembly jobs. They do not replace clamps in a glue-up.

When this brace first came out (owner Jerry sold them at trades shows -- 20 years ago?), people found it interesting. Like tracks (tracksaw tracks), they were popular.https://www.leevalley.com/en-ca/shop/tools/jigs-guides-and-fixtures/51101-90-assembly-braces

Jerry now sells braces of different sizes too.

That was not really the point I was trying to make.

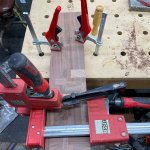
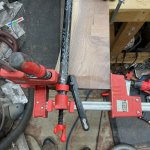
I use these clamps to perform the same function as the corner braces shown in the earlier post.  They are much cheaper, have no loose components to lose, and appear to me to do the same job.  I have 8 of these that are not mounted and four that are mounted, each with a 8” x 8” x 3/4” piece of plywood.

220px-Miter_clamp.jpg


I see them on Amazon for about $4.00 each.

I see the newer type selling for $20.00 each ($80.00 for a set of four).

These look pretty, but seem no more functional that the $4.00 clamps.

images
 
As [member=58857]Crazyraceguy[/member] mentions a big advantage of the parallel clamps is the length and stability of the head allowing interlacing of the clamps. Here’s an example:

[attachimg=1]

Here’s one that uses all the types:

[attachimg=2]

Ron
 

Attachments

  • 80A3817D-1AFC-4C4B-B4A0-4C426D05E425.jpeg
    80A3817D-1AFC-4C4B-B4A0-4C426D05E425.jpeg
    524.8 KB · Views: 574
  • FECFA9AE-A2A4-443D-862A-95CACA2A0B88.jpeg
    FECFA9AE-A2A4-443D-862A-95CACA2A0B88.jpeg
    547.4 KB · Views: 561
I started gluing up the 3rd cabinet this afternoon. I elevated the cabinet and placed the parallel clamps on their side, along the joint. I was able to use a lot more pressure and the clamp heads squared up as you all said they would, though I had to back them off a bit as the bottom was starting to bow.

My thought process for the glue up and clamp placement still felt a bit clumsy and rushed but I'll work through that with time and experience.

Monosnap_2023-01-08_17-57-18.png


As for clamping squares, I've never used picture framer squares as asked by [member=74278]Packard[/member] so I don't know pros/cons. Before getting squares in the pictures, I used DIY squares made from plywood.
 
4nthony said:
Thanks for the replies.

If a slight toe-in is the norm, maybe I'm using the wrong clamps for the type of glue up I was doing today. Or I oriented the clamps in the wrong direction. With the sides unsupported at the top, the 2° of toe-in threw them out of square with even the lightest amount of clamping pressure. Having the clamping squares didn't make a difference.

I should've elevated the cabinet on bench cookies and turned the clamps on their sides. This would've put the entire clamping surface along the glue joint and not pointed up on the panel.

I have one more of these cabinets to glue up so I'll learn from these mistakes and hopefully make the next glue up a little more stress free.

Monosnap_2023-01-07_16-49-02.png


ChuckS said:
First,https://www.leevalley.com/en-ca/shop/tools/hand-tools/clamps/bar/72719-anti-slip-parallel-jaw-clamps  are what I've checked on. I also have Bessey clamps, but didn't put a square to them.

[member=57948]ChuckS[/member] those Lee Valley clamps look a lot like the Semble clamps at Woodpeckers.

They look similar because they're both re-branded Ehoma (Taiwan) clamps. Ehoma's clamps show up everywhere under all manner of brand names. That folks still struggle with the concept that much of what is presented as a choice isn't a choice at all beggars belief. Do your due diligence before laying down your hard earned cash. Another favorite is Fisch Wave forster bits. The Diablo forstner bits are made by Fisch, the only difference being a smooth shank (Diablo) versus a hex shank (Fisch) yet I don't think anyone can argue that paying twice the price for a hex shank makes any sense. Or the vacuum and vacuum accessory scam (rife with re-branding dominated by Nilfisk). Or U.S.-made large appliances which emerge from only one or two factories and feature only minor differences behind their respective badges but wide variation in price (all based on truly ancient technology and design). The list goes on and on. But I digress....
 
The clamp review video covered the topic of warranty, and it seems the reviewer placed some emphasis on the warranty. I seldom pay attention to warranty unless it's a machine. It's a non-issue to me at all.
 
With those intricate clamping arrangements, how do you address squeeze-out?  Much of the joint appears to be inaccessible.
 
I usually deal with glue squeeze-out in one or more than one of these ways:

1) Before glue is applied - tape off the area concerned or pre-finish the piece or wax the area concerned
2) As soon as glue is applied - clamp, remove clamp, wipe off squeeze-out, then reclamp
3) After the glue is semi-dried - Remove rubbery glue with a chisel or sharp edge
4) After the glue is completely dried - Remove glue with a cabinet scraper.

#1 is done for midpanel construction/box insides where glue is hard to remove.

#2 is what I usually do with the Domino Joint in a complex glue-up, because the assembly won't come apart when the clamps are removed for some quick clean-up.

#3 & 4 for flat surfaces, panels and boxes (outsides).

[attachimg=1] [attachimg=2]

In the particular cupboard below, thanks to the use of Dominoes, any of the clamps could be removed if necessary whether to clean up glue squeeze-out or to reposition the clamp for case squaring, and reclamped.

[attachimg=3]


Attachments

  • squeezeout3.JPG
    squeezeout3.JPG
    63.6 KB · Views: 379
  • squeezeout2.JPG
    squeezeout2.JPG
    51.8 KB · Views: 370
  • squeezeout1.JPG
    squeezeout1.JPG
    18 KB · Views: 385
When I clamp, I usually have pretty good access to the joint and I wipe clean with a damp cloth. 

Lately, I’ve been doing a lot of painted cabinets, and the glue is less worrisome with paint (than staining).

A while back I got a stage 4 HVLP system.  Since I retired, I have been using it quite a bit and am getting more comfortable with it all the time. 

I did once hire an “experienced” picture framer for our shop.  He was convinced that he could lay down “just the right amount” of glue for the mitered joints and not have any squeeze out. 

I had him make some sample joints and he rarely had more than 75% coverage and often nearer to 60%.  He said, “That’s good enough”.  He did not last long in our shop.

I always had squeeze out (though I did like just a tiny bit of it).  A damp rag took care of it.  Picture frame shops almost always use pre-finished moulding, so raising the grain with the rag was not an issue.
 
[member=74278]Packard[/member] if you were asking me, i usually get things to a reasonable state and the pull the clamps and wipe then re-apply the clamps.

Mostly I don't worry about it a lot, I get it as best I can. The parts are just sanded to 80 grit and will get a lot more sanding after gluing.

Ron
 
Packard said:
When I clamp, I usually have pretty good access to the joint and I wipe clean with a damp cloth. 

Lately, I’ve been doing a lot of painted cabinets, and the glue is less worrisome with paint (than staining).

A while back I got a stage 4 HVLP system.  Since I retired, I have been using it quite a bit and am getting more comfortable with it all the time. 

I did once hire an “experienced” picture framer for our shop.  He was convinced that he could lay down “just the right amount” of glue for the mitered joints and not have any squeeze out. 

I had him make some sample joints and he rarely had more than 75% coverage and often nearer to 60%.  He said, “That’s good enough”.  He did not last long in our shop.

I always had squeeze out (though I did like just a tiny bit of it).  A damp rag took care of it.  Picture frame shops almost always use pre-finished moulding, so raising the grain with the rag was not an issue.

Agreed totally. Squeeze out is a must, but unlike a lot of Youtubers, it doesn't have to run like Niagra falls either.
I do quite a bit of solid surface work and it's a absolute must with that. The glue s color matched and the squeeze out becomes part of the surface, making the seam go away.
I always wipe around joints that will be stained with mineral spirits. The glue residue becomes very obvious and can be cleaned up and re-checked. Does not raise the grain either.
 
Had a bit of time in the shop so I checked the Bessey clamps for squareness. They were a bit off, but under tension, they all seemed to be fine.

[attachimg=1]            [attachimg=2]

Under tension

[attachimg=3]            [attachimg=4]

Closed

[attachimg=5]


Attachments

  • bessey 1.JPG
    bessey 1.JPG
    33.6 KB · Views: 384
  • bessey 2.JPG
    bessey 2.JPG
    31.2 KB · Views: 363
  • bessey 3.JPG
    bessey 3.JPG
    30.9 KB · Views: 371
  • bessey 4.JPG
    bessey 4.JPG
    34.9 KB · Views: 361
  • bessey 5.JPG
    bessey 5.JPG
    43.1 KB · Views: 368
ChuckS said:
Had a bit of time in the shop so I checked the Bessey clamps for squareness. They were a bit off, but under tension, they all seemed to be fine.

[attachimg=1]            [attachimg=2]

Under tension

[attachimg=3]            [attachimg=4]

Closed

[attachimg=5]

They are “off” with no load.  “On” with moderate load, and predictively “off” again under heavy load.

In my opinion, it is an error to ever rely on a bar clamp for squareness.

My cheap Harbor Freight bar clamps bow excessively under load.  My Bessel clamps do much better, but will bow also.

My pipe clamps seem immune, but they have very short jaws, so the leverage is not there.

 
Packard said:
Snip.

They are “off” with no load.  “On” with moderate load, and predictively “off” again under heavy load. Snip

Whether the heads will be off again under "heavy" load I don't know. But even if they are, I don't see that a huge concern in my work.

Well cut joints do not need undue clamping pressure to close. Again, dry fitting -- an indispensable process -- which includes checking for square while in a dry assembly condition should tell a woodworker any problems ahead.

 
I never once considered the squareness of my clamps.  I figure it like the accuracy of a broken clock:  It shows the correct time twice a day.

The clamps are potentially accurate at one clamping pressure only.

I have to assure squareness by some other means.
 
One of the first things he says is...

The_Truth_about_Parallel_Clamps_and_Why_Theyre_Hard_to_Review_-_YouTube_2023-04-03_10-49-09.png


He also goes on to clarify that I exhibited the trait of "not knowing what I was talking about" by putting a square to my clamp head. I'll be the first to admit I don't know what I'm talking about [doh]  [big grin]
 
4nthony said:
I started gluing up the 3rd cabinet this afternoon. I elevated the cabinet and placed the parallel clamps on their side, along the joint. I was able to use a lot more pressure and the clamp heads squared up as you all said they would, though I had to back them off a bit as the bottom was starting to bow.

My thought process for the glue up and clamp placement still felt a bit clumsy and rushed but I'll work through that with time and experience.

Monosnap_2023-01-08_17-57-18.png


As for clamping squares, I've never used picture framer squares as asked by [member=74278]Packard[/member] so I don't know pros/cons. Before getting squares in the pictures, I used DIY squares made from plywood.

Too much pressure can starve the joint of glue and if everything fits is unnecessary. In my experience most people use too much glue and it is this that causes movement up because the pieces being glued together float and slide on the glue. When it is possible I actually wait a short time until the glue starts to go off a little and then clamp and this ensures the pieces do not move during clamping. Using a few offcuts experiment a little and you will be surprised at how little glue is needed to ensure a good join. I had a job making 35 tables and during that process I learnt a lot when gluing the panels together and more glue does not always work, in fact it creates problems.
 
Sliding on the glue, which seems to have exceptional lubricity, is a problem I have experienced.  An easy fix is one given to me from a old timer.

Before I apply the glue, I use a brad pusher to press into place a few very small wire brads on the glue surface. I then take an end nipper to trim those brads within 1/8” - 1/16” of the surface.

Those brads need to be placed in spots that are accessible to clamping pressure.

I apply the glue and position the mating piece. The sharp trimmed ends of the wire brads prevent the pieces from sliding.  After the pieces are properly positioned, I clamp over the brads and over any additional places as required.

For applying trim, I place the brads as required.  Smaller profiles need more frequent brads.

These brads are hidden and serve no joint function other than positioning.  So even those purists who object to metal fasteners, can feel comfortable with this process.
 
Back
Top