- Joined
- Jan 22, 2007
- Messages
- 1,486
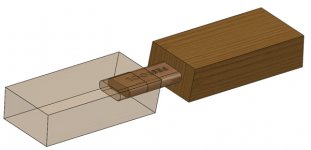
mbira said:Well-looking at this for the second day, I can see what the problem is. There is no way for me to mortise the long piece from the outside(where I would scribe the pencil mark) and have both the fence and the face of the Domino touching the wood. The fence would need to be able to go to 93.5 degrees to do that.
I hadn't considered this because it didn't immediately jump out (visually) in your graphic. This does change the problem. However, considering your angle is so minor, I believe you should consider making the plunges at 90 degrees to the reference faces. If you did manage to set the fence to 93.5 degrees, it would mean that your mating plunge would have to reset the fence to 86.5. The problem with that is that you have made a set-up change in your Domino between making plunges. That will invariably lead to inaccuracies.
So my recommendation is to keep your fence at 90 degrees. The fence will sit flat on the surface of both workpieces. The front of the Domino, however, will touch the edge of the workpiece only in a line with a slight angled gap top-to-bottom.
If the angle was greater than 3.5 degrees, you would have to make your plunges deeper than normal. But in your case, there is enough extra depth built in to the plunge depth that you can ignore it.
")