You are using an out of date browser. It may not display this or other websites correctly.
You should upgrade or use an alternative browser.
You should upgrade or use an alternative browser.
How to guide OF 1010 properly along a curved edge?
- Thread starter shu
- Start date
Roachmill
Member
- Joined
- Jun 11, 2015
- Messages
- 325
I've not done this but I'd start by thinking about making a template of the wavy edge with a guided straight bit.
Then take the template and position and secure it 30mm + diameter of bit I'd use away from wavy edge. I'd then use a short* top guided straight bit to follow the template. I'd also use a beefier router than the 1010 so take shallow passes (~3mm) if it's the only router available.
* "short" as in the height of the cutters is less than the thickness of the template (or vice versa) so the guiding bearing contacts the template before the cutter plunges into the plywood.
1010 will be just fine for this operation. The slot shu is looking to cut will only be a few mm deep and 8-16mm wide.
Festool's copier scanning set may work for you. #486534 & 486052. Might not allow you to quite get 30mm inboard from three ge though.
See this thread for insight :http://festoolownersgroup.com/festool-how-to/how-to-use-copier-scanning-set/
This will certainly get you 30mm inboard of the edge. If your curves are too tight it might not work either.
https://www.mlcswoodworking.com/shopsite_sc/store/html/smarthtml/pages/onpoint_router_plate.html
You could also make your own base with a fixed pin 30mm from the cutter.
Roachmill
Member
- Joined
- Jun 11, 2015
- Messages
- 325
I thought about the copier set. I have one, but I've never used it as yet with the reason being if you partially reorientate the router along the way (e.g. handle at 90 degrees to starting edge and you end up somewhere along the way now at 60 degrees) the cut line will not be equidistant to the corresponding distance at the start point. Like I said, I've never used it because of this but I could be wrong! It's also quite a spend for one wavy line ")
tjbnwi
Member
- Joined
- May 12, 2008
- Messages
- 7,048
antss said:Tom , that might be useful too. Quicker than making your own curved template for sure.
But it would require filling all the holes used to attach it to the piece. That may not be desirable.
Masking tape barrier and hot melt glue---no nail holes.
Tom
Masking tape barrier and hot melt glue---no nail holes.
Tom
Now that's a clever trick. Dots of glue or a continuous bead ?
Does the hot melt's heat affect finish ?
AlexThePalex
Member
- Joined
- Nov 12, 2008
- Messages
- 7,808
Make a screw-on base for the router out of very thin sheet material. Put two pins on the bottom that stick out. With the pins you can follow the curve and guide the router reliably along the edge.
Michael Kellough
Member
- Joined
- Jan 23, 2007
- Messages
- 7,101
Alex said:Make a screw-on base for the router out of very thin sheet material. Put two pins on the bottom that stick out. With the pins you can follow the curve and guide the router reliably along the edge.
Until one of the pins goes off the end of the board.
I'd just clamp a piece of wood with the approximate curve to the router base but that only works if the curve is concave only or convex only. If it's a compound curve...go to Tom.
I don't now why we bother to answer a random question about a "random curve".
What is a random curve?
blaszcsj
Member
- Joined
- Feb 21, 2015
- Messages
- 580
antss said:Masking tape barrier and hot melt glue---no nail holes.
Tom
Now that's a clever trick. Dots of glue or a continuous bead ?
Does the hot melt's heat affect finish ?
Masking Tape down first then attach template with hot glue. The tape will prevent any harm to the wood finish.
tjbnwi
Member
- Joined
- May 12, 2008
- Messages
- 7,048
antss said:Masking tape barrier and hot melt glue---no nail holes.
Tom
Now that's a clever trick. Dots of glue or a continuous bead ?
Does the hot melt's heat affect finish ?
Continuous bead.
No affect at all on any I've ever used it one, directly or on tape.
Tom
While I'm digesting your suggestions and info, let me add more details on what I'm doing. So that you can check if I'm doing it properly [big grin]
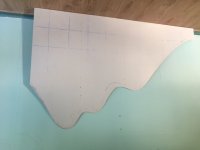
I'm doing a climbing wall for kids. The base is 25mm plywood attached to battens fixed onto wall studs. The base is not full height. The top are curved in shape. Check the image for a templet for part of it made by 3mm MDF.
View attachment 1
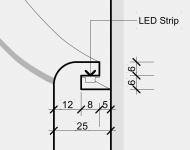
Now I think it would be cool to have LED strip along the curved top, with light washing upwards.
But I don't want to see the LED directly. So I need a slot to hide it. Check the second image for the slot design.
The difficulty here is: on the one hand I should set the LED as far away from the edge as possible, to avoid the dotted effect and create a more smooth effect; on the other hand, I could not cut too far away as I need to allow enough number of screws as close to the edge as possible, so the plywood is structurally sound enough. I also don't want to create too big a slot, or anything to allow the kids to grab on the top edge of the board, when they climb close to it. As this is a weak part and I don't want them to get close to the LED either.
So please check the second image, which is the section view of the slot. It is quite tiny for the reasons above. I may need to do some test to see if it works. But before I start, I really would like to listen to your opinions.
View attachment 2
Regards.
Shu
I'm doing a climbing wall for kids. The base is 25mm plywood attached to battens fixed onto wall studs. The base is not full height. The top are curved in shape. Check the image for a templet for part of it made by 3mm MDF.
View attachment 1
Now I think it would be cool to have LED strip along the curved top, with light washing upwards.
But I don't want to see the LED directly. So I need a slot to hide it. Check the second image for the slot design.
The difficulty here is: on the one hand I should set the LED as far away from the edge as possible, to avoid the dotted effect and create a more smooth effect; on the other hand, I could not cut too far away as I need to allow enough number of screws as close to the edge as possible, so the plywood is structurally sound enough. I also don't want to create too big a slot, or anything to allow the kids to grab on the top edge of the board, when they climb close to it. As this is a weak part and I don't want them to get close to the LED either.
So please check the second image, which is the section view of the slot. It is quite tiny for the reasons above. I may need to do some test to see if it works. But before I start, I really would like to listen to your opinions.
View attachment 2
Regards.
Shu
Attachments
AlexThePalex
Member
- Joined
- Nov 12, 2008
- Messages
- 7,808
Michael Kellough said:Alex said:Make a screw-on base for the router out of very thin sheet material. Put two pins on the bottom that stick out. With the pins you can follow the curve and guide the router reliably along the edge.
Until one of the pins goes off the end of the board.
Do the last half inch by hand?
Thanks everyone for your inputs.
RAK,
see reply #14 for more details.
Roachmill,
I think the template will be hard to make. The reason is that the template should be 30mm+dia of bit off the original curve. I can not trace the original curve as the offset curve will be a different one.
antss:
Thanks. I almost placed an order for the OnPoint plate, before I noticed the predrilled holes are not allowed for Festool 1010.
I also has a concern that the two-guide system will make the concave and convex setback slightly different from each other. With the convex setback more than 30mm, and concave one less than 30mm, I assume.
I may need a single guide one to maintain a continues setback. But that means I need manually make the moving line perpendicular to the curve all the time, which could be tricky.
I think I can somehow use the #486534 & 486052. I may need to make a base to attach them thou.
tjbnwi,
Thanks. It’s really good to know that. I'm now considering whether but it or not.
Roachmill,
Agreed. A not-perfect solution is to have a extension bar attaching to the router, with a handle at the end, as a control anchor. The longer the bar is, the easier to control. I guess the attached guide rail adapter will do.
Michael,
random curve is my freehand drawn curve made of lot of curves close to concave or convex.
Holmz,
will that cause the LED overheating?
[member=66123]shu[/member]
You might be able to use something like a CMT flexible template. But the tightest radius you'll achieve is probably around 2-3". Use a template guide on the router and place some 1/2" ply behind the flexible template for support. It won't give you a perfect offset off the edge, but it might be workable? And the screw holes created when afixing the template will be on the back side, so that shouldn't be an issue.
Once you have the channel for the LED routed, you should be able to raise the bit a little and hog out the remaining material out to the edge freehand.
https://www.amazon.com/CMT-TMP-1200-Flexible-Template-Routing/dp/B008AXXH54
Michael Kellough
Member
- Joined
- Jan 23, 2007
- Messages
- 7,101
Since the curve is compound, and the radius is tighter than the CMT flex template, and extreme fidelity to plan is not needed, you should go with Alex's suggestion to use two pins protruding from a sub-base you clamp to the router base.
Make the deep grove first then install a larger diameter bit and re-adjust the pin base and go again. If the wider shallower groove is not a 100% match/overlap of the first deep groove it shouldn't matter in this case.
To deal with my concern that you loose control when one of the pins is off the work you can just be very careful or clamp a guide to the work for the actual router base at the entrance and exit points.
Similar threads
- Replies
- 11
- Views
- 41K
- Replies
- 11
- Views
- 283
- Replies
- 0
- Views
- 118
- Replies
- 0
- Views
- 251