That is going to be a bit of a challenge, especially with that much overhang. The horizontal base will not allow for that much height or the angled off-set, at least in one go.
You are likely to need a spacer/shim for the base to follow. The next challenge is the follower bearing. The roller itself is there to run along a square edge. Not only will it not follow an angled edge very well, the adjusting knob will probably interfere.
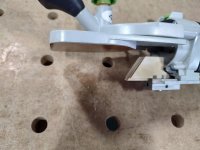
I have gotten around this problem with a hand-made wooden block with a matching angle. The one I made (seen below) is angled the opposite way, but the idea is the same.
As far as the vertical spacer/shim, it could be simply clamped to the surface of the board, or much smaller and adhered to the bottom of the baseplate.
")