arso_bg
Member
- Joined
- Jan 6, 2008
- Messages
- 179
There is no doubt that the Festool Domino machine is one of the best options to consider when you have to make some “loose tenon” joinery, but have you ever considered to use the Domino machine in order to produce a “regular” mortise and tenon joint? If you never speculated upon than it might be interesting to you to have a look at my method to use the Domino machine for regular mortise and tenon joinery. Of course the Domino machine cannot be of any help when it comes to making the tenons. That is why we will talk here only about how to use the Festool Domino machine in order to produce a suitable mortise. ")
Let’s have a look how we usually use the Domino machine to produce the mortise.
First of all we take our stock and mark the center of the future joint/mortise. (picture 1).
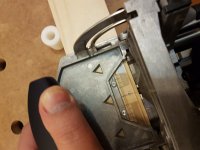
Second we center the Domino machine using the scale and our mark (picture 2) and push gently to produce the mortise. If we did everything correct we will finish with a perfectly centered mortise like on Picture 3.
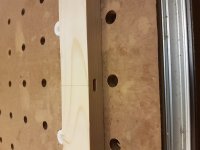
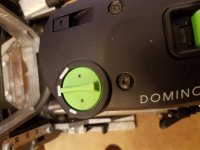
The Domino machine has a green knob which has three positions. (picture 4) Changing these positions we can produce mortises of three different widths while using the same cutter. On Picture 5 we can see two different mortises produced with an 8 mm cutter. The first mortise was produced in position one and the second - using the third position. The important question here is – is this the limit of the Domino machine? Three positions – three different widths of the mortise for every cutter.
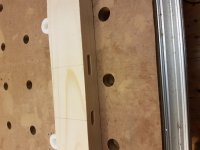
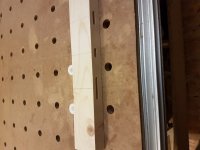
Well! My answer on this question is that this is far from the limit of the Domino machine. Let’s have a look at the scale of the machine on picture 2. It has a center mark and metric scales to left and to the right of this center mark. The scales are placed exactly 10 mm to the left and 10 mm to the right of the center mark. With the help of these scales we can set the Domino machine very precise off the center to the left and to the right and rout the mortise in three consecutive steps. First step – centered, Second step – we move the machine to the left (right) by 10 mm, Third step – we place the machine to the right (left) by 10 mm. If we do everything correct we will end up with a mortice that will be perfectly centered on our mark but will be by 20 mm wider (Picture 6). Actually using the scales we can set the Domino off the center very precise by 10,11,12,13 etc. mm. This combined with the three positions of the green knob gives us almost limitless possibilities.
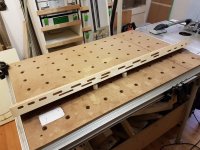
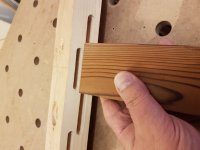
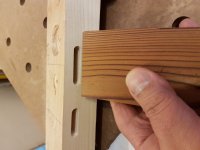
For practical reasons I have a piece of scrap with a number of mortises routed in it. (Picture 7) One row is produced with a 10 mm cutter and the second one with an 8 mm cuter. Every different mortise is marked how exactly it was produced so it is very easy to reproduce it. Then you just pick up your stock and place it against the guide (Pictures 8 & 9). It is very easy to choose the proper width of the mortise/tenon and once you have made your choice than you already know how to make the mortise. The tenons you can produce using your favorite method.
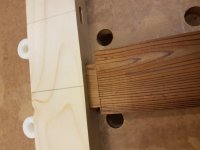
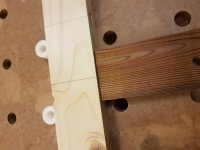
On Pictures 10 and 11 you can see a sample mortise and tenon joint. It looks that the mortise is a bit wider than it should be and maybe the tenon is not perfectly centered but this is not due to my method of work but due to the fact that I am not very skilled in making the tenons!
On Picture 12 you can see a table with a list of the mortises that I have on my guide with instructions how to produce them.
Thank you for your attention!
Let’s have a look how we usually use the Domino machine to produce the mortise.
First of all we take our stock and mark the center of the future joint/mortise. (picture 1).
Second we center the Domino machine using the scale and our mark (picture 2) and push gently to produce the mortise. If we did everything correct we will finish with a perfectly centered mortise like on Picture 3.
The Domino machine has a green knob which has three positions. (picture 4) Changing these positions we can produce mortises of three different widths while using the same cutter. On Picture 5 we can see two different mortises produced with an 8 mm cutter. The first mortise was produced in position one and the second - using the third position. The important question here is – is this the limit of the Domino machine? Three positions – three different widths of the mortise for every cutter.
Well! My answer on this question is that this is far from the limit of the Domino machine. Let’s have a look at the scale of the machine on picture 2. It has a center mark and metric scales to left and to the right of this center mark. The scales are placed exactly 10 mm to the left and 10 mm to the right of the center mark. With the help of these scales we can set the Domino machine very precise off the center to the left and to the right and rout the mortise in three consecutive steps. First step – centered, Second step – we move the machine to the left (right) by 10 mm, Third step – we place the machine to the right (left) by 10 mm. If we do everything correct we will end up with a mortice that will be perfectly centered on our mark but will be by 20 mm wider (Picture 6). Actually using the scales we can set the Domino off the center very precise by 10,11,12,13 etc. mm. This combined with the three positions of the green knob gives us almost limitless possibilities.
For practical reasons I have a piece of scrap with a number of mortises routed in it. (Picture 7) One row is produced with a 10 mm cutter and the second one with an 8 mm cuter. Every different mortise is marked how exactly it was produced so it is very easy to reproduce it. Then you just pick up your stock and place it against the guide (Pictures 8 & 9). It is very easy to choose the proper width of the mortise/tenon and once you have made your choice than you already know how to make the mortise. The tenons you can produce using your favorite method.
On Pictures 10 and 11 you can see a sample mortise and tenon joint. It looks that the mortise is a bit wider than it should be and maybe the tenon is not perfectly centered but this is not due to my method of work but due to the fact that I am not very skilled in making the tenons!
On Picture 12 you can see a table with a list of the mortises that I have on my guide with instructions how to produce them.
Thank you for your attention!
Attachments
-
 Pic 1.jpg347.5 KB · Views: 572
 -
 Pic 2.jpg377.9 KB · Views: 563
 -
 Pic 3.jpg385.7 KB · Views: 501
 -
 Pic 4.jpg392 KB · Views: 553
 -
 Pic 5.jpg400.7 KB · Views: 532
 -
 Pic 6.jpg388.8 KB · Views: 502
 -
 Pic 7.jpg511.7 KB · Views: 844
 -
 Pic 8.jpg361.7 KB · Views: 648
 -
 Pic 9.jpg341 KB · Views: 559
 -
 Pic 10.jpg365.3 KB · Views: 615
 -
 Pic 11.jpg379.3 KB · Views: 590
 -
 Pic 12.jpg201.1 KB · Views: 586