You are using an out of date browser. It may not display this or other websites correctly.
You should upgrade or use an alternative browser.
You should upgrade or use an alternative browser.
How would you go about making these LAP JOINTS
- Thread starter Intex
- Start date
Jiggy Joiner
Member
- Joined
- Dec 25, 2018
- Messages
- 1,090
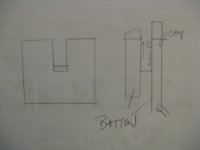
[member=62093]Intex[/member] That’s exactly how i meant, the post in the photos was just to shown a sliding dovetail, the second photo is a better example, showing one side of the joint. You would use a double length board for two legs, cut the tails/channels/female dovetail into both sides of that board leaving a stop.
Then cut the pins/male dovetails to the smaller leg, also leaving the same stop.
There are other ways this joint could be done, quite a few in fact but, this is a fairly straight forward way, and durable once the top is fixed.
Then cut the pins/male dovetails to the smaller leg, also leaving the same stop.
There are other ways this joint could be done, quite a few in fact but, this is a fairly straight forward way, and durable once the top is fixed.
derekcohen
Member
- Joined
- Jun 22, 2008
- Messages
- 1,060
Intex said:Jiggyjoiner
I think I will take your advice with a slight change. Since the legs are mounted 90 degrees to each other, I will do away with the center post, and make one leg the length of two reg legs, then put dovetails into each side of the center of the long leg for the two 90 degree legs
I’m hoping I can find a large dovetail bit for my router
You are making this awfully complicated for simple joinery. All that is required is a lap joint as i have shown. No dovetails or mortice and tenon joinery needed. This is especially easy if the parts are square to one another. You could do this joint on a tablesaw or use a handsaw, and complete it in under 15 minutes.
Here's a video:
Regards from Perth
Derek
I, too, will go with the lap joint for this kind of cross-base build:http://tinyurl.com/y6l6xojp
I use dominoes a lot, but won't use them on this one just because I can. The sliding dovetail joint isn't as straight forward as it looks to cut, unless you have the right set-up, or have enough spare stock to do the necessary test cuts. Compared to the lap joint, there is extra work without any extra benefits.
I use dominoes a lot, but won't use them on this one just because I can. The sliding dovetail joint isn't as straight forward as it looks to cut, unless you have the right set-up, or have enough spare stock to do the necessary test cuts. Compared to the lap joint, there is extra work without any extra benefits.
Derek,
Thank you for the advice. My only concern is that since the base legs are 12" high, the cut would be 6" deep. Too deep for my Kapex with the stop feature, and too deep for the tracksaw or router. I am still waiting for the Festool sawstop to come out, but probably too deep for that as well.
Alternative is to take it to a shop that has a larger table saw with dados.
The Kapex can handle the job well, if you have a flush trim router bit.
First, cut out the notch as deep the Kapex can cut. Then rout out the remaining part with a straight bearing trim bit. In the last step, clean up the corner with a sharp chisel.
Alternatively, use scribed lines to define the waste, jigsaw or drill most of the waste away, and clean up the rest with a chisel.
Either way, try it out on some 2x6 scrap to refine your technique.
Attachments
derekcohen
Member
- Joined
- Jun 22, 2008
- Messages
- 1,060
Intex said:Derek,
Thank you for the advice. My only concern is that since the base legs are 12" high, the cut would be 6" deep. Too deep for my Kapex with the stop feature, and too deep for the tracksaw or router. I am still waiting for the Festool sawstop to come out, but probably too deep for that as well.
Alternative is to take it to a shop that has a larger table saw with dados.
One alternative is to saw as deeply as your Kapex will permit, then use the kerf to guide a hand saw to complete the remainder.
Another is to mark it all out, knife in a chisel line all around, and let the hand saw track in that.
Bandsaw?
Regards from Perth
Derek
I have begun the build, starting with the base. I decided to do a CROSS LAP JOINT, but i will make the cut with wood, instead oif cutting it in:
Since the legs are 2 cross pieces, 12" high by 3" thick, I will make each one of the two cross members from 6" wide pieces glued up, since it is very hard to get 12" wide 12/4 white oak here. INSTEAD of gluing the two pieces together, I will glue two pieces on top of one longer piece, while keeping a 3" void in the middle. Since I am going to have to glue up these pieces anyway, why not leave the 3" gap while gluing the two 6" wide legs together to get a 12" wide leg. I will probably make the channel a bit narrower (ie:L 2/15/16") and chisel it to a tight fit.
I will use Dominoes to help with the glue up.
Which orientation is best for the glue up of the pieces, reverse grain direction in left drawing or same grain direction in right drawing.
Thanks everyone.
PS- I did have to go and buy a Festool domino for the base and top
Attachments
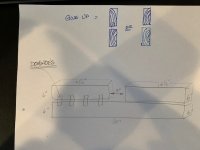
From the joint strength point of view, since it is long-grain to long-grain, dominoes won't be necessary. They will help with the alignment keeping the pieces from sliding, but I'm sure you'll find plenty of uses for the DF.
Grain orientation: the mating pieces should both have their heart sides facing out.
heart side
[__________]
Glue
___________
[ ]
heart side
Grain orientation: the mating pieces should both have their heart sides facing out.
heart side
[__________]
Glue
___________
[ ]
heart side
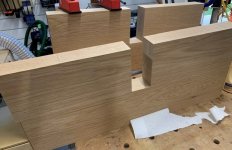
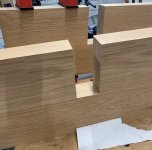
Update on construction of the base so far, Definitely much more work than I though, especially when dealing with 12/4 oak and no Table Saw, and a new but lousy Delta jointer.
I was thinking of attaching this to the round table top with steel figure 8 clips ?
Found out that there is no one I have found that has a 1/2" shank 3" CL upcut router bit, so I will have to use a TRAMMEL and cut 2" down, then do the rest from the bottom. I am thinking I will use the Blue Painters Tape with CA Glue to glue a block on top and bottom in order to drill the pin for the trammel, without touching the actual table top. Im going to investigate how i will get dead center on both holes ?
Attachments

Why both holes? No need. Rough cut with jig saw or whatever, accurate circle with trammel to half depth, follow from the other side with pattern bit.Intex said:Im going to investigate how i will get dead center on both holes
That will work only if the first cut with the straight router bit removes all of the wood to the outside. If the jigsaw cut was to far from the cut line, then the router bit will just make a cut in the wooid, where I cant use the pattern bit.
Thanks for the suggestion, but my jigsaw talent does not let me get to close the the line
Thanks for the suggestion, but my jigsaw talent does not let me get to close the the line
Similar threads
- Replies
- 15
- Views
- 766
- Replies
- 19
- Views
- 971