How would you repair these split V.G. Fir drawer-front stiles?

Vtshopdog

Member
Joined
Aug 30, 2018
Messages
325
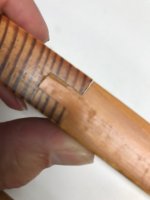
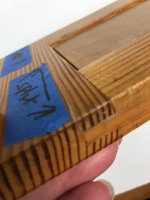
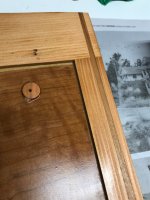
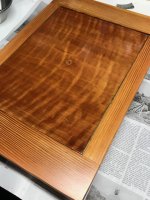
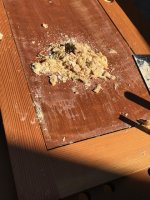
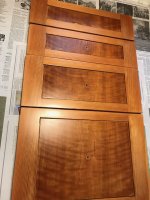
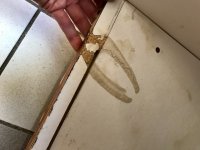
It's a rainy day and am diving into a kitchen refinish project I've been ignoring/avoiding.  The bank of drawers nearest our sink and stove are more heavily used than all other cabinets in our kitchen and have developed splits at the T&G joints.  They're also in need of refinishing.

I think origin of the splits was installation of too thick bumper pads on drawer sides that caused stress to the glue joint each time the drawer got slammed shut.  After repair to the fronts I can reduce stress on the joint with some combination of new or repositioned slides and/or more careful use of bumpers.

Considering everything below but maybe folks here have better suggestions?

1- Pulling apart and reattaching with Dominos (Fir is split on multiple grain lines, likely won't come apart clean)
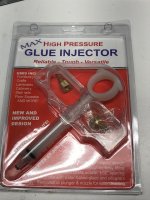
2- Reglue joint with high pressure syringe (maybe not super strong but cleanest)
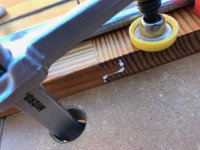
3- Add dowels from side to #2 (plenty strong but long way to drill in a thin panel, panel is too tall for my drill press)
4- Cut a dado across top and bottom of backs and install a semi decorative spline for strength (will be somewhat visible but plenty strong)

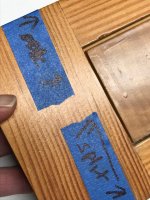
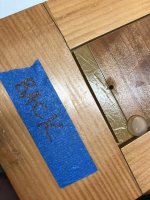
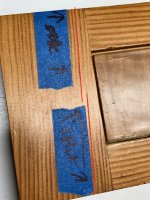
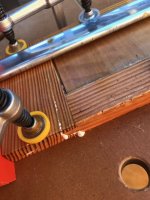
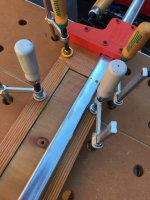
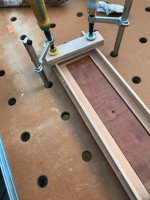
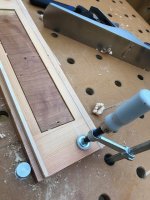
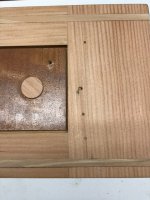
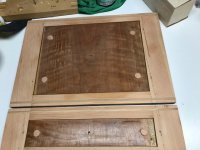
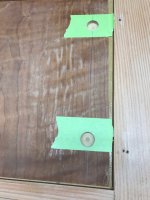
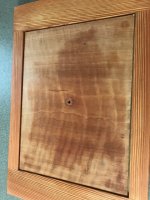
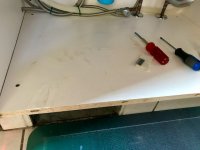
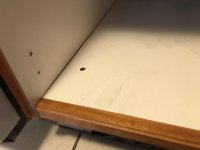
Did my best to get photos of the damage, basically the sides are split on several grain lines.  Any suggestions appreciated, favoring #4 above right now.


Attachments

  • IMG_9238.jpeg
    IMG_9238.jpeg
    38 KB · Views: 172
  • IMG_9243.jpeg
    IMG_9243.jpeg
    57.4 KB · Views: 173
  • IMG_9241.jpeg
    IMG_9241.jpeg
    130.6 KB · Views: 158
  • IMG_9240.jpeg
    IMG_9240.jpeg
    137 KB · Views: 143
Happily, the fastest and easiest way to repair this is also the best way to make the repairs.

1.  Complete the split.  Wedge something in the existing split that will allow the split to extend across the drawer front and render it to two pieces.

2.  Apply glue along the entire length of the split using a brush to make sure it is evenly applied.

3.  Clamp.  No fasteners required.

4.  Use a damp cloth to wipe off any squeeze out. 

5.  Wait 24 hours and put the drawer back in service.

Note:  You may need to intentionally split the rail on the other side of the stub tenon.  It appears that only one side is split.

Attempting to squirt glue in the crack will prove futile and will probably deface the exposed surface.

There will be sufficient glue surface to make the repair stronger than the surrounding wood.  You will want to take care not to mess up the exposed face of the drawer.  The repair should be nearly invisible when done.

A friend’s end table split the leg along the grain.  I finished the split and glued as described above.  It is still in service after about 20 years.  The length of the split was about 6 to 8 inches.  A fake mahogany finish was largely un-marred by the repair.  I have faith in this method.  Note:  I used Elmer’s white glue.  Modern glues should perform even better.
 
Should you choose Packard's method, you'll likely need four cauls to keep the rails and stiles properly aligned while they're clamped as the glue sets up.  [smile]
 
I have the exact same issue myself and what I intend to do is simply route a 10mm x 10mm groove with a rebate cutter along the top and bottom edge stopping about 10mm from each end, and inside the groove drive a screw at an angle from the rail into the stile, and then glue a square piece of the same material in the groove.

Depending how I go I may even also end up using a secret nail chisel put a screw each end and glue the fold back down so it's invisible.

This is the only way I can think best for my situation to fix it and stop it happening again.
 
I'm very leery of trying to pull the pieces apart.  I should have made more clear in the first post, there are two or three splits in each stile and I think pulling apart will make a splintered accordion mess as the splits run diagonal to the edge.  Here is a shot with the splits highlighted for clarity:

View attachment 1


Attachments

  • IMG_9244.jpeg
    IMG_9244.jpeg
    153.1 KB · Views: 85
luvmytoolz said:
I have the exact same issue myself and what I intend to do is simply route a 10mm x 10mm groove with a rebate cutter along the top and bottom edge stopping about 10mm from each end, and inside the groove drive a screw at an angle from the rail into the stile, and then glue a square piece of the same material in the groove.

Depending how I go I may even also end up using a secret nail chisel put a screw each end and glue the fold back down so it's invisible.

This is the only way I can think best for my situation to fix it and stop it happening again.

I was thinking something along the same lines but minus any fasteners.  I've had good luck injecting glue using this high pressure syringe with thoughtful placement of drill holes and clamping on other repairs.

View attachment 1

So right now I'm thinking start with injected glue and the drawer front clamped flat to my MFT also clamping from sides to make an initial  repair and flatten and restore position of the stiles.  Next rout a groove (8-10mm wide??) right down middle of each rail and glue in a matching spline that is maybe 1-2mm taller than the groove and apply all the clamp pressure to the spline. Let it dry then flush trim the extra couple mm's with a hand plane.  Likely to go with contrasting Cherry for the spline and simply own the repair as part of the drawer.  Since it will be on back of drawer front really won't be too noticeable.
 

Attachments

  • IMG_9245.jpeg
    IMG_9245.jpeg
    105.5 KB · Views: 65
Seeing as it's drawer fronts you're repairing and if they come off the case itself, if you have a drum sander or know someone who has one, you could simply put the drawer faces through it and remove 5-6mm off the back, and then laminate the drawer to a piece of timber before screwing back onto the drawer case.

The fix would pretty much be invisible then and it'll never come apart again?
 
luvmytoolz said:
Seeing as it's drawer fronts you're repairing and if they come off the case itself, if you have a drum sander or know someone who has one, you could simply put the drawer faces through it and remove 5-6mm off the back, and then laminate the drawer to a piece of timber before screwing back onto the drawer case.

The fix would pretty much be invisible then and it'll never come apart again?

I'm not so sure about that one. You are going to get into a cross-grain situation with this method, especially if that center panel is solid wood to (and properly floating)
This may or may not be an issue, depending upon the humidity variation in your area.
Personally, I think I would wedge or otherwise force open the gaps, without fully breaking it apart, and gluing it back together. My tendency would be to use a thinner glue, that would more easily penetrate the gaps, rather than a PVA type glue.
Probably a clear epoxy in a kitchen, but hide glue everywhere else. Hide glue does not do well with moisture.
I think the original assessment of "understanding the cause", and attempting to mitigate it, is absolutely on point. I would definitely work on that too.
 
If the offending edge is on the bottom of the drawer, and is not easily visible while using the drawers, this is another option.

Drill a 1/4” diameter hole in the center of the 3/4” dimension.  Make the hole long enough to span the split.  Add glue to the hole.  Tap in a length of 1/4” diameter hardwood dowel stock. Clamp the split so it is in the “closed” position.  Allow the glue to dry.  Trim off the excess,  Apply finish to the bottom edge. 

You would probably want to use 2 or 3 dowels to keep the split from re-opening. 

Well-glued, dowels are very strong connectors in tensile strength. 

Note:  I have not used dowels in this kind of repair.  This will not work if the split is at the top of the drawer edge where the ends of the dowels will be visible.  It will also not work if you are not able to apply enough force to close the split while the glue dries. 

To spread the glue in a deeply drilled dowel hole, use a bamboo skewer.  There are available at most supermarkets and generally measure 3mm (skewers), or 5mm (s’mores).  If you wipe off the glue after each use, one skewer will last a very long time. Save the rest of the package forhttps://www.allrecipes.com/recipe/218486/moms-beef-shish-kabobs/
 
OK had at a couple of the drawer fronts with the glue injector and clamps.  The high pressure syringe pushes a surprising amount of glue into the joints (recommend if you don't own one of these to get one to have around - when it's the right tool for the job it's very right...)

Pretty happy with how the squeeze out is making its way across the broken T&G glue joints and splits in stiles - (see photos). 

Plan at moment is to make this initial glue up repair to all the fronts to get them flat, straight and unbroken then contemplate if I want to reinforce with dowels or splines or go with them as is.

LOL - I'm a belt and suspender kinda guy, can't see stopping without making them stronger than new.....


Attachments

  • IMG_9248.jpeg
    IMG_9248.jpeg
    125.3 KB · Views: 105
  • IMG_9247.jpeg
    IMG_9247.jpeg
    121.9 KB · Views: 87
  • IMG_9246.jpeg
    IMG_9246.jpeg
    123.3 KB · Views: 107
Place your vacuum cleaner hose opposite the injection point and it will suck the glue further into the split.
 
After gluing the splits and broken joints I cut 1/4 inch wide dados on top and bottom and installed 2 splines on back sides of each drawer front to reinforce the stiles.  I got in a hurry (A.K.A. "lazy")  to glue the splines and put them in at full 3/4" height leaving me about 1/2" to trim down on each one. 

Original plan was to get out a flush trim router, I was out on my deck and it was a beautiful, quiet Saturday morning:  Firing up a router did not suit my mood.  Instead opted to go with a seldom used 12" hand plane and a fair bit of elbow grease.  Not the end of the world but ended up mostly filling a 5 gallon bucket with shavings.  (Anybody remember that old oil filter commercial - "You can pay me now, or you can pay me later" ?  I definitely "paid later" on this task)

All in all the fronts are very solid now and happy with repair so far.  Still have to resolve how to remount them as it appears many of the splits originated where attachment screws from drawer boxes had been driven into the sides.


Attachments

  • IMG_9255.jpeg
    IMG_9255.jpeg
    131.7 KB · Views: 69
  • IMG_9256.jpeg
    IMG_9256.jpeg
    130.4 KB · Views: 82
Vtshopdog said:
Still have to resolve how to remount them as it appears many of the splits originated where attachment screws from drawer boxes had been driven into the sides.

Could just drill them out a little bigger, glue in dowels, and then re-fix the screws?
 
luvmytoolz said:
Vtshopdog said:
Still have to resolve how to remount them as it appears many of the splits originated where attachment screws from drawer boxes had been driven into the sides.

Could just drill them out a little bigger, glue in dowels, and then re-fix the screws?

Yes, have already cut some cherry plugs to do something like this but plan is to move the mounting screws to the center panels rather than the stiles as the Fir has proved a bit delicate
 
Do these drawers have pulls?  Are the pulls through bolted to the drawer box face?  If it has pulls, the extra screws only function to keep the drawer front flat to the box face.  It should not exhibit any stress on those extra screws at all. 

I suspect that the pilot holes were undersized and it put undue pressure on the grain, causing it to split over time. 

On my drawers, the screws for the pulls are through bolted.  For shallow drawers (4” to 5” deep) I put one screw to the right and one to the left about 2” - 4” from the edge.  For deeper drawers I will add 2 more screws.  Since the box face is smaller than the drawer face, the box face determines the location of the screws.

I don’t build cabinets with no pulls.  It sacrifices the finish too much over time. 
 
Got busy and bored 5/8" holes in the center panels and cut matching cherry dowels with a plug cutter. Turned into mostly a layout project as I scratched my head while working around damaged areas and based the hole locations on the center drawer pull drillings for both the drawer boxes and fronts.

Installed the plugs with epoxy (because belt and suspenders, right??) and sanded them flat to match frame height.

Last photo is of drawer back with first coat of finish, happy with things so far, the spline repair looks like part of the drawer design, but it won't really be visible for the most part.
 

Attachments

  • IMG_9274.jpeg
    IMG_9274.jpeg
    97 KB · Views: 65
  • IMG_9271.jpeg
    IMG_9271.jpeg
    104.6 KB · Views: 63
  • IMG_9270.jpeg
    IMG_9270.jpeg
    79.8 KB · Views: 78
  • IMG_9269.jpeg
    IMG_9269.jpeg
    86.2 KB · Views: 65
First attempt at applying new varnish was a giant FAIL!!

The whole kitchen is built with curly cherry veneers in the door and drawer panels.  Some crazy beautiful book match stuff in other parts of the room that at time of installation I recognized as beautiful but did not fully appreciate. I do now, and some of the stuff the builder did was a ton of work.  He was honestly a bit mental and would disappear for weeks at a time (my wife would have killed him if she could have found him...)

Wanting to not burn through the veneer I was being very cautious sanding off old finish and it was very hard to see where the old varnish was still on the panels until I applied first coat of finish and got this:
YUCK!!

[attachimg=1]

Got after them with a card scraper to have better control over material removal than simply using my DTS or ETS and hand sanding.  Still sanded, but the steel scraper let me see exactly where and what was coming off the panels.

I think things are starting to look pretty good with this first coat of finish on same drawer:

[attachimg=2]


Attachments

  • IMG_9275.jpeg
    IMG_9275.jpeg
    133.8 KB · Views: 7,152
  • IMG_9279.jpeg
    IMG_9279.jpeg
    137.9 KB · Views: 6,994
Drawer fronts now finished and waiting a couple days for full cure before install.  The curly cherry really pops with new varnish:

View attachment 1

For better or worse the new look drawers have led me to embark on more refinishing in the kitchen.  Under sink cabinet doors are next, they house the trash, have suffered occasional water leaks and are generally beat up.  Pulled them off and noticed a small split originating at the hinge cup screw.  Found what pharmaceutical industry would call an "off label" use for a couple 6mm dominos.  (using a Domino machine is kind like drugs to some of us, no??)  Injected glue in the split and clamped then came back and cut a narrow full depth mortise right into the crack and glued in a Domino then flush trimmed.  Should reinforce things nicely:

View attachment 2

Last, got at removing all the old yellowed varnish off the door.  Used a card scraper again in tandem with sanding.  Quite a pile of old crunky yellow varnish shavings:

View attachment 3
 

Attachments

  • IMG_9286.jpeg
    IMG_9286.jpeg
    152.3 KB · Views: 45
  • IMG_9282.jpeg
    IMG_9282.jpeg
    118.2 KB · Views: 35
  • IMG_9287.jpeg
    IMG_9287.jpeg
    128 KB · Views: 39
I knew when starting this project that it would take me into the weeds, and what better weed patch to end up in than the under-kitchen-sink-cabinet??  The cabinets are 25+ years old and under sink area has suffered several water leaks and endured multiple chemical burns where my beloved made a habit of placing the toilet bowl cleaner bottle with excess chemical dripping down the sides.  The front edge of the melamine was swollen from water and there were multiple spots where the chemical had burned the top laminate.

Found another "off label" use for my Domino in cutting off the front edge of the cab bottom by making repeated plunges across width of the panel then finishing ends with oscillating tool.  A jigsaw would have been obvious choice here, but I almost always have issues with blade deflection and wanted clean 90 degree cut for the hardwood strip that would be joined to existing melamine.  Domino had advantage of clean cuts and almost no dust in my living space.

View attachment 1

Dug out a half dozen chemical burn areas with a knife and Dremel then back filled with white epoxy.  Pretty good color match, not perfect but smooth enough and big improvement.

View attachment 2

Off in the weeds already, might as well replace switch and rewire the garbage disposer:

View attachment 3

Cherry front edge attached and patched areas finished.  Can reinstall cabinet doors next and contemplate how many other cabinets I want to refinish this month.

View attachment 4


Attachments

  • IMG_9322.jpeg
    IMG_9322.jpeg
    69.3 KB · Views: 43
  • IMG_9325.jpeg
    IMG_9325.jpeg
    63.5 KB · Views: 46
  • IMG_9327.jpeg
    IMG_9327.jpeg
    79.8 KB · Views: 34
  • IMG_9329.jpeg
    IMG_9329.jpeg
    42.5 KB · Views: 49
Very nice repair work!

I’m looking forward to see the picture of the full kitchen with all the repairs and refinished doors and drawer fronts in place. I hope you took a before and after!
 
Back
Top